
This is the third tutorial in the series Learning to play with SteemJS. In this tutorial we will learn how to fetch the profile details of the users from Steem blockchain once we have their steem handles.
What will you learn?
In this tutorial you will learn
- How to use SteemJS
- How to use
steem.api.getAccounts(usernames, function(err, result) {function to fetch the details of steem user. - Create a basic HTML that will list the steem users' profile details in a list.
- How to use the browsers copy to clipboard feature in Javascript.
Requirements
These are good to have requirements. Even if you don't know these you can still read the tutorial and make sense out of it.
- Basics of HTML
- Basics of Javascript
Difficulty
- Basic. You can take a look at the code even if you are not from a development background. I will be happy to answer any queries you have in the comments section.
Create a HTML skeleton
    <div class="container">
      <h1>Steem Profile List Builder</h1>
      <div class="row">
        <div class="col-xs-18 col-md-9 left-region">
          <div class="row">
            <div>
                  Enter the list of user accounts whose profile details you need to fetch.
            </div>
            <textarea id="handles" rows="4" style="min-width: 100%">@gokulnk, @dragosroua, @barrydutton, @lexiconical</textarea>
            <div class="btn-group">
              <button type="button" class="btn btn-primary" id="fetch-profile">Fetch Profile Details</button>
              <button type="button" class="btn btn-primary" id="copy-html">Copy HTML</button>
            </div>
          </div>
          <div class="row" id="profile-details-html"></div>
          <div class="row" id="profile-details"></div>
        </div>
        <div class="col-xs-6 col-md-3 right-region">
          Follow <a href="https://www.steemit.com/@gokulnk" target="_blank">@gokulnk</a> for further updates.
        </div>
      </div>
    </div>
  </body>
We have created a basic layout using the Twitter Bootstrap library. You can learn more about the Bootstrap layouts and grids from here. We have created a text area input field along with two buttons one from generating the html and the other for copying the html.
We have also created two empty divs <div class="row" id="profile-details-html"></div> <div class="row" id="profile-details"></div>which will store the sample perview and the html code once the user clickcs on the button.
Add relevant javascript files
In your head tag add the following scripts
    <script src="https://ajax.googleapis.com/ajax/libs/jquery/2.1.4/jquery.min.js"></script>
    <script src="https://maxcdn.bootstrapcdn.com/bootstrap/4.0.0-alpha.2/js/bootstrap.min.js" integrity="sha384-vZ2WRJMwsjRMW/8U7i6PWi6AlO1L79snBrmgiDpgIWJ82z8eA5lenwvxbMV1PAh7" crossorigin="anonymous"></script>
    <script src="https://cdn.steemjs.com/lib/latest/steem.min.js"></script>
The first script is the jQuery library file which simplifies DOM manipulations and saves time in performing the frequently used actions in javascript. We will use these two files in all the browser based tutorials going forward.
The second script is the minified version of Bootstrap library which will help created the basic grids and makes sure that we can reuse the css elements from bootstrap library. In this case we have used this for creating grid, create button groups and making the input fields full width. We can do most of this by adding relevant classes to the html elements that we already use.
The third script is the minified version of SteemJS library which will help us interact with the steem blockchain direction from the javascript/browser.
Getting the inputs and sanitising the data
    $('#fetch-profile').click(function(){
      $('#profile-details').text("Fetching the details from Steem Blockchain");
      $('#profile-details-html-textarea').text();
      markDownHolder = "";
      handles = $('#handles').val();
      usernames = handles.replace(new RegExp("@", "g"),"").replace(new RegExp(" ", "g"),"").split(",");
In the above code on click of the submit button we are clearing the contents of our placeholder divs and adding relevant messages. We are doing this to make sure that even if the user clicks on submit button after fetching the output, it should still work as expected. We are cleaning up the input from the text area to remove unnecessary spaces and converting it into an array of steem handles that can be passed to the next function.
Understanding steem.api.getAccounts function
The takeaway from this tutorial will be how to use steem.api.getAccounts function. We pass the array of usernames to the function as the first parameter and second parameter is the handling function. If there is an error we are printing it to the console. If there is no error then we are processing it to display the output.
steem.api.getAccounts(usernames, function(err, result) {
if (err) {
console.log(err);
}else{
$('#profile-details').text("");
$('#profile-details-html').html('<textarea id="profile-details-html-textarea" rows="4" style="min-width: 100%">Filling HTML</textarea>');
result.forEach(function(userAccount, i){
console.log(getProfileHTML(userAccount));
profileDetails = getProfileHTML(userAccount, i);
markDownHolder += profileDetails;
});
$('#profile-details-html-textarea').html(markDownHolder);
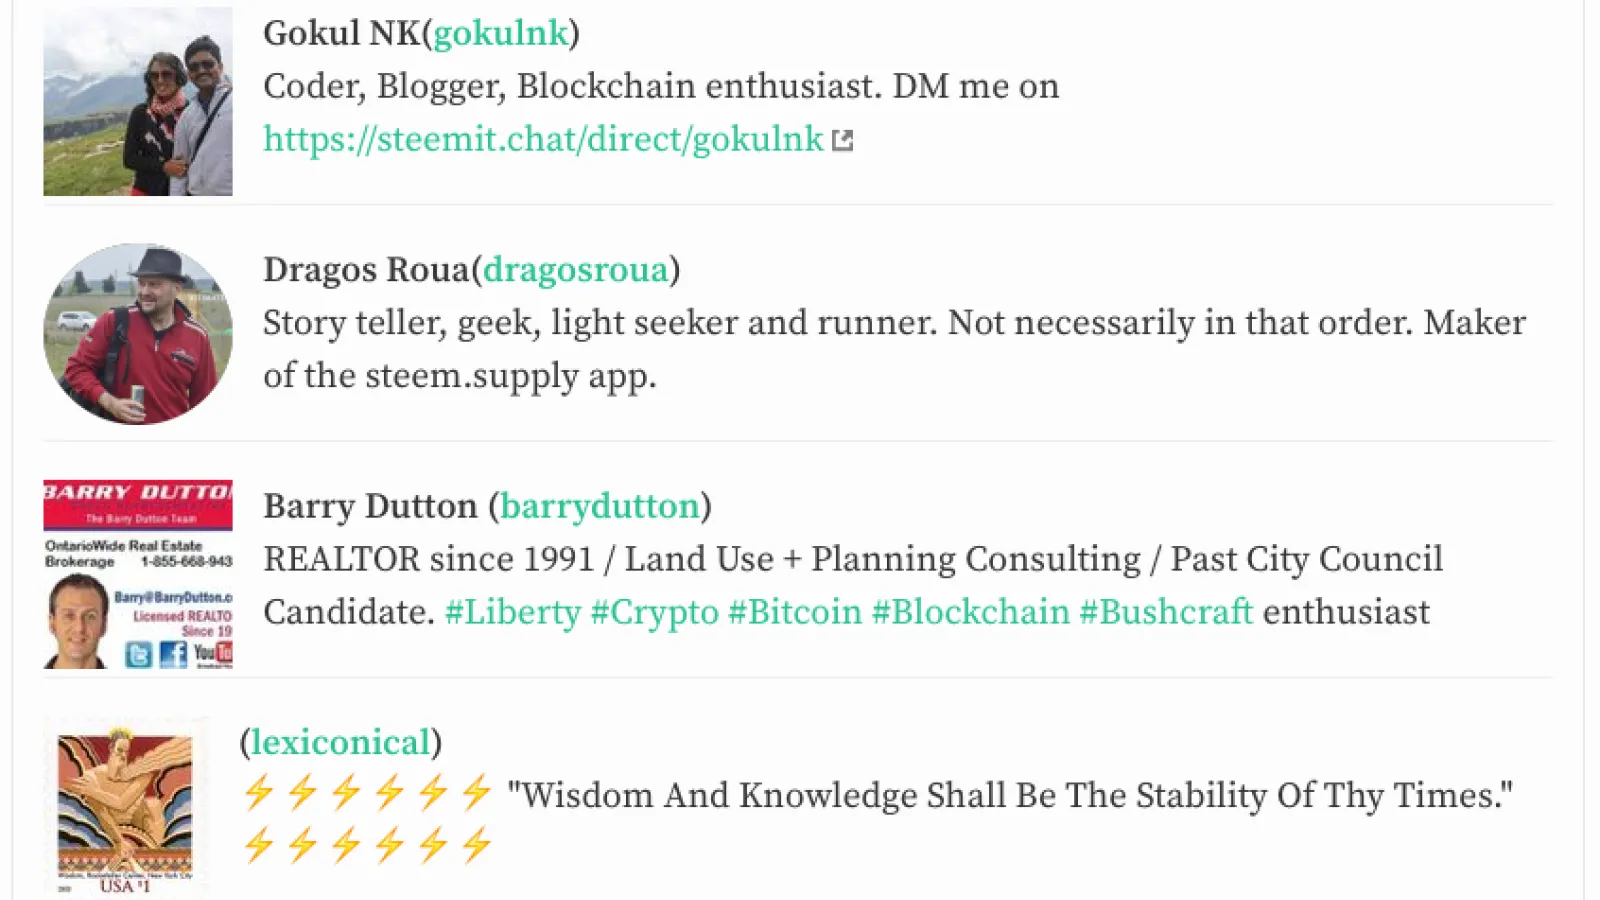
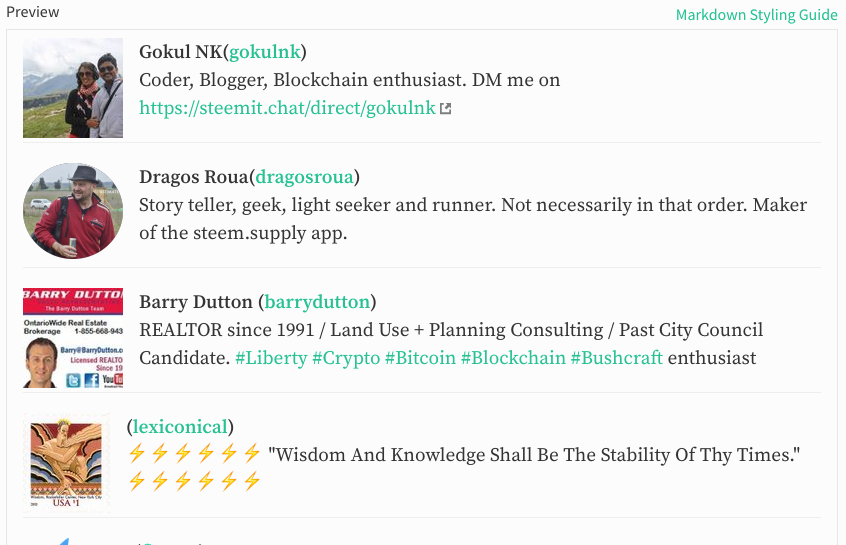
$('#profile-details').html('<h4>Preview (Looks much better in Steemit)</h3>' + markDownHolder);
}
In this code we are doing a couple of things. We are calling the function steem.api.getAccounts and once we have the details of the users we are looping through the results and concatenating the processed output of the users. Then we are populating the Preview and code text area with the processed output.
The processing function
The processing function generates the html output for each of the user. I have just used some crude string concatenations to generate the output. It can definitely be improved.
function getProfileHTML(userAccount, i){
  profile = JSON.parse(userAccount.json_metadata).profile;
  divBgColor = i % 2 == 0 ? "#FEFEFE" : "EDEDED";
  console.log(userAccount);
  console.log(profile);
  profileImage = profile.profile_image || defaultImage;
  profileTargetUrl = steemAuthorFullurl(userAccount.name);
  profileHTML = `<div style="clear:left"></div><div style="width:100%;height: 100%;border:red 1px;background-color=${divBgColor};padding=2px"><div class="profile-image" style="float:left;display:inline-block;width: 100px;height: 100%;"><a href="/%24%7BprofileTargetUrl%7D"><img width = "90px" height = "90px" src="/%24%7BprofileImage%7D"></a></div><div class="profile-details" style="float:left;display:inline-block;width: -moz-calc(100% - 100px);width: -webkit-calc(100% - 100px);width: calc(100% - 100px);height: 100%;">${profile.name || ""}(${userAccount.name || ""})<br/>${profile.about || ""}</div></div>`;
  //divPullClass = i % 2 == 0 ? "pull-right" : "pull-left";
  divPullClass = "pull-left";
  profileSteemHTML = `<div class="${divPullClass}"><a href="/%24%7BprofileTargetUrl%7D" target="_blank"><img src="https://steemitimages.com/100x100/${profileImage}"></a></div><b>${profile.name || ""} (<a href="/%24%7BprofileTargetUrl%7D" target="_blank">${userAccount.name}</a>)</b><br/>${profile.about || ""}<hr/>\n\n`;
  return profileSteemHTML;
}
Following Helper functions are used to generate links to the authors and blogs.
  function steemBlogFullurl(author, permlink) {
      return BASEURL + '@' + author + '/' + permlink;
  }
  function steemBlogFullurl(author, permlink) {
      return BASEURL + '@' + author + '/' + permlink;
  }
  function steemAuthorFullurl(author) {
      return BASEURL + '@' + author;
  }
  function steemAuthorLink(author) {
    return getLink('@' + author, steemAuthorFullurl(author));
  }
  function getLink(linkText, targetLink) {
    if (typeof linkText == "undefined" || linkText == ''){
      linkText = targetLink;
    }else if (typeof targetLink === "undefined") {
      targetLink = linkText;
    }
    return `<a href = ${targetLink} target="_blank">${linkText}</a>`;
  }
Final notes.
You can checkout the final code and the demo to see what you have created with the help of this tutorial.
Originally published on https://steemit.com/utopian-io/@gokulnk/creating-a-list-of-steemit-prof…