

Unit testing is an essential part of software development, and PHPUnit is a popular framework for testing PHP applications. In Drupal, PHPUnit is used to write and run automated tests for various components of the system. By writing tests with PHPUnit, developers can ensure that Drupal code is working as expected, catching bugs early and ensuring stable and reliable code. In this post, we'll walk through the steps of installing and setting up PHPUnit for Drupal 9/10, so you can start testing your Drupal code with ease.
What is PHPUnit?
PHPUnit is a unit testing framework for PHP, and it is used in Drupal to write and run automated tests for Drupal code. PHPUnit is used to test different components of the system, such as modules, themes, and core functionality. Writing tests with PHPUnit helps ensure that Drupal code is working as expected, making it easier to identify and fix bugs, and catch problems early to ensure that the code is stable and reliable.
Why use PHPUnit for automated unit testing in Drupal?
PHPUnit has several features which make it the best option for automated unit testing in Drupal. Some of these features include:
- Automated testing: PHPUnit allows for the creation of automated tests for Drupal code.
- Coverage analysis: PHPUnit generates reports that show how much of your Drupal code has been tested.
- Integration with Drupal: PHPUnit is integrated with Drupal's testing framework, making it easy to write and run tests for Drupal code.
- Community support: PHPUnit has a large community of developers who use it for testing Drupal code, providing many resources for learning and troubleshooting.
- Best practices: PHPUnit follows best practices for writing tests, such as using assertions to check code output, ensuring reliable and accurate tests.
How to install and setup PHPUnit for Drupal 9/10?
Step 1: Install Composer
PHPUnit is typically installed using composer, a dependency manager for PHP. You can download and install composer from their main website.
Step 2: Navigate to the root directory of your drupal project
Step 3: Require the PHPUnit module
Run the following command to install PHPUnit and it’s dependencies:
$ composer require --dev phpunit/phpunit:8.x --with-dependenciesStep 4: Install code coverage
We require xDebug for generating coverage reports. We can install it using the following command:
$ sudo apt-get install php7.4-xdebugStep 5: Enable Xdebug
After installing Xdebug, you'll need to enable it in your PHP configuration file. To do this, open your php.ini (/etc/php/7.4/cli/php.ini) file and add the following line at bottom:
xdebug.mode=coverageStep 6: Verification
To verify the correct installation, run php -v and check for the following output:
PHP 7.4.33 (cli) (built: Feb 14 2023 18:31:23) ( NTS )
 Copyright (c) The PHP Group
 Zend Engine v3.4.0, Copyright (c) Zend Technologies
   with Zend OPcache v7.4.33, Copyright (c), by Zend Technologies
   with Xdebug v3.1.6, Copyright (c) 2002-2022, by Derick Rethans
The above line shows that Xdebug is enabled successfully.
Setting up PHPUnit for Drupal
Step 1: Creating the phpunit.xml file
Locate the phpunit.xml.dist file in the core folder of your drupal project. Copy and paste this file into your root directory and rename it to phpunit.xml.
Step 2: Creating simpl_test and browser_output directories
We need to create the two directories as mentioned above and assign the proper permissions to them. So run the following command to create them:
$ mkdir -p web/sites/simpletest/browser_output && chmod -R 777 web/sites/simpletestStep 3: Requiring dependencies to resolve any errors
We may encounter an error related to dependencies upon running the tests. So to prevent this, run the below command to install them:
$ composer require behat/mink && composer require --dev phpspec/prophecyStep 4: Verify for existing core tests
Once you have setup phpunit.xml, resolved all errors, and created the related directories, we can run PHPUnit test files using the following command from the root directory of your Drupal site:
$ ./vendor/bin/phpunit web/core/modules/user/tests/src/Unit/UserRegistrationResourceTest.php (This is for verifying existing drupal core test files)
You should get the following output in the snapshot below:

Step 5: Verification for coverage reports
To verify the coverage report process, we can run the following command:
$ ./vendor/bin/phpunit --coverage-html test-reports web/modules/custom/custom_module/ (coverage-html generates coverage report)You should get an output similar to the snapshot below:
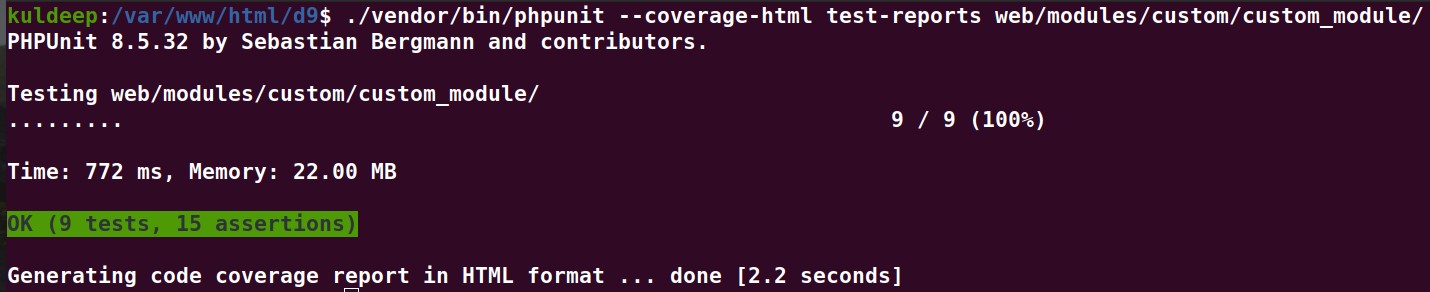
You may check the test reports in the test-reports folder in the root directory.
Writing a PHPUnit test
In this example, we create a service for fibonacci sequence related operations and write tests to check for the validity of these operations.
Step 1: Create a custom module in the custom folder
Follow path ‘\web\modules\custom\’. ‘custom_module’ is the name of the module here.Step 2: Create the info.yml file for the custom module
Follow the code as below:
Step 3: Create the ‘Services’ folder for the module
Follow the folder structure as shown below
‘\web\modules\custom\custom_module\src\Services`Step 4: Create the FibonacciService.php file within the ‘Services’ folder
The code for the service file is given as below.
The above service file defines two functions, viz.:
‘returnNumber’ gives a random number between 0-9.
‘calculateNthFibonacci’ takes in a number ‘n’ and gives the ‘nth’ term of the fibonacci sequence via recursion
Step 5: Create the directories for the unit tests
Follow the below structure to set it up
‘\web\modules\custom\custom_module\tests\src\Unit\Services’This ‘Services’ folder is where we will put our unit test files.
Step 6: Create the test file
We can now create a file ‘FibonacciTest.php’ within `tests\src\Unit\Services’.
The below code sets up the testing functions for the ‘FibonacciServices’ file:
setUp() is a method in PHPUnit that is called before each test method and is used to set up the test environment and prepare objects for the test. It is used to perform repetitive tasks required for each test case method, like initializing objects or connecting to databases.
testReturnNumber() is a custom method to test for the returnNumber() function in the previously created service file. We use assertTrue() to check for the number being between 0-9 by inserting our custom condition as the parameter.
testNthFibonacci() is a custom method to test for the calculateNthFibonacci() function in the previously created service file. We first call the service method to calculate the result and store it in a separate variable. Then we check for equality using assertEquals() to verify the calculation.
Step 7: Testing the module
Run the following command from the root directory of your project to perform the unit test:
$ ./vendor/bin/phpunit web/modules/custom/custom_module/You will get an output as such:
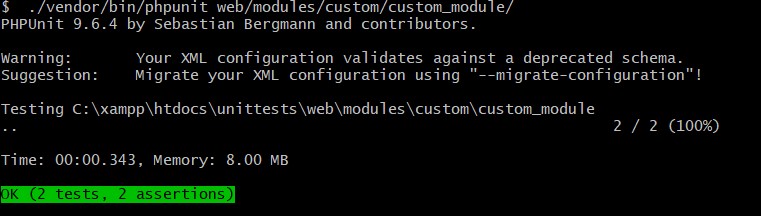
This indicates that both of our tests were successful.
Conclusion
PHPUnit is an essential tool for writing and running automated tests for Drupal 9/10. By setting up and configuring PHPUnit, developers can catch bugs early and ensure that their code is stable and reliable. With the many features and benefits of PHPUnit, it's no wonder that it's the go-to choice for automated unit testing in Drupal. So why not get started with PHPUnit today?
If you need any help or guidance with installing or setting up PHPUnit for your Drupal projects, don't hesitate to reach out to the experts at Valuebound. Our team of experienced Drupal developers can help you with all your testing and development needs. Contact us today!