
As a member of development team, I used to develop web applications using Drupal CMS without worrying about HTTP or HTTPS as it has to be added by dev operational team in my organization. On the serious note “How the Secure Sockets Layer (SSL) prepended to the existing URL” and How does it make a huge difference? Why it is important to make your web URL prepend https instead of HTTP.
Today SSL has become an eye-glazing topic and people want to know more about it so that they can protect their data from unauthorized access. In this blog post, we will take a brief look at basics of SSL and discuss how to secure the website running on Apache with HTTPS. Don’t worry! It's not a rocket science and very simple to secure your site as well as private data. In between, we will also explore some examples of secured and unsecured websites. You may also like to check out how to install & configure Apache on Windows machine.
Note: HTTP is not an encrypted server, hence, prone to cyber attacks and malware.
Scenario
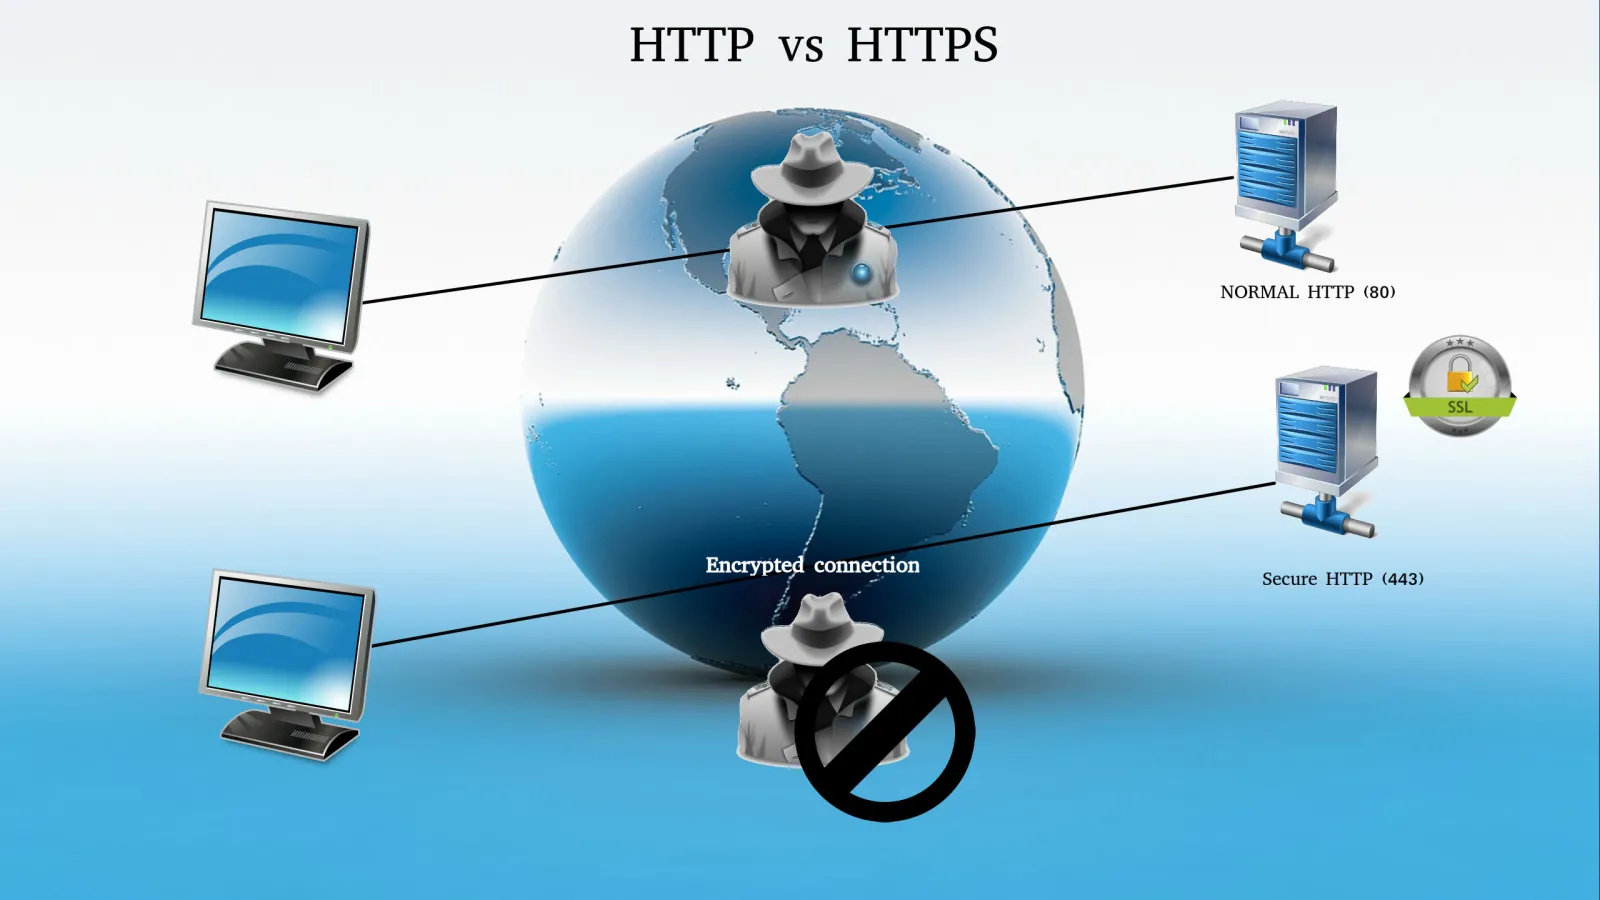
What happens when we connect to any website by entering the URL, it looks for specific IP address and then connect you to that server. Ones you start making a frequent request for each and every event from the HTTP server, the data sent from your server becomes prone to attack as it is in clear text format.
And during this process, eavesdropper gets an access to read the conversation and attempt to create severe problems by using personal credentials, bank details, and other sensitive data. This is one of the major loopholes of HTTP. In contrast to that https protects your data from unauthorized access. Saving from all these headaches.
See the image below for an example of an above-mentioned scenario.

Solution:
In order to overcome the above situation, we need to transform HTTP to HTTPS in an address bar. In HTTPS, S stands for Secure Sockets Layer (SSL), which is responsible for securing communication over the internet.
Check out the address bar of below screenshot for an example of SSL enabled site.

HTTPS is comparatively more secure than HTTP. When we connect to a website, it automatically redirects to HTTPS and after that browser checks the certificate and verifies from the certificate authority (CA). Remember, a bad certificate issued by CA causes system failure sometimes.
When we send information over HTTPS, note, we are safe to make online transactions and share important credentials as it is encrypted. Enabling https on your site protects you from eavesdropping and any other attack.
Below figure is an example of how HTTP and HTTPS work.

On top of that if you are marketing or promoting your website among others then you should be more careful and enable SSL. Enabling SSL helps you to place your website in the special category, called secure, which pops up on the address bar when you start searching.
However, the presence of HTTPS and lock screen on address bar is not enough to say your browsing is secured. Some hackers create lock icon and replace with favicon just to showcase secure website. Keep your eyes open for these technical glitches.

If you don’t find HTTPS indicator on the browser, it means you may be connected to an impostor website on a compromised network. Well, these are the basics and I guess this much knowledge is enough for SSL and how somebody can perform secure browsing over SSL.
Let’s get some local set up to perform SSL.
What I am running on
I have XAMPP web servers that run on Apache.
How can we achieve
To enable SSL, we have to configure three major files.
- Httpd-vhosts.conf
- Httpd.conf
- httpd-ssl.conf
httpd-vhosts.conf
At this place, we create hostname by adding some of the parameters to enable SSL for the local web.
Codes mentioned below belongs to my local instance.
# http
DocumentRoot "C:/xampp/htdocs/api"
Options All
AllowOverride All
Require all granted
# https
DocumentRoot "C:/xampp/htdocs/api"
ServerName api
SSLEngine on
SSLCertificateFile "conf/ssl.crt/server.crt"
SSLCertificateKeyFile "conf/ssl.key/server.key"
Options All
AllowOverride All
Require all granted
Once the SSL is enabled, your site is going to look similar to this.

Some of the important parameters that I would like to discuss here:
- SSLEngine
To turn on secure communications using SSL, we need to add a separate
Syntax: SSLEngine on|off|optional
Default: SSLEngine off
Module: mod_ssl
Example: SSLEngine on
- SSLCertificateFile
This certificate file holds X.509 Certificate public key for data encryption.
Syntax: SSLCertificateFile file-path
Module: mod_ssl
Example: SSLCertificateFile "conf/ssl.crt/server.crt"
- SSLCertificateKeyFile
This file holds private key for the corresponding public keys, which is used in SSLCertificateFile to encrypt and decrypt the data.
Syntax: SSLCertificateKeyFile file-path
Module: mod_ssl
Example: SSLCertificateKeyFile "conf/ssl.key/server.key"
- httpd.conf
Apache configuration file contains one directive per line. Main configuration is of server is always been pulled up from httpd.conf file. Httpd is capable of loading multiple module and configuration for your website.
Location: C:\xampp\apache\conf\httpd.conf
To enable SSL make sure SSL is enable not comment out by [#]tag.
search for
#Secure (SSL/TLS) connections
#Include conf/extra/httpd-ssl.conf
- httpd-ssl.conf
All SSL enabled from apache takes default port as 443.
Make sure to remove the comment from DocumentRoot to allow SSL
##
## SSL Virtual Host Context
##
# General setup for the virtual host
#DocumentRoot "C:/xampp/htdocs"
Location: C:\xampp\apache\conf\extra\httpd-ssl.conf
This post is all about transforming your HTTP to HTTP(S), which is required to secure transmission & avoid eavesdropping. I have performed this on my local machine. In a similar way, you can do it on the real-time web application on the web server. To get the verified certificate, you can get in touch with web hosting distributor or third party or create your own self-signed-certificate to list your website in the generic list and Top Ranking.
Enable SSL on your website and see what it can do for you. Also, if you have any suggestions or queries please comment down and let me try to answer.
