
Razorpay Payments is the converged payment solution that enables merchants to accept, process, and disburse payments with the help of its product suite. This payment gateway allows businesses to access all kinds of payment modes, such as credit & debit cards, UPI, and mobile wallets. Razorpay Payments can easily scale itself to match the growing demands of a business, which is why it has become one of the most sought-after payment infrastructures.
Razorpay Payment enables end-to-end payment solutions. It is the payment gateway system that can be easily added to the app or web platform for a faster and seamless checkout process. This blog is a complete step-by-step guide for setting up Razorpay Payment Integration into a Django backend with React's front-end app, which is a full-stack payment gateway application. Razorpay Payment is not just easy to use, but also very smooth for integration.
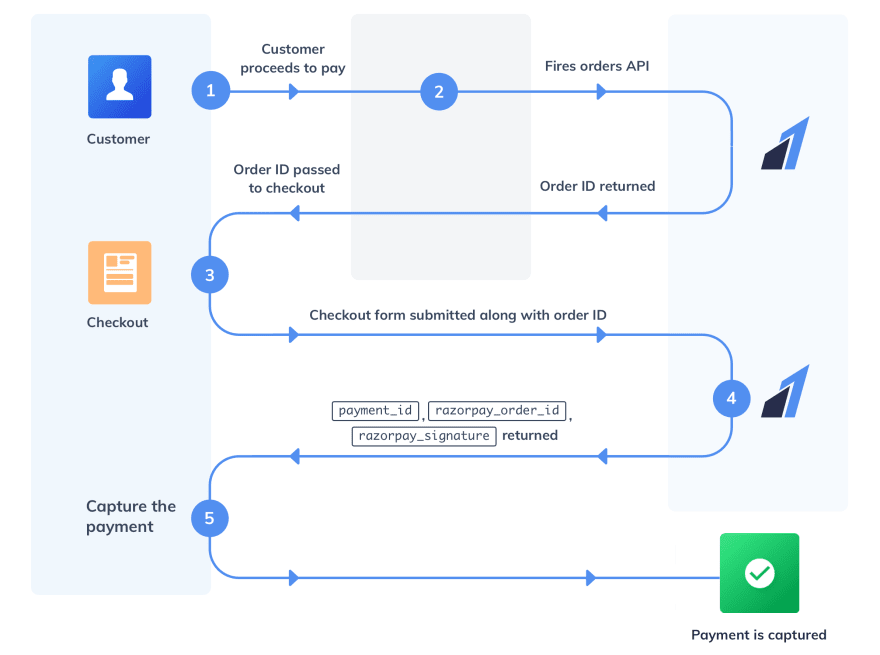
Before we move to the tutorial part, let us understand the Razorpay payment flow (Fig. 1). This has been taken from the official documentation of Razorpay for Integration.
Getting Started with the Razorpay Payment Gateway Integration
The tutorial below is a step-by-step guide to going live with Razorpay Payment integration. The reason it is easier to set up this integration is that Razorpay Payments gateway is a developer-friendly platform with a variety of libraries, APIs, and plugins. Supporting the extensive sets of modes for payment, Razorpay Payment integration supports versatile businesses, and hence, remains much in demand. So let’s get started with the tutorial on Razorpay Payment Gateway integration.
Step 1: Setting up Razorpay Account
You need to sign up for a Razorpay account to use the Razorpay Payments access to the Razorpay Dashboard. To create a Razorpay Account:
- Click here to check official docs from Razorpay for creating and setting up an account.
- Businesses can only accept payments from customers after they have created a Razorpay account. Once the KYC (Know-Your-Customer) verification is complete, the money is settled into your account with Razorpay.
- Razorpay Setting allows you to get your Razorpay Key Id and Razorpay Key Secret from Razorpay Setting.
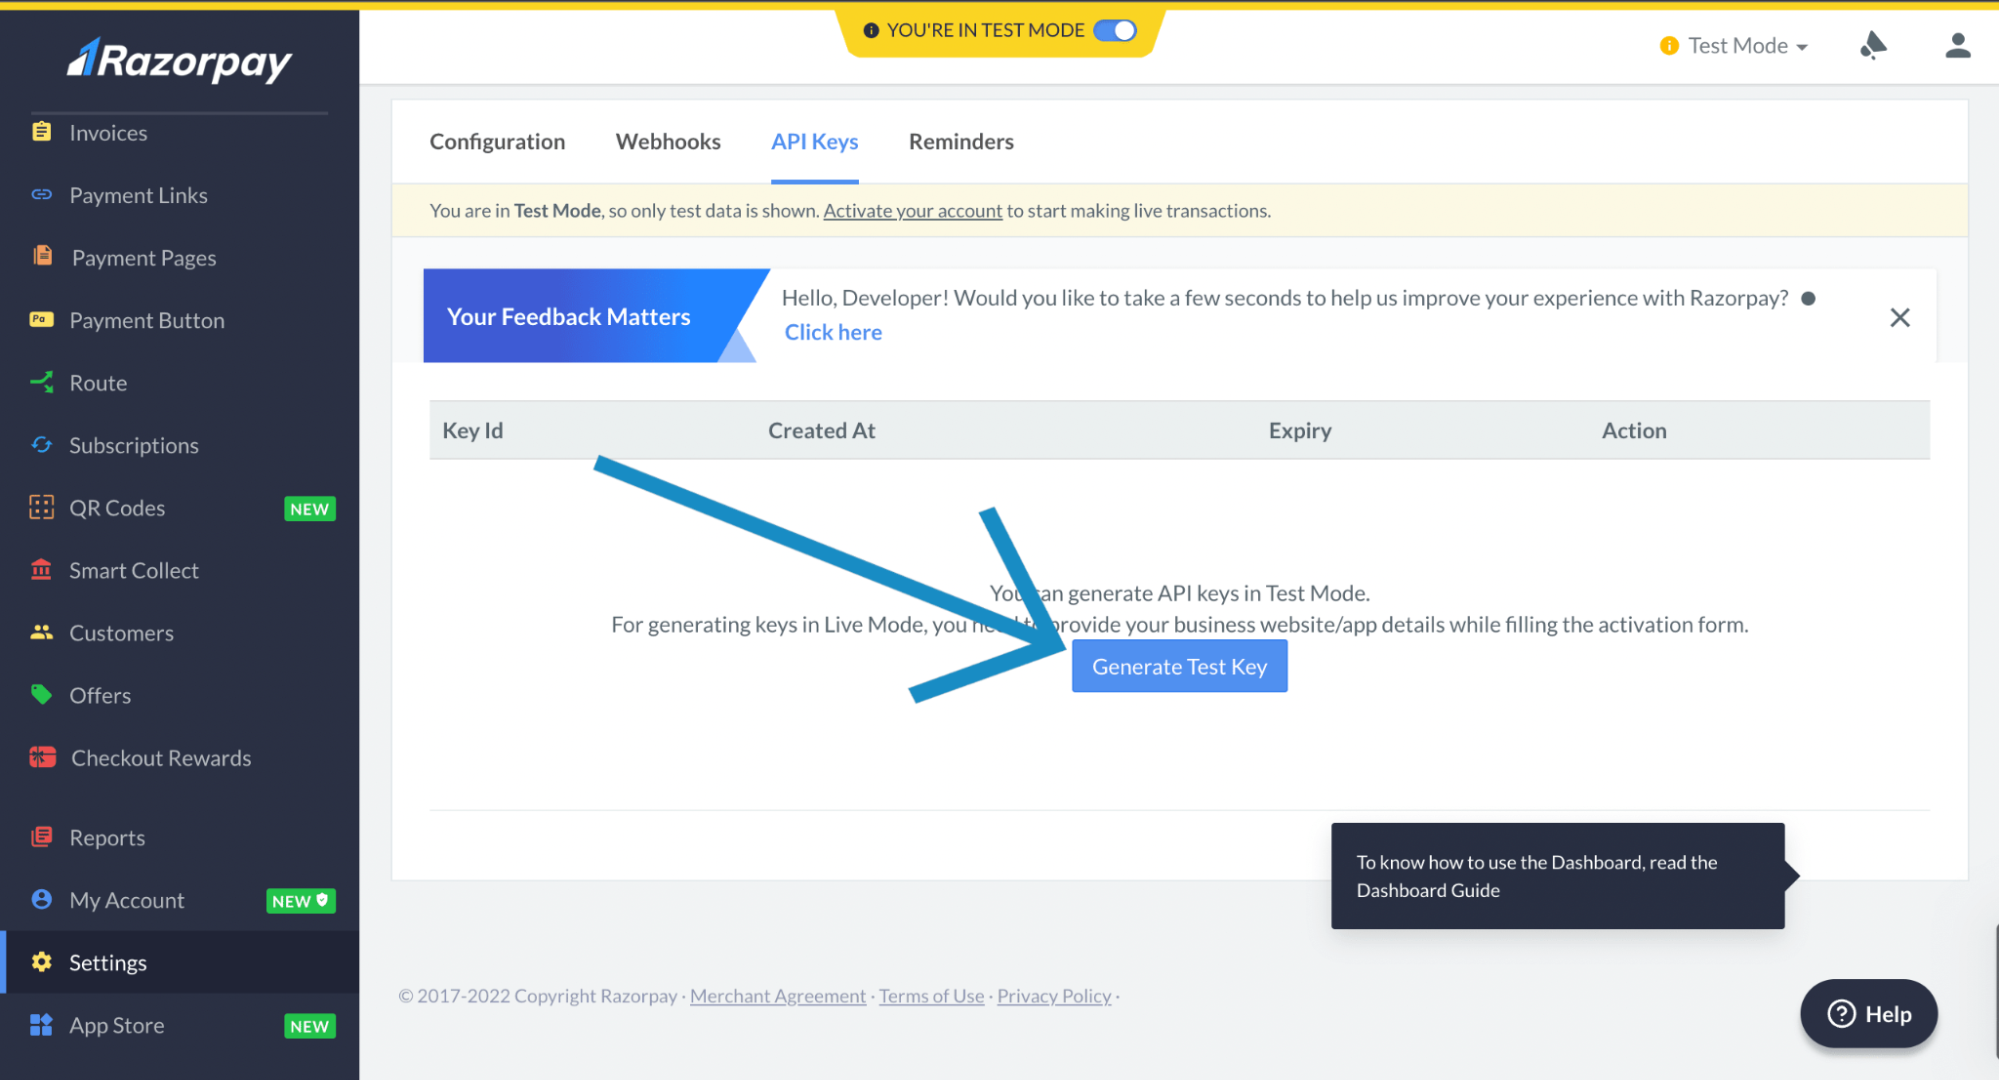
- To check the Razorpay Dashboard -> go to the settings (Fig. 2 & Fig. 3)
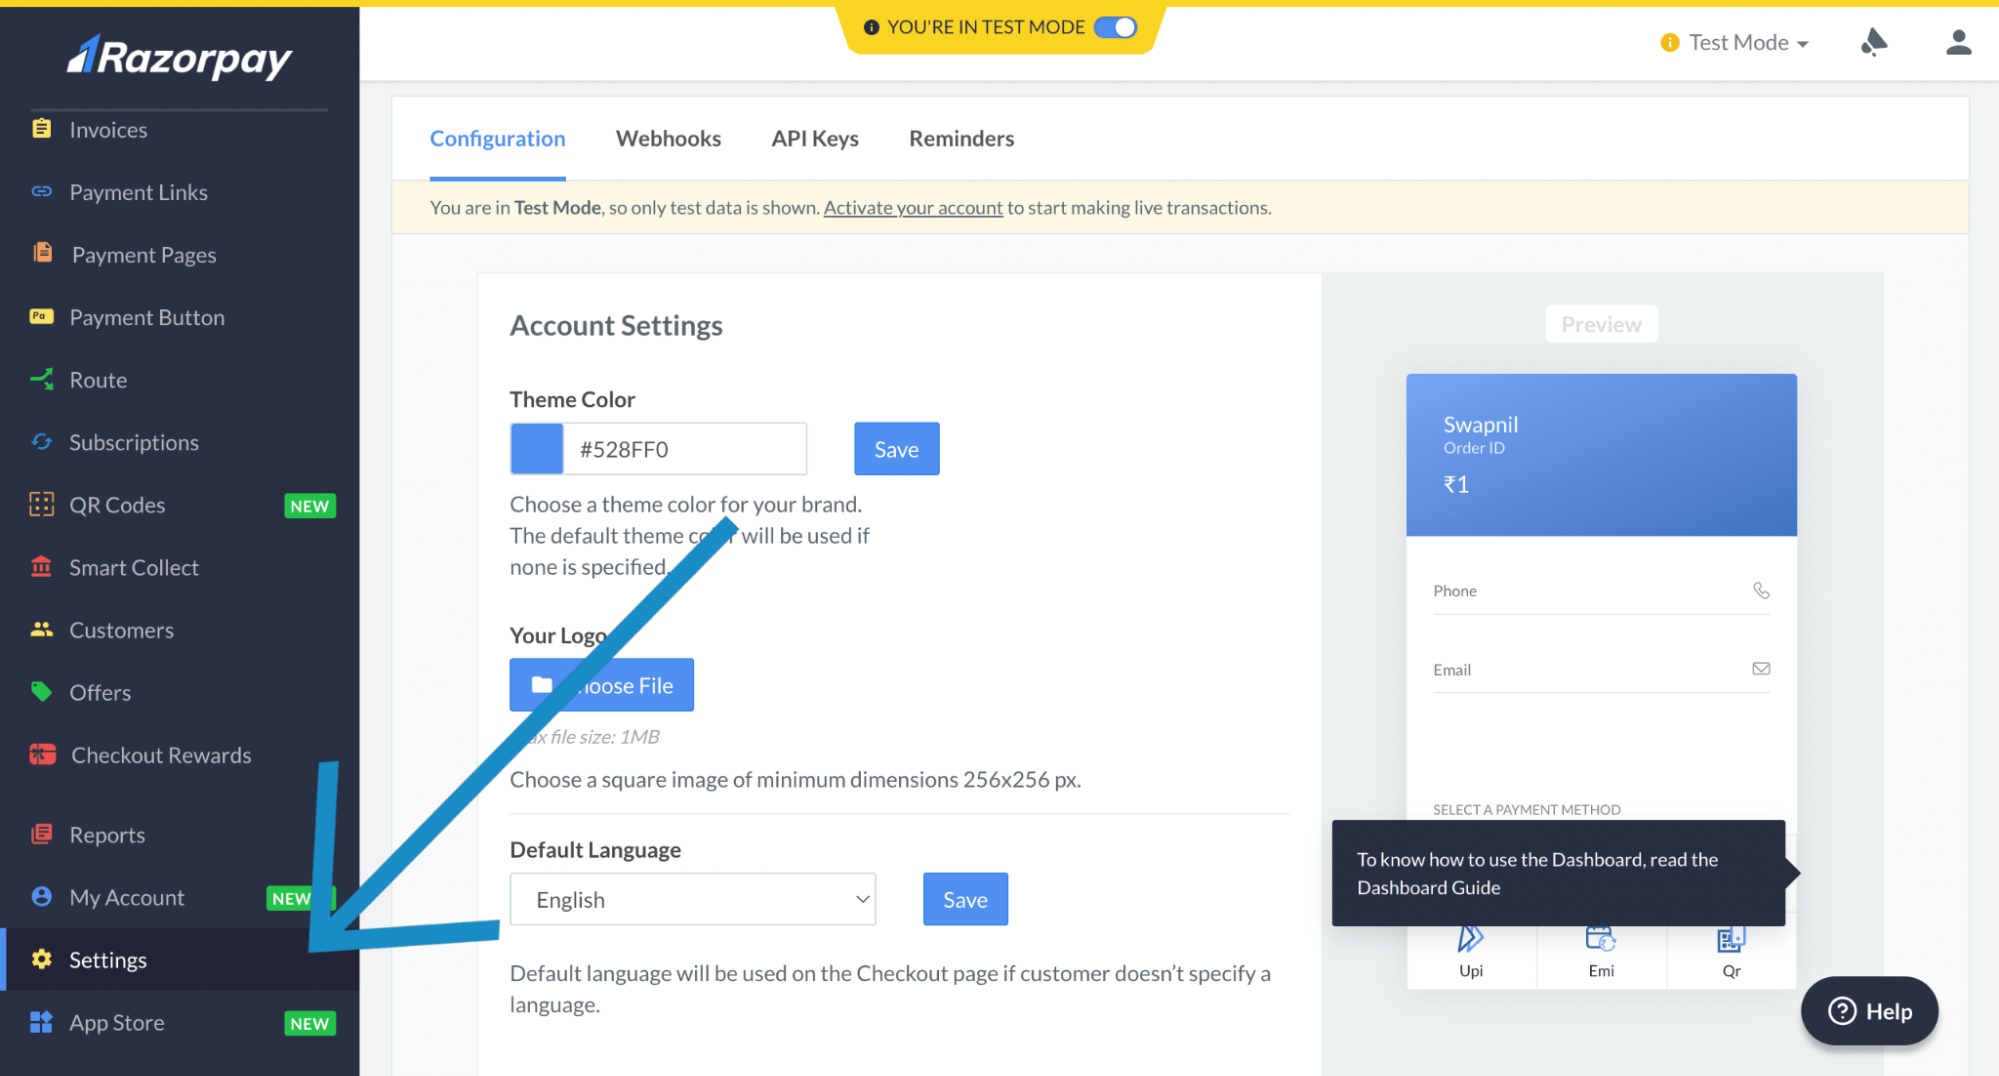
- Click on API Keys
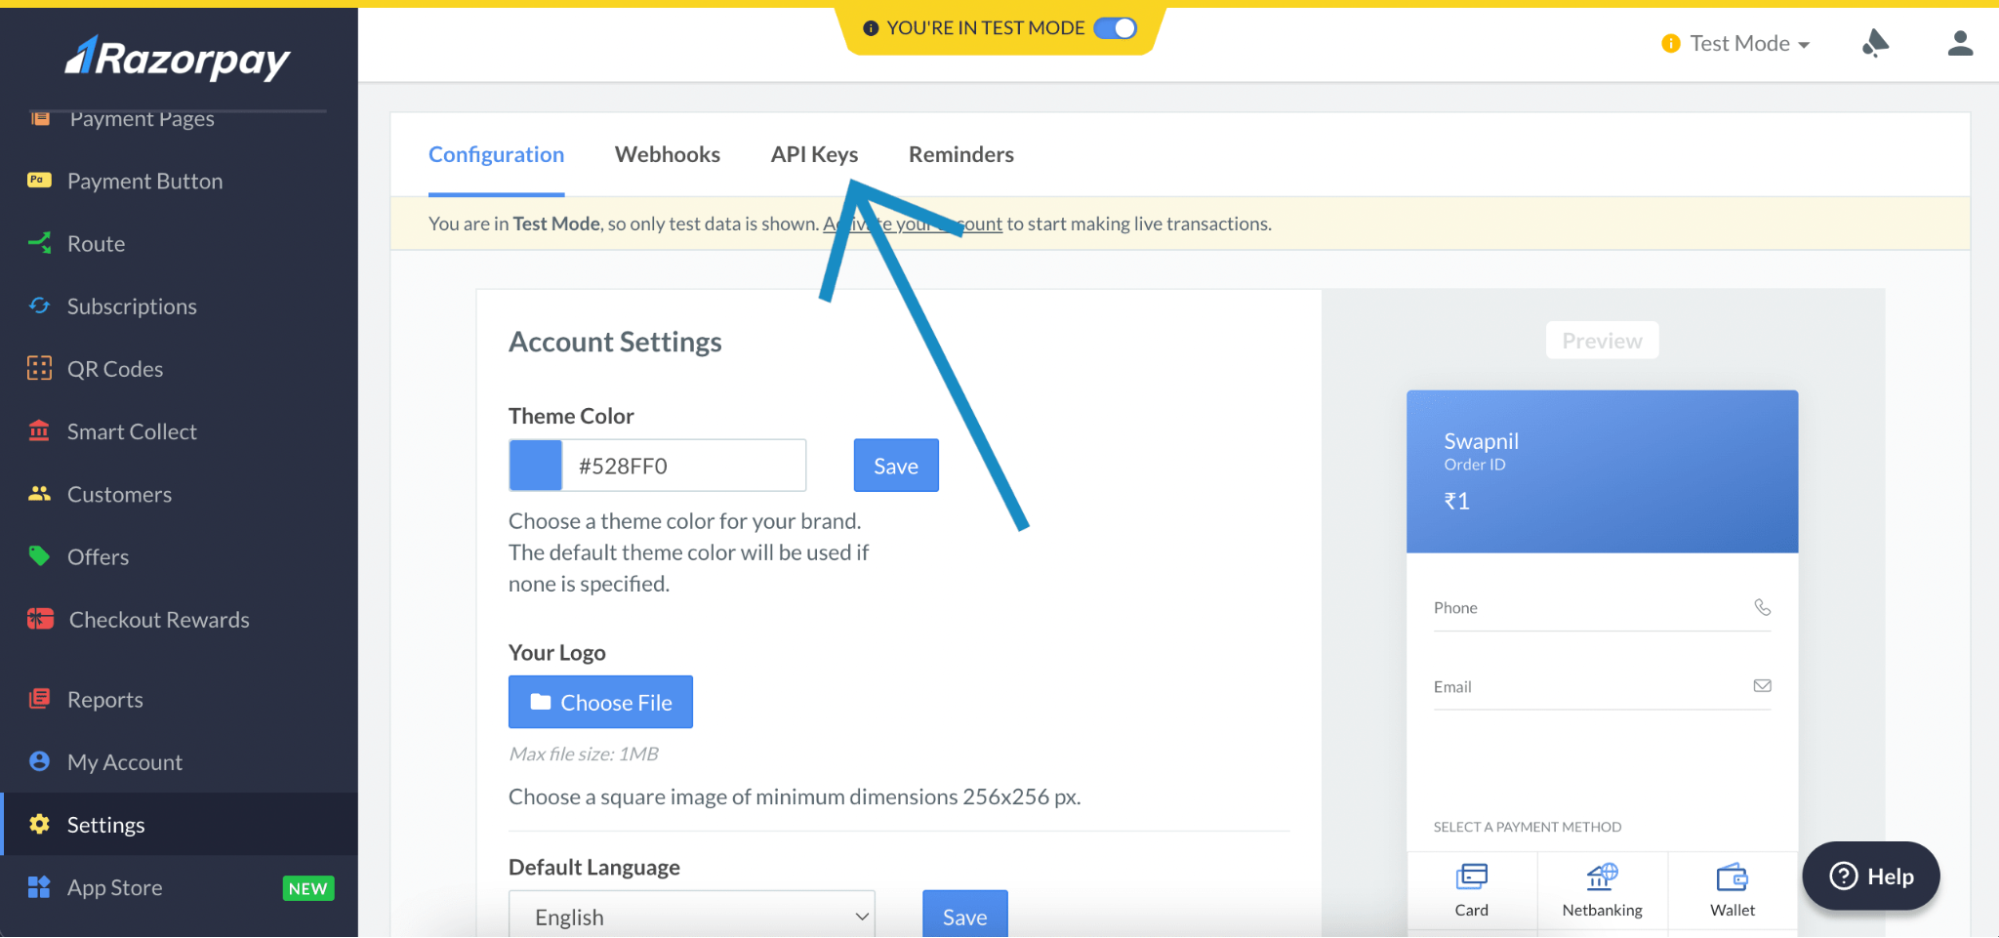
- Click on Generate Test keys.
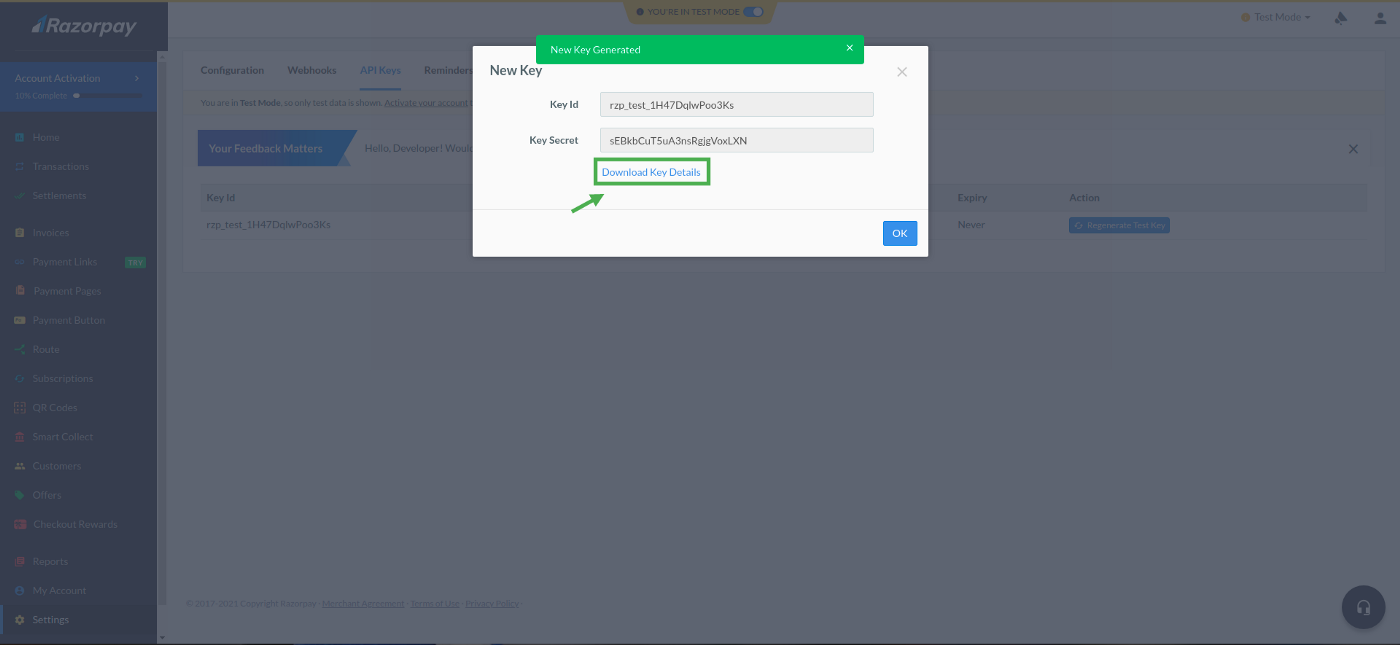
The popup will show you the Key Id and Key Secret. Click and download the file, and store that API key somewhere since we are going to use it later in our next few steps.
RAZOR_KEY = YOUR_KEY
RAZOR_SECRET = YOUR_KEY
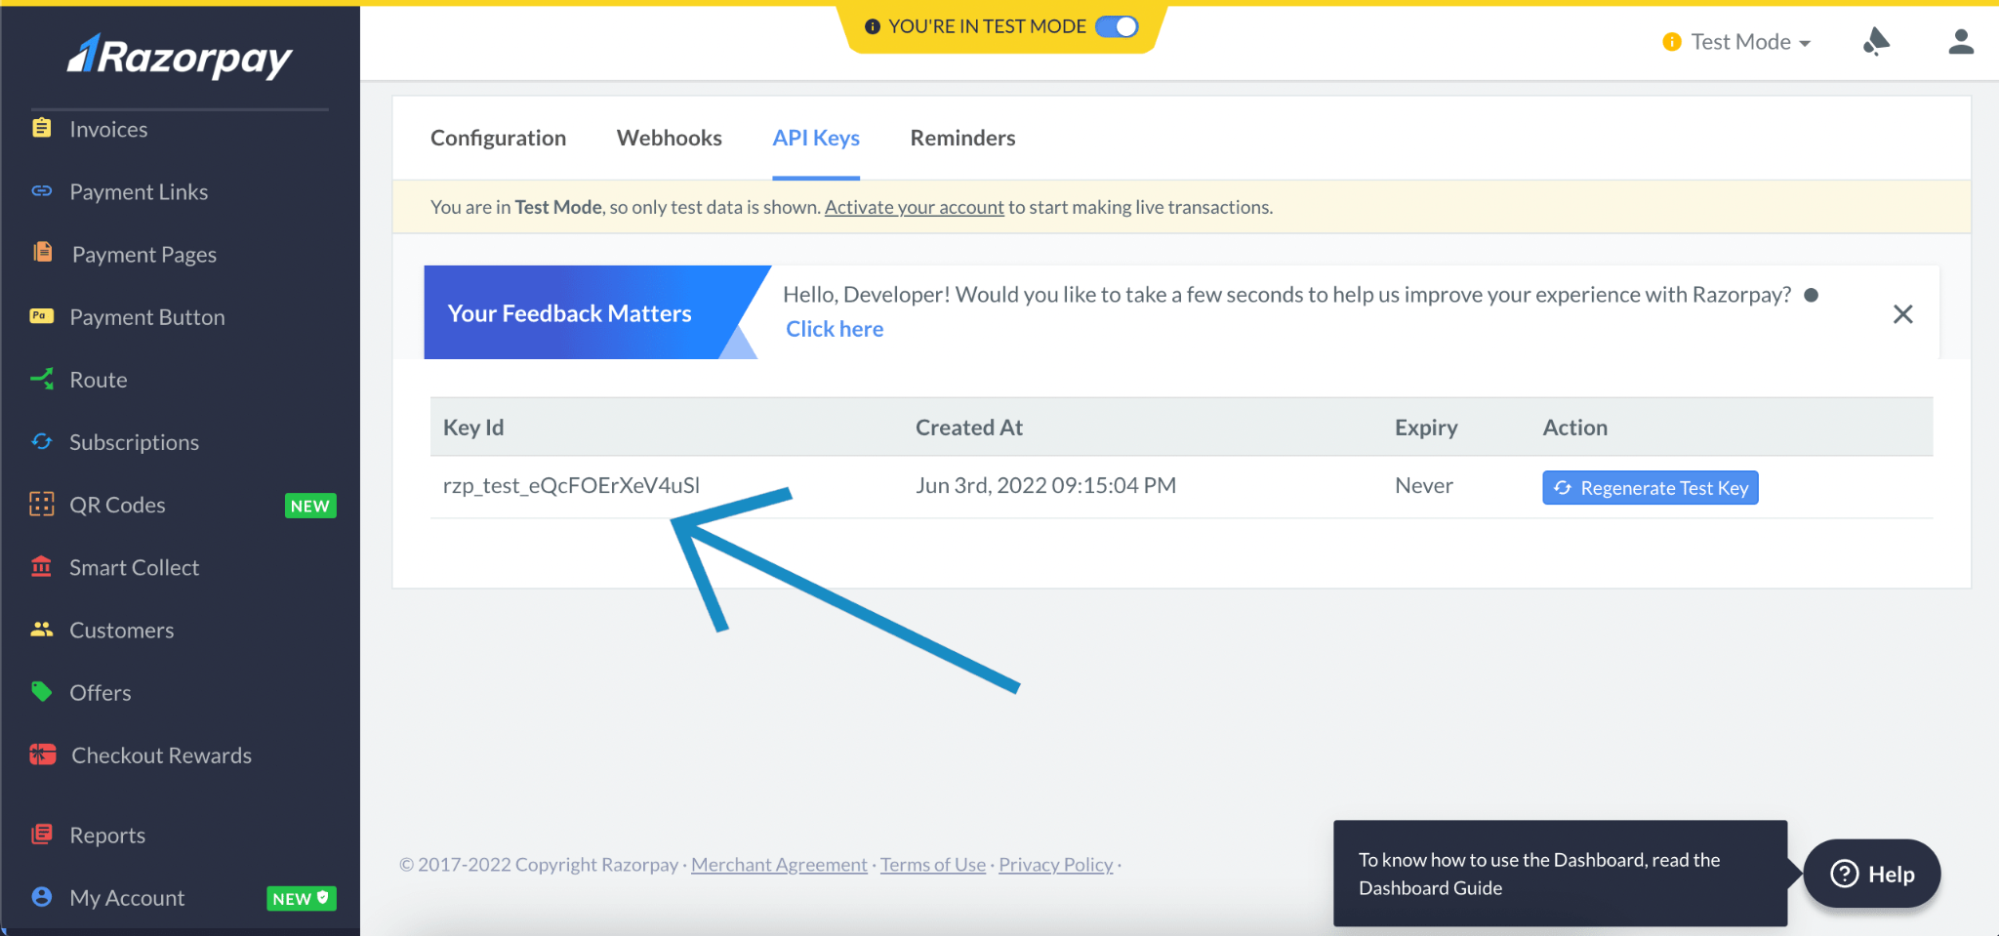
- Finally we can see Keys are Generate.
Step 2: Create Django Project Backend
For creating Razorpay orders and handling Callback API, follow these steps shown through codes below:
- Install Razorpay's python package
- $ pip install razorpay
- Install djangorestframework
- $ pip install djangorestframework
- Create Project
- $ django-admin startproject myproject
- Create payments app
- $ python manage.py startapp payments
CORS is very important to access other domains and here we are using React Js. Since it is a completely different domain, that is why we are adding CORS Headers for a smooth transaction between the cors domain i.e our Django App and React js App. Read More Here.
- $ python -m pip install django-cors-headers
To use the app in our project we need to specify our app name, rest framework, and corsheaders in the INSTALLED_APPS list as follows in settings.py:
INSTALLED_APPS = [
'django.contrib.admin',
…
‘payments’ , # add like this
'rest_framework', # add like this
‘corsheaders’, # add like this
]
To Access CORS Domains, we also need to add middleware in your settings.py file.
- MIDDLEWARE = [
'django.middleware.security.SecurityMiddleware',
…
‘corsheaders.middleware.CorsMiddleware', # add like this
]
CORS_ORIGIN_ALLOW_ALL=True # add like this after middleware.
If we want to use our app URLs, we need to add them in URL patterns.
Now also add the Payment Model in our admin.py file for GUI view of Tables in Browser.
In the admin.py file add the code shown below:
The Setup part is now done and hence, we can move to the actual coding. Follow the instructions below for completing your tutorial.
Create the Order Schema in payments
With the help of codes available across multiple sources, you can create Order Schema in payments, and make migrations for the payment app. For doing so, hit the below commands to migrate this model into the database:
$ python manage.py makemigrations payments
$ python manage.py migrate
And with this, we have set up our model. It is now time to write API Logic to perform operations. But before moving to that part, first, we’ll understand the flow of Razorpay payments. To understand this, let us first explain the Code Logic or Views.py file in the payments app.
How do the payments actually work in Razorpay Payment Gateway? We’ve got you covered in the dev language for better understanding:
- Initiate a Razor order from the Django server.
- Pass order Id and all options to the React front end.
- The user clicks the payment button and pays with one of the payment methods listed on the front end.
- Razorpay Payment System will handle payment success or failure.
- On failure of payment, Razorpay will try to retry the payments in the front end only.
- On success, Razorpay will make a post request to a callback on our server.
- Verify the payment signature and other details to confirm that the payment is authentic and not tampered with.
- Once the signature is verified, capture the payment and send the success response to the front end.
Since the Razorpay amount works in sub-units of currency, therefore while passing the amount we multiply it by 100. For example, INR 200 would become 20000 paise.
Add API logic for creating orders and verifying payment signatures (views.py)
The codes mentioned below will help you add API logic which is needed for creating orders, and also for verification of payment signatures.
Add API routes for orders and for verifying payment (urls.py)
Below is the code that will help you in adding API routes meant for orders and verification of payment.
Create a constants.py file in the same dir for easy access
Also, add one more file constats.py for easy update of payments status using the code written below:
And with this, we are done with our backend Django setup. Now the next step is to set up the react frontend and make payments with APIs.
Step 3: Set up React front end and make payments with APIs
In order to set up React front end, refer to the official documentation of React JS Here.
Create a simple project with React App by referring to the Official doc.
Follow the codes below for further steps:
- $ npx create-react-app my-app
- $ cd my-app
- $ npm start
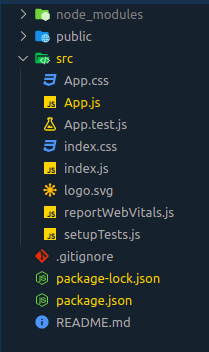
Your folder structure will look like this (Fig. 7).
In App.js under the src folder paste the below code for a smooth transaction.
Step 4: Start the React project -
$ npm run start
Step 5: Start Django Project -
$ python manage.py runserver
Code GitHub Link - https://github.com/SwapnilPawar88/Razorpay-Django-ReactJs-App
High-Level Architecture of Razorpay Django Integration
Before you integrate Razorpay with React, it is important to understand the overall flow. A secure Razorpay React integration always involves both the frontend and backend working together.
Here is the simple flow in plain terms:
First, the React frontend sends a request to the Django backend to create a payment order. The frontend never talks directly to Razorpay using secret keys.
Next, the Django backend communicates with the Razorpay API using secure credentials. Razorpay then generates and returns an order_id.
This order_id is sent back to the React frontend. The frontend uses this ID to open the Razorpay Checkout window, where the user completes the payment.
After payment, Razorpay sends back a payment_id and a signature to the frontend. These details are then sent to the Django backend.
The backend verifies the signature to confirm that the payment is genuine and not tampered with.
Once verification is successful, the backend updates the database, marks the order as paid, and triggers any further business logic, such as sending confirmation emails or activating subscriptions.
Backend Best Practices (Django Side)
When implementing Razorpay Django integration, security and reliability should be your top priorities. The backend is responsible for protecting payment data and ensuring that transactions are verified correctly.
Secure Key Management
Always store your Razorpay Key ID and Secret Key in environment variables. Never hardcode them inside your Django files or commit them to version control. Use Django’s settings.py to read these values securely from environment variables.
Most importantly, never expose your secret key to the frontend. The React application should only receive the public Key ID. The secret key must remain on the server because it is used to create orders and verify signatures.
Order Creation Strategy
Before sending an order to the frontend, always store it in your database. Save details such as user ID, amount, currency, and order status. This ensures you have a record even if the user closes the browser during payment.
It is also important to use idempotency logic. If the same request is triggered twice, your backend should not create duplicate orders. You can handle this by checking whether an unpaid order already exists for the same transaction.
Signature Verification
Signature verification is critical in Razorpay Django integration. It confirms that the payment response originated with Razorpay and was not modified.
Always validate the payment signature on the backend only. Never trust payment details received directly from the frontend. Proper verification prevents tampering and protects your application from fraudulent payment confirmations.
High-Level Architecture of Razorpay Django Integration
To properly integrate Razorpay with React, you need to understand how the frontend and backend communicate during a payment. A secure Razorpay React integration is not just about opening the checkout window. It follows a clear backend-driven flow.
The process begins when the React frontend sends a request to the Django backend to create a payment order. The frontend does not generate orders directly because sensitive credentials must remain on the server.
Next, the Django backend connects to the Razorpay API using secure keys. Razorpay then creates an order and sends back an order_id. This ID is important because it links the payment attempt to a specific transaction.
The backend sends this order_id to the React frontend. Using this ID, the frontend opens the Razorpay Checkout interface where the user completes the payment.
Once the payment is completed, Razorpay returns a payment_id and a signature. These details are sent back to the Django backend for verification.
The backend verifies the signature to confirm the payment is valid. After successful verification, the database is updated, the order is marked as paid, and any related actions, such as subscription activation or email confirmation, are triggered.
Frontend Best Practices (React Side)
When working on a Razorpay integration in React.js, the frontend should focus on user experience while keeping security in mind. Even though payment verification occurs on the backend, the frontend plays an important role in ensuring the checkout flow runs smoothly.
Load the Razorpay Script Safely
Do not include the Razorpay checkout script multiple times. Load it dynamically when needed and ensure it is available before opening the payment window. This prevents duplicate script injection and unexpected errors during Razorpay React JS integration.
Never Trust Frontend Payment Data
After payment, Razorpay returns a payment_id and signature to the frontend. However, you should never mark the payment as successful directly in React. Always send these details to the backend for verification. When you integrate Razorpay with React, remember that the frontend is only responsible for collecting the response, not validating it.
Handle Success and Failure Properly
Provide clear feedback to users. If payment fails, show a meaningful error message and allow retry options. If payment succeeds, show a confirmation message only after backend verification is complete.
Prevent Amount Manipulation
The amount should always be calculated on the backend. Do not rely on frontend values for pricing. This keeps your Razorpay React integration secure and prevents users from modifying payment amounts using browser tools.
Webhook Integration
Webhooks are a critical part of a secure Razorpay Django integration, especially in real-world applications. Many developers rely only on the frontend payment response, but that is not enough for production systems.
A webhook is an automatic notification sent by Razorpay to your backend when a specific event occurs. For example, when a payment is captured, failed, refunded, or when a subscription is renewed, Razorpay sends a server-to-server request to your webhook endpoint.
This is important because users may close the browser immediately after payment. In such cases, the frontend may never send the payment details back to your server. With webhooks enabled, your Django backend still receives confirmation directly from Razorpay.
When setting up webhooks:
1. Create a dedicated webhook endpoint in Django.
2. Verify the webhook signature using the secret configured in the Razorpay Dashboard.
3. Update your database only after successful verification.
4. Handle events such as payment.captured, payment.failed, and subscription.charged.
Webhook verification must always happen on the backend. Never trust raw webhook data without validating the signature.
Handling Subscriptions & Recurring Payments
For SaaS platforms, membership portals, and online learning systems, recurring payments are often more important than one-time transactions. When you integrate Razorpay with React and Django, you can easily extend your setup to support subscriptions.
Razorpay provides a subscription API that allows you to create plans with fixed billing cycles, such as monthly or yearly. Instead of creating a new order each time, you create a subscription linked to a customer and a plan.
Here is how it works in simple terms:
1. Create a plan in the Razorpay Dashboard or via the API.
2. Create a customer record and store the customer ID in your database.
3. Generate a subscription from your Django backend.
4. Send subscription details to the React frontend.
5. Open Razorpay Checkout for the user to authorize the recurring payment.
Once activated, Razorpay automatically charges the customer based on the billing cycle. Webhooks should be used to track events such as successful charges, failed payments, and subscription cancellations.
In a proper Razorpay React integration, always store subscription IDs and payment statuses in your database. This ensures you can control access to services, pause accounts on failed payments, and manage renewals smoothly.
Testing Razorpay Integration Properly
Testing is a crucial step in any Razorpay Django integration. Before going live, you must ensure that both the backend and frontend flows work correctly under different scenarios.
Start by using Razorpay’s test mode. Razorpay provides test API keys and test payment methods, including demo card numbers and UPI IDs. This allows you to simulate successful and failed payments without real transactions.
When working on Razorpay integration in react js, test the complete flow:
1. Order creation from the backend
2. Checkout opening from the frontend
3. Payment success response
4. Payment failure response
5. Signature verification on the backend
Also test edge cases such as network interruption, page refresh during payment, or closing the browser after completing payment. This helps confirm that webhook handling updates the database correctly.
To test webhooks locally, you can use tools like ngrok to expose your local server to the internet. This allows Razorpay to send webhook events to your development environment.
Finally, review your logs carefully. Confirm that order IDs, payment IDs, and signatures are stored and verified properly before marking any transaction as successful.
Security Considerations
Security is the most important part of any Razorpay Django integration. Even a small mistake can lead to payment fraud, data leaks, or incorrect transaction records.
First, always use HTTPS in production. Payments should never be processed over an unsecured connection. SSL certificates are mandatory for protecting user data during checkout.
Second, never expose your Razorpay Secret Key on the frontend. Only the public Key ID should be used in Razorpay React integration. The secret key must remain on the Django backend and should be stored in environment variables, not inside your codebase.
Third, always verify the payment signature on the backend. Do not trust any payment success response coming directly from React. Signature validation ensures that the response originated from Razorpay and was not tampered with.
Also, never accept the payment amount from the frontend. Always calculate and validate the amount on the server before creating the order. This prevents users from manipulating prices using browser tools.
Protect your APIs using CSRF protection and proper authentication. Add rate limiting if needed to prevent abuse. Secure logging and audit trails also help in tracking suspicious payment activity.
Conclusion
Razorpay Payment Integration allows your corporate customers to simplify, automate, and accelerate the pace of their financial operations. Whether it is accepting payment, reconciling transactions, or managing cash flow, a simple Razorpay Payment Integration will help them get various benefits like flexible payouts, excellent customer experience, and a unified platform that can control, analyze, and track the movement of money.
Let us know what other payment gateway integrations might interest you! We are looking forward to your queries and suggestions. Drop us an email or write to us in the comments below.