How to pass page callback arguments in Drupal 8

In earlier blog post, we have seen how to pass arguments in views pages in Drupal 8. But not all the time we have to use views. What if we have a custom page created where we have to pass arguments to a page thru’ url. We are going to explore how to do the same in this blog post. Before we get into passing argument to a page, i would like to go through small introduction of Controller

In earlier versions of Drupal (D7), there was hook_menu. Hook menu actually managed a few different features. In addition to handling incoming requests, it provided menu links, access control, action links, and a number of other features that are all very tightly coupled together.

But in Drupal 8 By using Symfony2 Routing component, we are able to split out the route handling aspect, and get a much improved and feature-rich solution. the main reason for using Symfony2 Routing was to be able to create routes on more than just the path, for example make a request for JSON, XML or HTML while still using the same path.

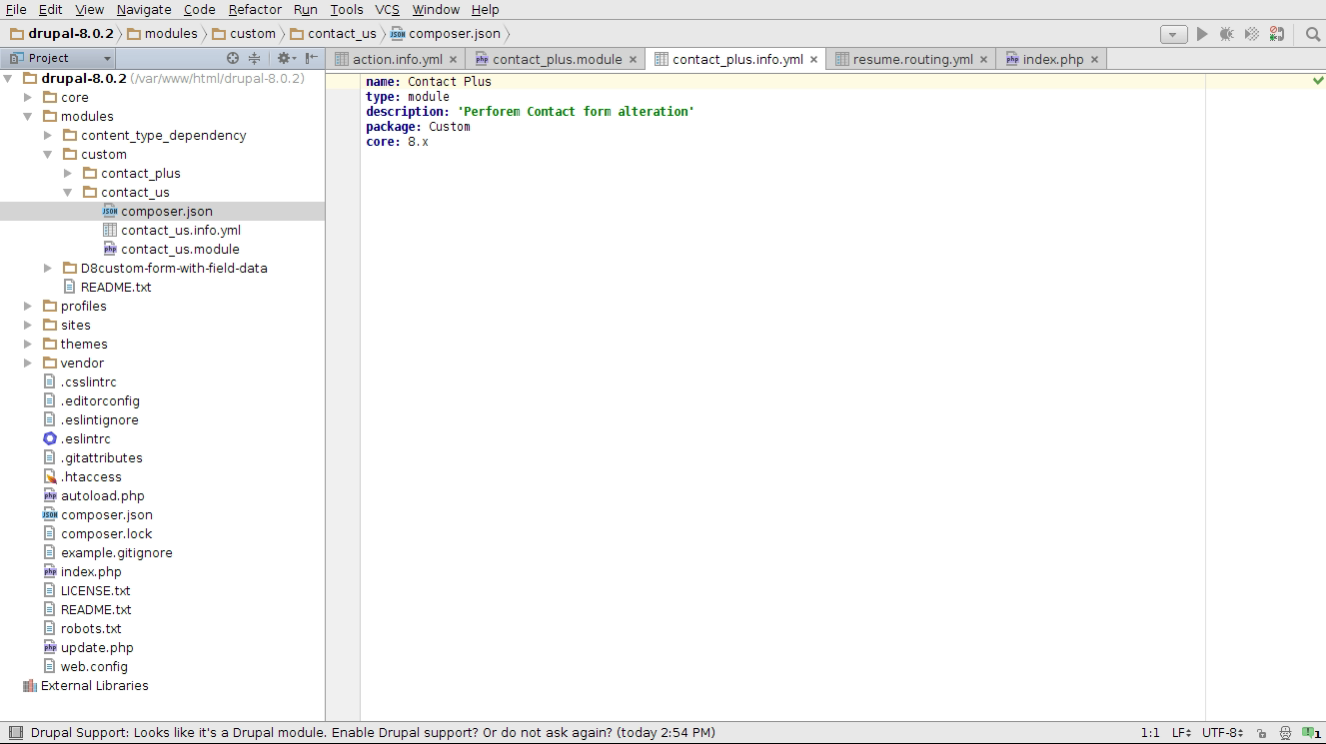
If you wants to grab more info on controller please visit here [https://www.drupal.org/node/2116767]. In order to pass the page argument using url, we need to  create one new controller under modules/custom//src/Controller with name called “ControllerName.php”     

Step 1: Created controller

addition.form:
    path: '/resume/addition/{first-arg}/{second-arg}/{third-arg}'
    defaults:
      _controller: '\Drupal\\Controller\::’'
    requirements:
      _permission: 'access content'

Where,
path:
path: '/resume/addition/{first}/{second}/{third}'
path name should be any generic name with three different argument.

Controller:
_controller: '\Drupal\resume\Controller\AdditionController::add'
To accessing a specific controller use _controller path with Controller name and accessible function name. In my case AdditionController is my controller with add function.


Step 2: Now lets create another Controller AdditionController for additional functionality, where we are going to pass three different argument & performing addition for three numbers.
Once these arguments has passed on. we perform addition of three numbers & storing the output to an array.

$total[] = $first + $second + $third;

To render the output we are using theme function.

 $render_array['addition_arguments'] = array(
      // The theme function to apply to the #items
      '#theme' => 'item_list',
      // The list itself.
      '#items' => $total ,
      '#title' => $this->t('Addition of 3 values'),
    );
return $render_array;

Code Base for Controller:

namespace Drupal\resume\Controller;

use Drupal\Core\Controller\ControllerBase;

/**
 * Controller routines for page example routes.
 */
class AdditionController extends ControllerBase {

  public function add($first, $second, $third) {

    $total[] = $first + $second + $third;

    $render_array['resume_arguments'] = array(
      // The theme function to apply to the #items
      '#theme' => 'item_list',
      // The list itself.
      '#items' => $total ,
      '#title' => $this->t('User Information'),
    );
    return $render_array;
  }
}

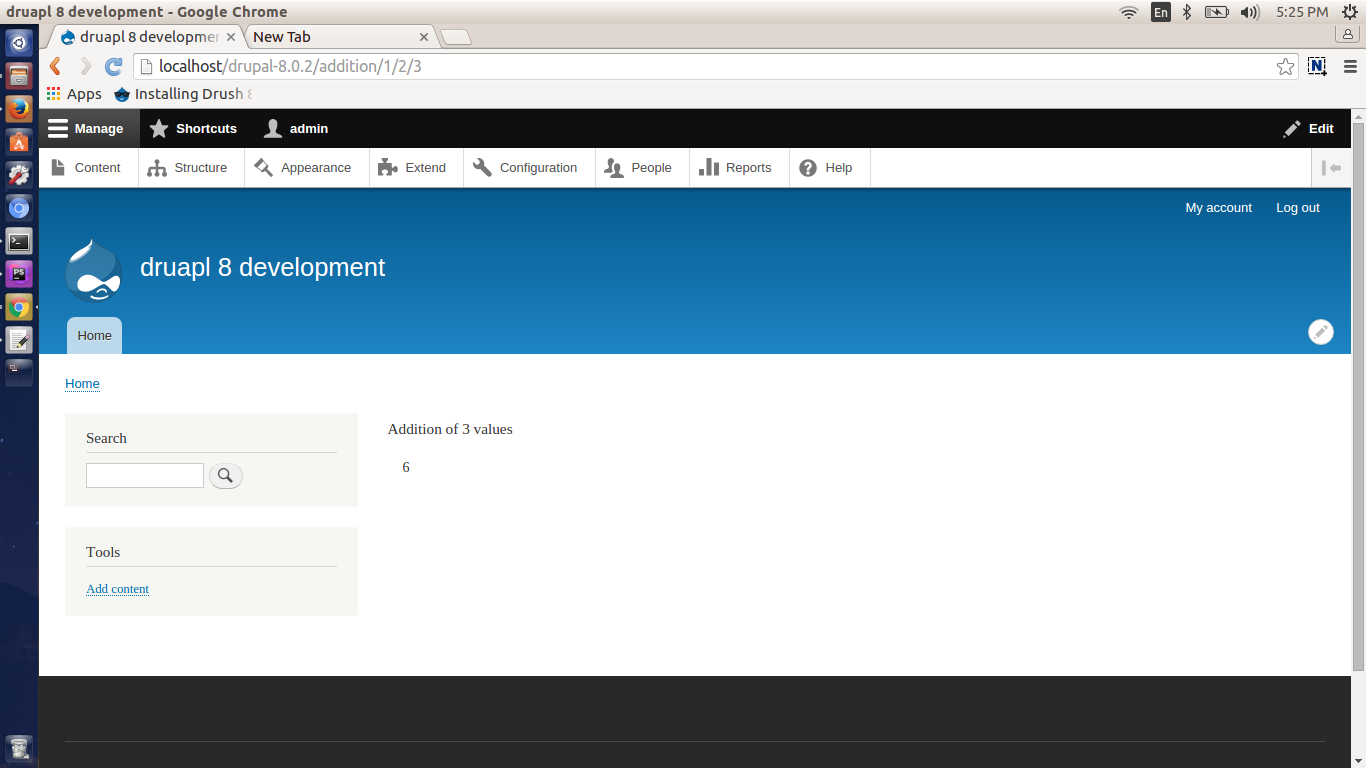
Once we have done with controller and routing system. we can visit the page by passing three argument and  we can see the data on renderable page. Below is the attached screenshot

Where i’m passing 20,30,40 as argument and i’m getting sum of those numbers: 90 on that page
URL: example-name/addition/20/30/40

addition page by passing 3 argument

What we have seen above is very simple demonstration of how to to pass arguments from URL to page and making use of the same to calculate some values.

Source code: https://github.com/xaiwant/D8-passing-arg-to-page

Power of Drupal Console in Drupal 8

Drupal Console is command line tools, help us to speed up the development tasks for Drupal websites. After installing console, you will be able to perform actions simply by typing commands into a terminal, actions that usually takes multiple steps in a web browser (Drupal Installation/ Field addition on Bundle), or Writing a basic code.
Just to add here, Drupal Console works with Drupal 8 only, whereas Drush runs on Drupal 8.

Below are the syntax for Console, With Drupal Console you can generate boilerplate code for modules, themes, controllers, forms, blocks, and much more.
        
        Node
              drupal create:nodes
        Controller
              drupal generate:controller
        Entity
        Form alter hook
        Module
              drupal generate:module
        Block
              drupal generate:plugin:block
        Field type, widget and formatter
        Image effect
        Rest resource
        Service
        Theme

              drupal generate:theme
        Switch maintenance mode on or off
              drupal site:maintenance on
        Run unit tests

There are few similar tools available e.g.

Module Builder: (Generates Drupal 6, 7, or 8 module scaffolding)
Drupal Module Upgrader: (Converts modules from Drupal 7 to Drupal 8; generates static help file with links to relevant change records)
Drupal 8 Tools: (Drupal code generator written in bash)
Drush: (Interact with Drupal installation via CLI, create aliases, create custom commands)

Why it’s Unique?

Drupal Console use modern PHP practices introduced into Drupal 8, includes object-oriented PHP. Console isn't a Drupal module, but was built with the Symfony Console Component and other libraries, such as Twig, to generate PHP, YAML, and other file types used in Drupal 8 module development.

It is a designed for anyone using or planning to use Drupal 8. At the moment, it is used via a CLI, but there are plans to make it accessible through the Drupal administration interface.

Drupal Console provides a number of commands for creating module temporary structure and boilerplate code. For any command, you will be asked a series of questions about what you want. In that case files are created and inside these files, classes — complete with namespacing and use statements — are created for you with the naming convention you specified in the command's prompts.


Let’s Have a look

For installation please refer here.
Once you have done with installation type drupal in terminal and you’ll get below list

s1

To pull out all the commands and option for console type drupal list & you will get list of options and available commands.

s2

As i’m going to show you how can we create boilerplate code “Generating Custom form in Module
Before we start with building a custom form we need to generate a module first

Step 1: Run drupal generate:module

s3

// Welcome to the Drupal module generator

 Enter the new module name:
 > Contact us

 Enter the module machine name [contact_us]:
 > [you can provide own machine name or else it will take default [contact_us]]

 Enter the module Path [/modules/custom]:
 > [you can provide own path or else it will take default [/modules/custom]]

 Enter module description [My Awesome Module]:
 > Creating custom contact us form with few fields

 Enter package name [Custom]:
 > [you can provide own choice or else it will take default [Custom]]

 Enter Drupal Core version [8.x]:
 > [you can provide own Core version or else it will take default [8.x]]

 Do you want to generate a .module file (yes/no) [no]:
 > [you can provide own choice or else it will take default [no]]

 Define module as feature (yes/no) [no]:
 > [you can provide own choice or else it will take default [no]]

 Do you want to add a composer.json file to your module (yes/no) [yes]:
 > [you can provide own choice or else it will take default [yes]]

 Would you like to add module dependencies (yes/no) [no]:
 > [you can provide own choice or else it will take default [no]]

 Do you confirm generation? (yes/no) [yes]:
 > [you can provide own choice or else it will take default [yes]]

Once we pressed yes we will get below files

Generated or updated files
 Site path: /var/www/html/drupal-8.0.2
     1. modules/custom/contact_us/contact_us.info.yml
     2. modules/custom/contact_us/contact_us.module
     3. modules/custom/contact_us/composer.json

s4

Finally we have done with module creation using Drupal Console. using Console we can reduce the time and energy to develop custom module or site configuration, which takes more when we go through step by step procedure in ui level.

Git Source: https://github.com/xaiwant/D8ConsoleForm/tree/master/contact_us

How to use if else statement in twig Drupal 8?

It is really exciting to work with twig in Drupal 8. Here we are going to find out how to use if else condition in twig in page.html.twig or any *.twig files. 

We are having a region called ‘banner’, which is already defined in your theme.info.yml. In the page.html.twig we need to check that if there is any content is present in the ‘banner’ region. For that, we need to use the if-else condition in our *.html.twig file. So we need to use the following code on your page.html.twig file.

{% if page.banner is empty  %}
   

Please place a block in the banner region.

{% else %}    {{ page.banner }} {% endif %}

From the above code snippet, you can understand the following points, 

How to check the if empty the region in drupal 8 twig?

   {% if page.banner is empty  %}

How to print the region in drupal 8 twig?

  {{ page.banner }}

How to use the if else condition in drupal 8 twig?

  {% if page.banner is empty  %}

Please place a block in banner region.

  {% else %}     {{ page.banner }}  {% endif %}

How to use nested if else condition in drupal 8 twig?

 {% if page.header  %}

    {{ page.banner }}

  {% elseif  page.banner %}

    {{ page.banner }}

  {% else %}

Please pace a block in either header or banner region.

  {% endif %}


Below is the CodeBase from page.html.twig from one of the "Bartik" Theme

s18

So we understood how to use the if else in twig drupal 8.

Related

How to Render Twig Blocks

Twig: An Introduction to theming in Drupal 8?

What is Twig?

Twig, a modern template engine for PHP, is part of the Symfony2 framework and is a direct replacement for PHPTemplate. Twig is created by SensioLabs, people who developed the Symfony2 framework itself. Drupal 8 uses Symfony2 codebase. Because Twig is natively supported by Symfony2, Twig compiles templates to optimize PHP code. Now the overhead compared to regular PHP code was reduced to the very minimum. Drupal 8 themes are much more secured,PHP calls no longer exist in theme files. This will also make theming easier to understand for non-programmers.

In Twig templating system one of the major change is, all of the theme_* functions and PHPTemplate based *.tpl.php files have been replaced in by *.html.twig template files.

In this article I’m giving you the basic introduction to Drupal 8 theme Template “Twig”. which holds basic introduction, advantage over Drupal 7 PHPTemplate, File naming convention  and basics of Twig syntax.

Drupal 7 PHPTemplate Vs Drupal 8 Twig

Let's do compare two snippets from Drupal 7 and Drupal 8.

Docblock:
PHPTemplate:

  /**
   * @file
   * File description
   */
?>

Syntax: D7

Drupal 7 Mixes up data types including strings, objects and arrays. It has many different ways to printing variables, object , array etc.

Printing a variable:
      

Printing a hash key item:
      

Assigning a variable:
       comments; ?>

Assigning an array:
        $author, '!date' => $created); ?>

Conditionals Structure:
    if  condition is TRUE
    comments): endif; ?>

    if is not empty.
    comments)): endif; ?>

    if variable is SET
    comments)): endif; ?>

    if condition is TRUE | FALSE
    0): endif; ?>

Control structures:

{% for user in users %} {% endfor %}

Filters:

Check_plain:

Translate:

Translate with substitutions:
$user->name)); ?>

There is also different way to printing variable in drupal 7 print() or print render()    

Drupal 7 node.tpl.php file:

11

Docblock:

Twig:
  {#
  /**
   * @file
   * File description
   */
  #}

Syntax: D8

In Drupal 8 uses common pattern to access all variables consistently.
In twig we don’t have to rendered your renderable. you can use
{{just print here}}

Printing a variable:
   

{{ content }}

Printing a hash key item:
   {{ item['#item'].alt }}

Assigning a variable:
   {% set custom_var = content.comments %}

Assigning an array:
   {% set args = {'!author': author, '!date': created} %}


Conditionals Structure:

   if condition is TRUE
   {% if content.comments %} {% endif %}

   if it is not empty
   {% if content.comments is not empty %} {% endif %}

   if it is not SET
   {% if content.comments is defined %} {% endif %}

   if condition is TRUE | FALSE
   {% if count > 0 %} {% endif %}


Control structures:

for each loop
Twig: {% for user in users %} {% endfor %}

Filters:

Check_plain:
          {{ title|striptags }}

Translate:
          {{ 'Home'|t }}


Translate with substitutions:
          {{ 'Welcome, @username'|t({ '@username': user.name }) }}


Drupal 8 node.html.twig

12


Inconsistency:

Sometimes Drupal 7 relies on template files, other times it relies on theme functions. This can make it hard to understand how to override some parts of the Drupal core. In Drupal 7 we use to create multiple template file and theme function to override the markup.

Drupal 8 only uses template files for rendering. kind of less template.

Redundancy:

Drupal 7 would have multiple files with the same lines of code, including:
Drupal 8 uses lines like this: {% extends "node.html.twig" %}. Twig integration eliminates the need for copying and pasting base or parent theme template files into your custom templates. This means you can use proper inheritance inside your theme files and eliminate a lot of duplicate code.

Security:

Drupal 7 would often prints unsanitized data. You could even run database queries from directly inside the theme files. Drupal 8 can automatically sanitize variables and won't permit unsafe functions to run.

File Naming Conventions for Drupal.

The naming convention for all theme templates has changed from *.tpl.php to *.html.twig.

HTML template

           Base template: html.html.twig
                                  location: core/modules/system/templates/html.html.twig

            Page template:
                              Pattern: page--[front|internal/path].html.twig
                              Base template: page.html.twig
                               location: core/modules/system/templates/page.html.twig

             Regions:
                             Pattern: region--[region].html.twig
                             Base template: region.html.twig
                             location: core/modules/system/templates/region.html.twig

             Blocks:
                             Pattern: block--[module|-delta]].html.twig
                             Base template: block.html.twig
                             location: core/modules/block/templates/block.html.twig

             Nodes:
                              Pattern: node--[type|nodeid]--[viewmode].html.twig
                              Base template: node.html.twig
                              location: core/modules/node/templates/node.html.twig

         
Twig templating engine will be a fresh air to themers and developers. Cleaner and more secure code will promote good practice and enable us to produce better work.

How to use Contextual Filter in Drupal 8

Contextual filters in Views are powerful, but getting them to work perfectly can be a tricky sometimes. This will hopefully save some people from the headache I had gone thru’. Contextual Filters in Drupal 8 are similar to the Drupal 7 with advance feature and more dynamic compared to normal filter. A Contextual Filter provides more convenient way to fetch the data either from variables sent programmatically or URL.

 For example: 
 A contextual filter for a node author would be able to display all nodes written by the currently logged in user.


My goal was to have a page of Articles that could be filtered  based on logged in user. In this tutorial we will use author relationship to get the name of the author and use it in a Display summary to list all the users with some additional information.

Step 1: We have to go through basic View Page creation by visiting /admin/structure/views/add

Fill up View Basic information, Page settings detail and click on Save and edit. 

I have created a view with below input.

View Basic Information
         View name: Article_by_You
         Description: listing article created by logged in User

View Settings
         Show: Content
         of Type: Article
         
Page Settings
        Page Title: Article_By_You
        Path: article_By_You

Page Display Settings
         Display format: Table

s11

Step 2: Once we have done with Step1, next we would be redirected to View Settings Page. Here I have added Body, Authored by & Authored on under Fields Section. Now click the Advanced Section on extreme right and click on CONTEXTUAL FILTERS “Add” button.

FIELDS
     Content: Body
     Content: Authored by (Authored by)
     Content: Authored on (Authored on)

s12
 

Step 3: Search For “Authored by” and click on Apply (all displays).

s13

Step 4: Select “Provide default value” under WHEN THE FILTER VALUE IS NOT IN THE URL & Select Type asUser ID from logged in user” and click on Apply (all displays).

s14

Step 5: So, we are done with view creation. It’s time to review by visiting
 the URL: example.com/d8/article-by-you

This page is showing articles created by logged in users and we don’t have to pass any additional argument. Try logging with some other user credentials and visit article-by-you page to test the view we have created just now. 

s15

Free Drupal Training by Valuebound, Bangalore on Drupal Global Training Days on Feb 6th 2016

We are happy to announce that we are running Drupal training sessions on Saturday, Feb 6th 2016 as part of the Global Training Days. The initiative is run by the Drupal Association to introduce newcomers to Drupal.

Come and join us to learn about what Drupal does and how it can help you. We will learn about Drupal and build our first website live.

What is a Drupal Global Training Day?

Drupal Global Training Days is a worldwide initiative to increase the adoption of Drupal. All across the world, people are teaching and learning Drupal, and sharing that open source love.

What is it? 

It's a full day introduction to Drupal. Attendees will leave having successfully built a Drupal site. Part of the Drupal Global Training Day initiative by the Drupal Association.

What we are going to do -

  1. Install Drupal 8 using Acquia Cloud - https://www.acquia.com/drupal-8
  2. Familiarize ourseleves with the new User Interface and options
  3. Learn about how to create content
  4. Experiment with the inbuilt views as well as image handling
  5. Create new blocks and understand about regions
  6. Manage users
  7. Q&A

Whose it for? 

  • It's for those interested in taking up Drupal as a career path.
  • Web developers/designers willing to get started with Drupal.
  • Project managers managing or considering Drupal projects.
  • Decision makers evaluating Drupal. 

Cost? It's FREE. Venue provided by Valuebound.

WHY IS THIS SESSION FREE?

Introducing Drupal among students and amateur designers free of cost is one of the many ways by which we thank this open source community.

Valuebound Interactive is solely dedicated in helping organizations and individuals to adopt Drupal in their operations in the most effective manner. At Valuebound, we believe in giving result oriented training sessions which will help you to build impeccable websites.

Limited availability to ensure personal guidance throughout the day.

How to use REST Export with Views in Drupal 8

Why we need Web Services? 

We have an online shop showing product catalog and info. & we want to make Mobile app which can interact with website with CRUD functionality.
In that case we need is to extend Drupal to receive and send data in machine readable format so it would be easier for the Application developer to make the app. So we need to make Drupal support a Web Services.

How does it works?

In the website, we have a content type (example:“article”) with other info. We need the app to use our website using simple requests, which can be made using RESTful Web API. REST uses the HTTP methods for communication between 2 devices in machine-readable format (JSON / XML) and is widely used in the WWW.
I’m assuming you are familiar with Contributed Services & Services view module in Drupal 7. In this article i‘m going to show you How can we create Rest Export view in Drupal 8 with few simple step and this won’t require any contributed module unlike drupal 7.

s40

Drupal 8 Provides core RESTful Web Services & Serialization in one single package called WEB SERVICES & also Views (help us to create Rest Export View).

Here's a 5-step guide to using REST Export Services with Views.

Scenario: To create a REST Export View for Article Content with some additional fields.
and it should display node by passing node id.

Step 1: Enable RESTful Web Services & Serialization. once enabled the module you will get REST EXPORT SETTINGS option in Views creation page.

s41

Step 2: Fill up View Detail as provided below View name as ArticleByID with some Description. selected Article as the content type. Tick the box against "Provide a REST export" under "REST export settings". & provide a link under "REST export path". This link is the End point to fetch the data. Here, we are giving path "/json/article-by-id" click save and edit.

s42

Step 3: Once we landed to View Configuration page Click "Settings" next to "Format:Serializer". You will get the option to choose the format of output data ( json / xml ) at the given End point  "json/article-by-id". as i have selected json format.

s43

Step 4: Added Title/ Body/ Image under FIELDS section. Selected Article Content type under FILTER CRITERIA. and also added exposed Node id to filter based  on specific NID and saved the setting.

s44

Step 5: To view the formatted data we can test using any REST client. for google chrome. i have downloaded a plugin “JSONView”
ref url: https://chrome.google.com/webstore/detail/jsonview/chklaanhfefbnpoihckbnefhakgolnmc?utm_source=chrome-app-launcher-info-dialog

Once we have done with installation of JSONView. we can visit the end point and view the output as below
End point: example-name/drupal-8.0.1/json/article-by-id?nid=5

Where nid is filter name with node ID

s45


Drupal 8 : How to create the local tasks[tabs] through custom module

Sometimes we need to add forms in a page which can be accessed using horizontal tabs. Default Drupal login forms already has few tabs e.g. Log in, Create new account & Reset new password. Either we can add additional tab here itself or we can also add tab if we need to show multiple form in a page using writing a small custom module.

What is module-defined local tasks?
Tabs on top of the page are called as Local task. you can view them easily on User Log-in page having Log in/ Create an account/ Reset your password

s1

Syntax to define local task in Drupal 8:

First of all, To create a static local tasks we need to define in our module should be static.


format: file name after your module.

E.g: if module name is "resume", the file will be resume.links.task.yml & placed in the root directory.

Here resume.links.task.yml define two tabs resume.tab_1 & resume.tab_2 route. the title of the tab will be shown in User Interface tab where base_route is same as the name of the route. we can also provide the weight for the tabs. by default negative weight appears on the left hand side.

Just to Display two quick tab in UI , i have added one additional form “Work Form”


s2

s3

To provide multiple levels of tabs, use the parent_id to relate a tab to its parent and use the same base_route to group the set of tabs together. Above are two quick tab “resume” , ”Work” which can visible while visiting resume/mypage

Conclusion: This tutorial tell us about basics of creating static local tasks[tabs]. by adding resume.links.task.yml in core directory. which required  mandatory route_name / title / base_route fields. & it doesn’t include Dynamic local task generation & Customising local task behaviour.

Source code:  https://github.com/xaiwant/D8custom-form-with-static-local-task

Creating a custom form in a block in two steps in Drupal 8

Lot of times we come across project requirement where standards form created using contact form or webform is not sufficient or overkill. In this article I am sharing the flexibility of Drupal 8 where I am creating a basic form and rendering the same form into a block

Step 1: Lets create a custom form - Add a file in resume/src/Form/WorkForm.php

Step 2: Now lets display the form we created in step 1 as block. For this create a new file  article/Plugin/Block/ArticleBlock.php

FormBuilder::getForm($form_arg)

This function should be used instead of self::buildForm() when $form_state is not needed (i.e., when initially rendering the form) and is often used as a menu callback.

Now you can check your page output “Article Block” is displayed in right side on the website.

s5

Source code: https://github.com/xaiwant/D8custom-form-rendring-in-block

Step by step method to create a custom form in Drupal 8

In Drupal 8 form API is similar to Drupal 7 Form API. forms still use array structure to render the data. but having separate validation and submission form. Drupal 8 has some new (HTML 5) elements available.    

New HTML 5 elements like

'tel','email','number','date','url','search','range' etc.

In Drupal 8 Form classes implement the\Drupal\Core\Form\FormBuilderInterface and the basic workflow of a form is defined by the buildForm, validateForm, and submitForm methods of the interface.

There are different classes to choose from depending on the type of form you are creating.


  • ConfigFormBase : For creating system configuration forms like the one found at admin/config/system/site-information.

  • ConfirmFormBase : For providing users with a form to confirm an action such as deleting a piece of content.

  • FormBase : The most generic base class for generating forms.

FIle structure:

s18
 

Step 1: Create .info.yml file

An essential part of a Drupal 8 module, theme, or install profile is the .info.yml file (aka, "info yaml file") to store metadata about the project.

In Drupal 8, .info file changes to .info.yml. Old .info files have been converted to YAML.

Added name, description, core, package, dependencies, type (The type key, which is new in Drupal 8, is required and indicates the type of extension, e.g. module, theme or profile.

Step 2: Creating .routing.yml

This routing system replaces the routing parts of hook_menu() in Drupal 7. The parts of hook_menu() that were used for creating menu entries, tabs.

A route is a path which returns some sort of content on.

For example, the default front page, '/node/2' is a route. When Drupal receives a request, it tries to match the requested path to a route it knows about. If the route is found, then the route's definition is used to return content. Otherwise, Drupal returns a 404.

In above code:

s31


1. {name} element in the URL is a path parameter and is available as $name in the controller method. e.g: resume.form

2. {path name} is url to access the page. e.g; /resume/my-form

3.  The {title} is title of the page. e.g: Application Form

4.  {module-name} is the name of our module. e.g: resume

Step 3: ResumeForm in the Drupal\resume\Form namespace, which implements the FormInterface and is defined in the file: modules/resume/src/Form/ResumeForm.php

In modules/resume/src/Form/ResumeForm.php. First we declare the namespace, the other classes we want to use, and extend the FormBase class. Some code:  

 s24 

Next we use to get code from some other classes, using the use PHP keyword and then the namespace, using the PSR-4 standard, which will autoload the classes in the files that correspond to these namespaces

s25

Now that we've our namespace, we'd like to use, we can declare our own class, ResumeForm extends the class FormBase, FormBase is the class we brought in as a dependency with this line: use Drupal\Core\Form\FormBase;

Form Creation: Which returns a Form API array that defines each of the elements your form is composed of.

Validation: After a user fills out the form and clicks the submit button it's common to want to perform some sort of validation on the data that's being collected. To do this with Drupal Form API we simply implement the validate form method from

\Drupal\Core\Form\FormBuilderInterface in our ResumeForm class.

Submission: Finally, we build the submit method. According to the FormInterface, we use: public function submitForm(array &$form, FormStateInterface $form_state).

Step 4: we are done with our drupal 8 Custom form. we can review the page by typing
d8/resume/myform

s21

Fill up all the required field and and click on save button.

s22

once you click on save button, you’ll get saved value info. as we are displaying this in the form.

s23

As per our Submit form source code it has to display all keys and values

s30

Conclusion: Going through from Drupal 7 form module to Drupal 8, I learned about more than just the Drupal 8 Form API. I've learned how hook_menu got replaced by routes and controllers, in YAML files and Controller.php files. I also learned how to use classes, and find the methods I could use by looking inside interfaces.
 

Git Source code: https://github.com/xaiwant/D8custom-form-with-field-data

Related:

How to create custom Form with CRUD operations in Drupal 8

Creating custom contact us block with a form field in Drupal 8

Feel Free to Talk to Us for your Enterprises


Download the Drupal Guide
Enter your email address to receive the guide.
get in touch