A Step by Step Guide to Drupal 7 Custom Theme Development

A Drupal theme is a collection of files that provides a presentation layer for a Drupal website. In my opinion the user experience and the user interface when combined with theming are as important as the backend architecture. It does not mean only writing the style.css files with random HTML markups. You can create a basic theme for your website quite effortlessly as all you need is a .info file and a css file. The files can be added to the theme, based on your requirements to have a better control while executing what you want your end user to see.

Here I am sharing my first experience at creating a Drupal theme which I hope will be useful for budding web developers.

The Theme Folder Structure

The first thing that you should be aware of is the folder structure in Drupal 7. The core themes that come shipped with the Drupal installation are placed in the themes directory of root folder. It is advisable to place all the extra themes in sites/all/themes directory. Meanwhile it is a good practice to place all the downloaded themes called themes in a separate folder called along with the custom themes in a folder called custom.

This is what a typical folder structure will look like :

..
..
sites
..all
….themes
…...contrib
……..bluemarine
……..omega
…...custom
……..blue
……..blue_admin
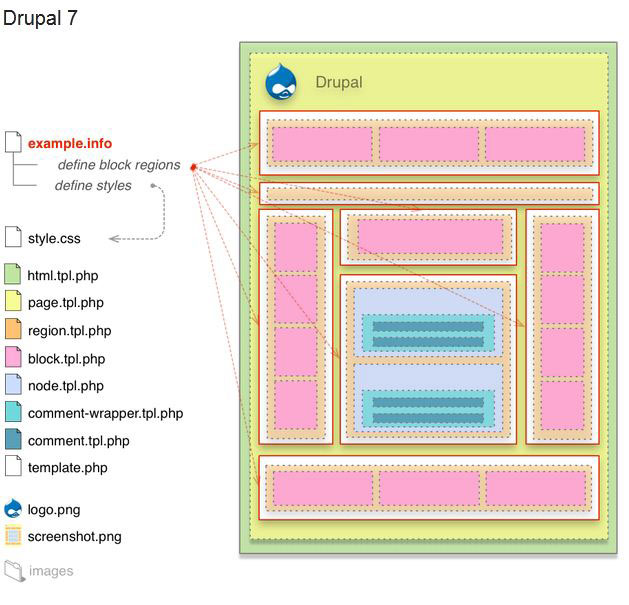
Drupal theme structure explained

A basic pictorial representation of the Bartik theme.

Source: https://www.drupal.org/node/171194

Overview of Theme Files>

The files associated with creating a theme are a mix of “one” text file (that is the .info file), PHP script, Javascript and Cascading Style Sheet file i.e CSS file.

Of all these files, the one you require is the .info file which tells Drupal about your theme. Though a CSS file is also necessary without which theme will look like a bunch of black text and images thrown in a webpage. All the other files are to make the theme more gripping and to customize the UI according to the palette. Below is the list of files that a theme can contain:

  • .info — A required file which provides information about the theme.
  • html.tpl.php—It displays the basic html structure of a single Drupal page.
  • page.tpl.php — The main template that defines the content on most of the pages.
  • style.css — The CSS file that sets the CSS rules for the template.
  • node.tpl.php — This file defines the content of the nodes.
  • block.tpl.php — It defines the content in the blocks.
  • comment.tpl.php — It defines the content in the comments.
  • template.php—It can be used to hold preprocessors for generating variables before they are merged with the markup inside .tpl.php files.
  • theme-settings.php—You can modify the entire theme settings form.
  • logo.png — Your logo, if you are using one.
  • screenshot.png — This is a screenshot of your theme that is used in the admin panel and in the user account settings if you have enabled more than one theme so that visitors can choose which theme they want to use.

...And this is how we do it

Now that you have got some idea about the files,let’s get started by creating a basic theme with custom regions, a CSS3 slider and a superfish dropdown menu. I am going to walk you through the process step by step based on how I went about it the first time.

Step I : Creating the .info file

The .info file is a static text file wherein you can provide information about the theme and specify CSS and javascripts that you would like to include. You can also specify features and toggle settings although it is a completely optional. This is how a .info file will look like :

name = Blue
description = A Custom Drupal 7 Theme
core = 7.x
regions[header] = Header
regions[banner] = Banner
regions[content] = Content
regions[sidebar] = Sidebar
regions[footer] = Footer

You may note that only the name and core is needed while everything else is optional. So, create a text file, enter the above lines and save as YOUR_THEME_NAME.info. Now your theme will appear under the theme list. Enable and set default to use the theme.

Lets have a look at the layout of the theme.
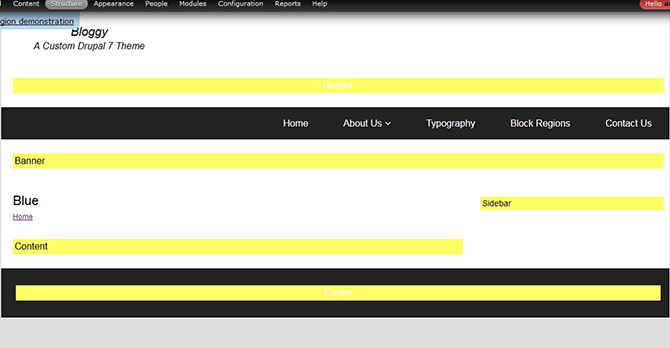
Custom Drupal Theme

P.S. : You won’t get the exact same result as you have not applied any CSS to the regions.

Step II : Creating page.tpl file

page.tpl is all about how a drupal page would look and where and how do you want to render the contents and the regions.

This is how you get it started :

IFrame

As you can see in the code, I have printed by main-menu using php in the header. Make sure you have created your main menu and added links to it. You can also create some content and blocks and assign them to regions.

Step III : Creating style.css

name = Blue
description = A Drupal 7 Theme for practice
core = 7.x
stylesheets[all][] = css/style.css
regions[header] = Header
regions[banner] = Banner
regions[content] = Content
regions[sidebar] = Sidebar
regions[footer] = Footer

To add a  CSS file to your theme,you must include the line

stylesheets[all][] = css/style.css.

You should make sure that you have given the right path.You can do the styling of your theme according to your design. Here’s how I have written my CSS :

IFrame

Step IV : Adding Javascript

name = Blue
description = A Drupal 7 Theme for practice
core = 7.x
stylesheets[all][] = css/style.css
scripts[] = js/theme.js
regions[header] = Header
regions[banner] = Banner
regions[content] = Content
regions[sidebar] = Sidebar
regions[footer] = Footer

scripts[] = js/theme.js

You have to use Javascript and CSS in order to make your drop menu function properly.There are a number of Javascript plugins to choose from. For my theme I chose superfish js plugin. You can implement the js library in two ways, one is by adding the js library from web within a

TIL – Access Object Properties via Variable

I have been struggling hard since morning as I try to figure out something that was pretty simple in the end . The goal was to create a node object by adding the node field object properties dynamically. Everything looked fine but still it was not adding up.

After burning nearly 4 hours I figured out what was wrong and now it seriously makes me feel like a noob :(

So lets say we have an object $obj which has a property test. So basically to put in data in the object we can access it like this and put in the value.

$obj->test = "Blah Blah!!"

But in my case I needed to insert the data accessing the property via a variable. I was trying to go about it like :

$obj->test = "Blah Blah!!"

And was getting error of illegal string offset.

After having tried to make it work in innumerable ways that went in vain, I finally got the solution.

What I had to do was to wrap the variable to make it accessible by the object.

So the proper working way came around as this:

$obj->{$test} = "Blah Blah!!"

Again, feeling like a noob in PHP programming after this. But it feels great because there is always something to learn everyday. #FeelingOptimistic :)

Reference :
http://stackoverflow.com/questions/3515861/how-can-i-access-an-object-property-named-as-a-variable-in-php
https://imalabya.wordpress.com/2015/04/10/til-access-object-properties-via-variable

Do your Content Marketing Efforts measure up with your User Engagement Goals?

If you are looking to rev up a content marketing campaign to improve your user engagement metrics, you might as well put in some thought into tweaking your Content Engagement Strategy. Successful content strategies center around the preferences of your target audience wherein the communication is focused on what they are interested in. Online content that caters to your target audience can be dished out in different formats(infographics, e-books, brochures, videos, podcasts) to involve them in spontaneous conversations which can be a real-time feedback for your content marketing efforts.

Let’s have a look at the ways in which you can reach out to your target audience with some value-adding content marketing efforts.

# Create a Content Engagement Strategy

Once you have established yourself as a thought leader, the next immediate task would be to engage your audience’s attention on a consistent basis. While developing an engagement strategy you are obligated to put in efforts to create content themes and topics based on an in-depth research. Your content should be of value to your audience as you continue progressing through different stages of your content marketing program. Quality matters, so don’t end up mass producing content instead of focusing on its uniqueness quotient.

# Define Your Customer Segments

One of the key elements in content marketing is maintaining a sharp focus on your customer segment. Although digital marketing affords you the luxury of reaching out to a much larger audience, a sound content marketing strategy would be to concentrate your efforts on driving home the message to a single customer segment. The task of aligning your content marketing strategy with targeted pitching will help you identify your target buyer persona in the long run.

# Establish a Connect Between the Content & Your Audience

Content is an effective medium to build some online credibility. The engagement factor in content marketing can be a measure of your performance as a thought leader. According to a study by Aol & Nielson approximately 27,000,000 pieces of content are shared across the web space each day. Your audience plays the dual role of an influencer and a curator while sharing your content across different social media platforms. This makes it an imperative to deliver the message convincingly with a certain knack for creativity as the audiences today have a built-in BS detector that can tell apart a genuine approach from an exaggerated attempt at connecting.

# Fine Tune Your Content : Know what Your Audience is Looking For

Good content delivers value while boosting the growth of your business.The availability of multiple content marketing platforms has made it easier for content marketers to create and share customer-centric content. As a content marketer it is important that you keep an ear out for what your niche audience, competitors and industry experts are talking about. While crafting a content strategy for your audience, make sure that you add a valid call to action so as to engage them in meaningful conversations and  faster conversions.

# Ensure Consistency : Deliver Reliable Content in a Timely Fashion

Consistent content creation and dispersal through blog posts, newsletters, online brochure pages, social media updates and press releases let you deliver the marketing messages for an unparalleled impact. The key to maintaining consistency lies in sticking to an Editorial Calendar with an itinerary for all the content that needs to be published in sync with a marketing campaign.

Post sales queries, FAQs, Post sales informational content can come in handy while keeping your customers enticed and loyal to the brand. In a nutshell, avoid self serving messages and promotional content while opting for value adding content that solves the pain points of your audience and fills in the content gaps.

# Track Your Social Engagement Metrics

Social media engagement helps promote the growth in brand awareness while impacting the overall traffic to a website. Conversation, Amplification, applause and economic value are some social media metrics that let you evaluate the performance of your content. The conversations and interactions happening on social media platforms like Twitter, Facebook or LinkedIn indicate how findable your content is. Meanwhile the the shareability quotient of your content is reflected in the retweets, re-shares and repins on the popular social media platforms. The more your content gets shared the better is the amplification rate for it.

# Engagement Marketing

Traditional marketing has given way to a more customer centric version of it where behaviour driven marketing and multi-channel engagement lead improved interaction with your audiences. Targeted media relations are basically built around the theme of customer engagement. Studies have revealed that consumers feel more engaged when a brand tends to reach out to them through personalized messages. A consumer today is not just a passive recipient of your marketing messages. Brands indulge in engagement marketing to reach out to their audience with informative and thought provoking content.

As a Content Contributor or a content strategist you must realize that the scope of content marketing is not just limited to creating better user engagement. Value adding content ultimately creates enhanced user experiences for your niche segment that keeps coming back to you for that "go-to-expertise" to get their product/service related issues resolved.

Integrating Drupal 7 with MongoDB to Manage Dynamic Web Content

MongoDB can be easily integrated with Drupal 7 to support millions of dynamic web pages on a daily basis to speed up the websites. This document oriented application is a schema less database that can store large files without complicating your stack.

Here’s a look at how to install MongoDB on Linux and integrated it with Drupal 7.

Step I : Install MongoDB on Linux

# Importing the MongoDB public GPG Key

The Ubuntu package management tools (i.e. dpkg and apt) ensure package consistency and authenticity as the distributors need to sign up with GPG keys. The following command is to be issued to import the MongoDB public GPG Key:

sudo apt-key adv --keyserver hkp://keyserver.ubuntu.com:80 --recv 7F0CEB10

# Creating a list file for MongoDB.

Create a list file called mongodb-org-3.0.list using the following command:

echo "deb https://repo.mongodb.org/apt/ubuntu "$(lsb_release -sc)"/mongodb-org/3.0 multiverse" | sudo tee /etc/apt/sources.list.d/mongodb-org-3.0.list
  
sudo apt-get update

# Installing the MongoDB packages.

Finally install the latest stable version of MongoDB.

sudo apt-get install -y mongodb-org

Reference: https://docs.mongodb.org/manual/tutorial/install-mongodb-on-ubuntu/


Step II : Installing the MongoDB PHP driver using Pecl

Install Pecl to install MongoDB PHP if it is not installed already.

# Install PEAR

PEAR is installed to put in place a package and distribution system that is used by both PEAR and PECL

sudo apt-get install php-pear

# The php5-dev package when installed lets you access the PHP5 source files that are needed to compile additional modules:

sudo apt-get install php5-dev

In case you fail to install the php-dev package before trying to install a PECL extension using “pear install”,the following error will show up on your screen :

sh: phpize: not found ERROR: `phpize’ failed

# The PECL_HTTP extension requires an additional dependency package to be installed. sudo apt-get install libcurl3-openssl-dev # Install MongoDB PHP driver using Pecl:

Pecl is the preferred way to install the MongoDB driver.

pecl install mongo

# Add the mongo extension to php.ini file to Configuring PHP To Use The Driver.

extension=mongo.so

Reference: https://www.mkfoster.com/2009/01/04/how-to-install-a-php-pecl-extensionmodule-on-ubuntu/

https://spf13.com/post/getting-started-with-drupal-and-mongodb

Step III : Configuring Drupal to use MongoDB plugin

Download the MongoDB module ( https://drupal.org/project/mongodb) like any other module and place it in sites/all/modules directory.

Although there isn’t an admin interface to configure MongoDB, it is a fairly easier task to configure it manually.First create a file called local.settings.php and it should be in the same directory as settings.php.

Populate the file with the following contents. Make sure you replace the placeholders [YOURDATABASENAME] and [SITENAME

 array( // Connection name/alias
    'host' => 'localhost', // Omit USER:PASS@ if Mongo isn't configured to use authentication.
    'db' => 'mongo' // Database name. Make something up, mongodb will automatically create the database.
  ),
);
include_once('./includes/cache.inc');
# -- Configure Cache
$conf['cache_backends'][] = 'sites/all/modules/mongodb/mongodb_cache/mongodb_cache.inc';
$conf['cache_class_cache'] = 'DrupalMongoDBCache';
$conf['cache_class_cache_bootstrap'] = 'DrupalMongoDBCache';
$conf['cache_default_class'] = 'DrupalMongoDBCache';
# -- Don't touch SQL if in Cache
$conf['page_cache_without_database'] = TRUE;
$conf['page_cache_invoke_hooks'] = FALSE;
# Session Caching
$conf['session_inc'] = 'sites/all/modules/mongodb/mongodb_session/mongodb_session.inc';
$conf['cache_session'] = 'DrupalMongoDBCache';
# Field Storage
$conf['field_storage_default'] = 'mongodb_field_storage';
# Message Queue
$conf['queue_default_class'] = 'MongoDBQueue';

Step IV : Enable the MongoDB module

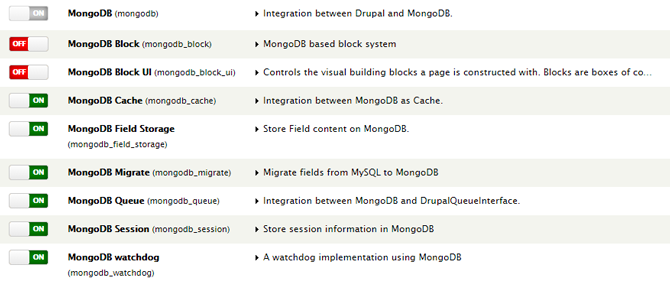
NB:If you want to use MongoDB Block module then you need to disable the core block module as it conflicts with MongoDB Block which in turn does not allow Drupal to enable the MongoDB plugin.

In our case we did not use the MongoDB Block so we kept using the core block module.

MongoDB Module Installation

Fix common issues in the MongoDB integration with Drupal

I encountered a few issues while using this module. The first issue I faced was while adding a content type field using field storage as it threw back a warning that said:

Notice: Undefined property: EntityFieldQuery::$propertyConditions in mongodb_field_storage_query()

I fixed this issue by applying this patch.

The second issue was with saving a new content or node. The warning issued was about the save method that is being used to save records in MongoDB as it is deprecated and we need to use ‘w’ instead.

I edited the mongodb_field_storage.module and made changes to line number 198

$collection->save($new_entity, array('safe' => TRUE));

to

$collection->save($new_entity, array('safe' => TRUE, 'w' => 1));

We at Valuebound are committed to furthering your business initiatives with our Enterprise level web solutions. For further information on our service offerings, pleaseContact Us

Content Marketing Strategy for Lead nurturing and Successful Conversions

The Lead nurturing process plays the part of a catalyst that triggers the movement of leads down a sales funnel. Apart from the momentum it provides, lead nurturing gets the conversation going with prospects as they move through different phases of lead conversion to becoming “sales ready”. Content Marketing has evolved into a critical resource that breeds familiarity and establishes trust in a B2B or B2C lead nurturing initiative.

The relevancy of your content not only establishes your credentials as a “Go to Industry Expert”, it also lets you have these brand conversations with your audience for improved engagement and eventual conversions. Here we have a look at some ways you can use Content Marketing to nurture your leads and improve your lead conversion rates.

# Content Mapping

When you are done creating some visually appealing content like an infographic or something more intensive like a video that in all probability is set to go viral, the next thing to do is to map your content. Content mapping lets you take the impact levels of your content notches higher than what regular promotion would do. Content Mapping from the context of buyer personas helps you organize content and create blueprints for content distribution through the right channels at the right time so as to resolve their queries and doubts at different stages in the buying cycle.

# Content Retargeting

Often regarded as a paid search marketing strategy, the prime aim of a retargeting campaign is to recapture the interest of your web audience and nurture them in the process. A Content retargeting campaign lets you improve brand recall to stay connected with your audience in order to help boost your engagement levels. A sound understanding of your audience’s objectives will help your content marketing team in creating a retargeting strategy that leverages high quality informative content in varying formats. Blog post ideas sourced from active social media channels can be used to create consumable content that can be accompanied by strong calls to action to retarget your customers.    

# Drip Campaigns

Drip nurturing your sales leads gets easier when the prospects are nurtured to a sales ready state with the help of relevant information that is sent via emails over regular intervals of time. Content resources in varying formats are effective tools to kickstart a Drip Campaign which is largely an automated process wherein the information is literally “dripped” to your leads to keep them engaged and informed.

These drips can be customized according to the initial reactions of your prospects, for instance promotional drips can be designed to entice prospects with promotional offers while competitive drips can be targeted to lure your competitor’s customer base. You can target a particular segment based on their preference/feedback regarding the frequency of messages, type of content and the format they would like to receive the content resources in. Marketing Automation Software automates this content personalization process by sending out emails at regular intervals during a drip campaign.

# Brand Storytelling/ Brand Journalism

A multitude of online platforms and other social networking sites let you tell stories and post brand messages through content. Social media is indeed a potent medium to deliver your business messages without an emphasis on direct promotion.The fact that the tone of your content resonates with your web audience is what renders your storytelling effective as it results in the brand message being shared across different channels.

Your content must be compelling and factual with a special emphasis on customer centricity so that it captures the emotional attention of your audience and encourages buying. Your stories must inspire change with the desired outcome being the driving force behind the direction of the story. A documented content strategy in the form of an Editorial Calendar ensures that your storytelling is consistent and right on track.

# Engagement Marketing

Engagement Marketing

If your digital marketing campaign is not yielding results as you have anticipated, it may be the right time to review your campaign goals and evaluate the engagement metrics. With an ever-increasing usage of Adblock technologies by the online population, indulging in hard-sell by sending out self-aggrandizing messages through content marketing channels is bound to fall flat in the long run. Customer engagement should be the key goal of your content marketing initiative if you want to build brand awareness. While focusing on a narrative that is thought provoking and problem solving all the same, you can rest assured that your lead nurturing efforts will hit the target.

A lead nurturing campaign expects you to have a long term content strategy that addresses the need for a steady flow of content that can be repurposed based on a particular stage in the buying cycle. It is important that you get acquainted with your target audience’s expectations and pre purchase behaviour patterns before a headlong dash into wooing them with promotional content and other offers.

We at Valuebound keep a tab on the latest B2B content marketing trends and developments to provide you with Enterprise level web solutions to boost your digital marketing initiatives. For more information on our service offerings, please Contact Us

How to Create Custom Web Services for Drupal 7

Web based service applications/web services integrate different network platforms, applications, softwares and various other services to help you enjoy a seamless experience. Custom Web services allow you to display content from one site to another using the Services module.

In one of the recent project, we need to exposes value of filed collection items of a node via API. But default services provides only node values. THere Default services module does not provide the values from field collection items of a node while written custom web services can be used to fetch paired values of field collection items. I have created a Custom Web Service to get the Field Collection item value. I began with creating one content type “Housing Scheme” with the fields listed below :

# Title (Text)
# About Scheme ( Long Text)
# Distance from the City (Text)
# Nearest Major City ( Text)
# Locality Review( Long Text)
# Property Description ( Field Collection)

For this purpose, I used Drupal 7 and the Services module. I have written a custom module to handle the back end. The first step would be to download and install the Services module and enable the REST Server module that comes together with it.

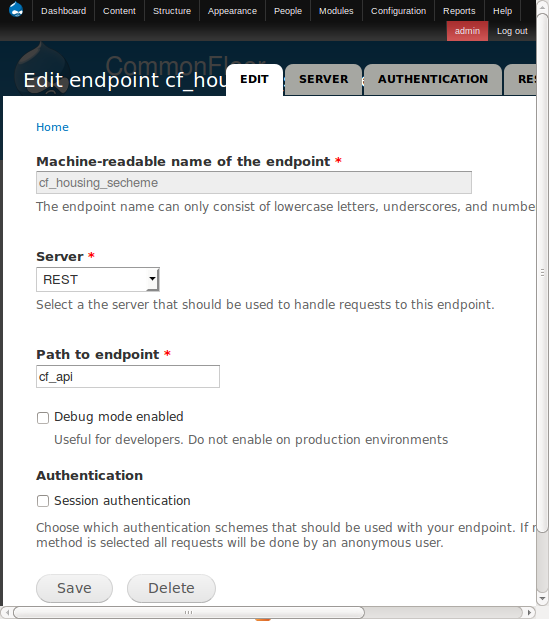
Step I : Add service

To create a service you have to navigate to Service UI (admin/structure/services) and then click add service.

Add service

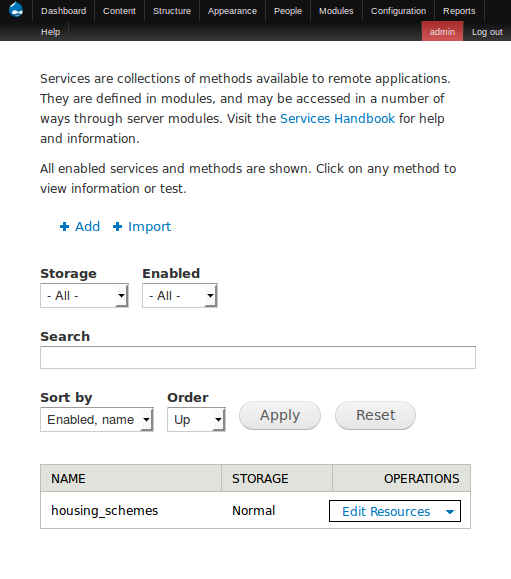
Step II : Open the Resources Page

The Open Resources Page will show a service list after you have saved a new service in it.

Now edit resources.

Service list page

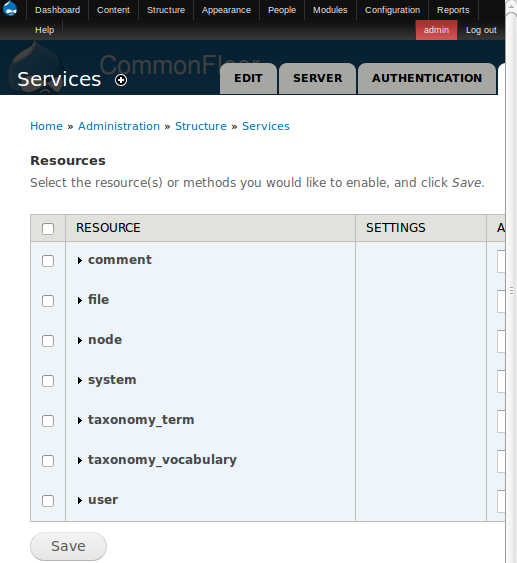
Resources are available in default setup where all resources come hard-coded with the Services module.

Drupal Resources List

Step III : Create Custom Module

As my resources are not showing yet I have created a custom module for the same:

# Created custom module “housing_schemes_services”.
# Created directory for custom Drupal module in my Drupal site: /www/sites/all/modules/housing_schemes_services

I have empty files in my module directory:

  • housing_schemes_services.info
  • housing_schemes_services.module
  • includes/housing_schemes.services.inc

Step IV: Create the .info file

I added this code in housing_schemes.info file:

name = Housing Schemes Services
description = WebService APIs for Housing Schemes.
core = 7.x
package = Housing Schemes
project = housing_schemes
dependencies[] = services
dependencies[] = rest_server


Step V : Create the .module file

Then I added this code in housing_schemes_services.module:

/**
 * @file
 * Module file for Housing Schemes Services.
 * Contains the resource declarations for the service APIs
 * and other commons functions/hooks. if necessary
 */

/**
 * Implements hook_services_resources().
 * Create service resource for APIs to return the necessary json data.
 */
function housing_schemes_services_services_resources() {
  $resources = array();

//Include the necessary inc files.
  module_load_include('inc', 'housing_schemes_services', 'includes/housing_schemes.services');

//Service Apis for contents.
  $resources += housing_schemes_services_resource();

  return $resources;
}

Step VI : Create the .inc file

Finally I added this code in the housing_schemes.services.inc file:

function housing_schemes_services_resource() {
  $api = array(
	'housing_schemes' => array(
  	'operations' => array(
    	'retrieve' => array(
      	'help' => 'Retrieves housing schemes info.',
      	'file' => array(
        	'type' => 'inc',
        	'module' => 'housing_schemes_services',
        	'name' => 'includes/housing_schemes.services',
      	),
      	'callback' => 'housing_schemes_services_resource_retrieve',
      	'access callback' => 'user_access',
      	'access arguments' => array('access content'),
      	'access arguments append' => FALSE,
      	'args' => array(
        	array(
          	'name' => 'nid',
          	'type' => 'int',
          	'description' => 'Function to perform',
          	'source' => array(
            	'path' => '0'
          	),
          	'optional' => TRUE,
          	'default' => '0',
        	),
      	),
    	),
      	),
	),
  );

  return $api;
}

Created callback function retrieve

/**
 * [housing_schemes_services_resource_retrieve] definition.
 * Returns the information about a housing scheme.
 * @param $nid
 *   The nid of the housing_scheme node.
 * @return array
 *	The node processed information array.
 */
function housing_schemes_services_resource_retrieve($nid) {
  $node = node_load($nid);
  //Check if the node type is housing schemes.
  if ($node->type == 'housing_schemes') {
//Get PROPERTY DESCRIPTION data from field collection.
$property_description = $node->field_property_description[LANGUAGE_NONE][0][‘value’];
// here we are loading field collection
$pd_item = field_collection_item_load($property_description);

//getting field collection item value.
$pd_item_values = array(
  ‘scheme_type’ => $pd_item->field_scheme_type[LANGUAGE_NONE][0][‘value’],
  ‘area’ => $pd_item->field_area[LANGUAGE_NONE][0][‘value’],
  ‘property_type’ => $pd_item->field_property_type[LANGUAGE_NONE][0][‘value’],
  ‘budget’ => $pd_item->field_budget[LANGUAGE_NONE][0][‘value’],
);

	//PROPERTY DESCRIPTION ENDS.


//Create return object.
$return_obj = array(
  'scheme_name' => $node->title,
  'scheme_id' => $node->nid,
  'created_date' => $node->created,
  'about_scheme'=>$node->field_about_scheme[LANGUAGE_NONE][0]['value'],
  'distance_from_the_city'=>$node->field_from_city[LANGUAGE_NONE][0]['value'],
  'nearest_major_city' => $node->field_nearest_city[LANGUAGE_NONE][0]['value'],
  'locality_review' =>$node->field_locality_review[LANGUAGE_NONE][0]['value'],  
'property_description' => $pd_item_values,
	);
  }

  return $return_obj;
}

Step VII : Enable the Custom Drupal Module

Enable custom Module "Housing Scheme Services".

Enabling housing scheme services

Step VIII : Enable the Custom Service Resource

On Drupal site:

  1. Go to admin/structure/services/list/housing_scheme/resources
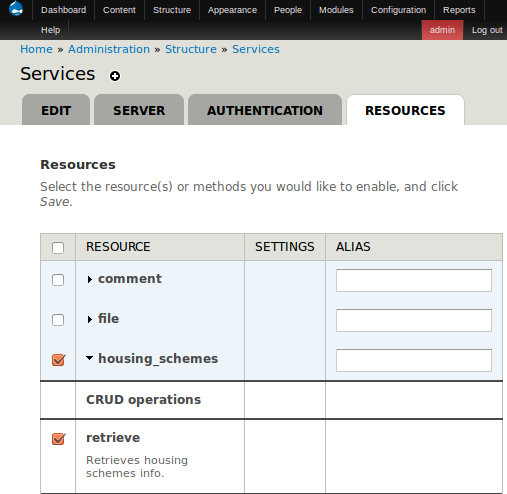
  2. Expand the "housing_schemes" under the "Resource" column then check the box and click save.

Custom resource

Test the Custom Service Resource

After enabling the resource you will be able to query the service by navigating to this path :

http://localhost/drupal/cf_api/housing_scheme/{{nodeid}}.json

It will return the Housing Scheme’s node details so that you are able to get field collection item values in your Services. You should be able to use JSON dump to consume the data in your application.

We at Valuebound are committed to creating exceptional web experiences and solutions based on your unique business needs. For further information on our service offerings, please Contact Us.

Cheatsheet for an Editorial Calendar : Gearing up for a Content Marketing Initiative

A Content Marketing campaign gains the right momentum when the entire content creation process has been scheduled in advance. The chief objective of having an editorial calendar is to showcase your content before the right audience at the right time. An ideal content calendar lets you save time while ensuring consistent content creation and repurposing. A key content marketing tool, an editorial calendar is instrumental in tending to your web properties as it lets you plan beforehand in more ways than one that we have covered here.

# Get a grip on your Basics : Let the Ideas germinate

Before you go about the task of filling in the entries for a content creation schedule, it is crucial that you take stock of the who’s,hows and whys of your Content marketing strategy. After you have identified your target audience and the motive behind content creation, the ideation phase lets you come up with probable content ideas and formats that are ideal for content generation. The Editorial Calendar must be designed in a way to keep the content contributors and the key stakeholders in the loop about how the Content Marketing initiative is progressing.

#  Plan ahead : Calendar for Content Strategy

The more well-defined your target, the clearer is your content strategy. While creating content for a specific audience the focus should be on the generation of marketing content that is customer centric. An editorial calendar brings in a disciplined approach that lets you attach a time frame or a deadline for your content marketing efforts. A regularly updated publishing schedule will make it easier to keep track of your content plans. If you are planning a viral marketing campaign on popular social marketing platforms, a content calendar that keeps track of the content generation and the frequency of social media postings is exactly what you need.

# Repurposing Content : Recycle your Best Content

An editorial Calendar affords you the much needed luxury of repurposing your content. As you keep repeating your valuable content in varying formats, the content marketing initiative receives a major boost as the shelf-life of your content increases. It lets you minimize the time lost in the ideation and creation of fresh content. For instance a blog post can be repurposed into a slideshow or an infographic while multiple blog posts from a particular series can be clubbed together to create an E-book.

# Master Editorial Calendar:Get an Overview

A Master Editorial Calendar is meant to provide you with a monthly/weekly overview of how your content marketing efforts have paid off. It lets you create a Content Timeline on a monthly,quarterly or annual basis. A content log helps you keep track of the changes made in the content based on date it was published on.You could also add data from analytics tools like Google Analytics to the calendar and track the performance of all your content items on different platforms.

# Track new ideas using a Content Calendar

An Editorial Calendar lets you record content ideas generated during all those brainstorming sessions or the inspirational moments in the ideation phase. Editorial Calendar tools cater to both SMEs and major organizations alike as they play a major role in keeping the content consistent and relevant. Google Doc is a widely used Editorial Calendar solution for its ability to support collaborative editing while you go about scheduling your weekly/monthly content calendar.

Kapost is another popular editorial calendar tool that helps you track the workflow of your content marketing strategy through the ideation, execution and promotion stages. This software would be an ideal choice if you plan on generating large volumes of content. Content Marketing tools like Gather Content can be used in sync with editorial calendar solutions like Excel spreadsheet/ Google Spreadsheet.

The current process of planning a content marketing initiative revolves around content amplification strategies that are executed in accordance with the schedule in a content calendar. Although there are multiple Editorial Calendar formats available to choose from, you should ideally stick to a single format that you have zeroed in on based on your business model.

We at Valuebound keep a tab on the latest B2B content marketing trends and developments to provide you with Enterprise level web solutions to boost your digital marketing initiatives. For more information on our service offerings, please Contact Us

How to Set up Instamojo Payment Gateway Module in Drupal Commerce

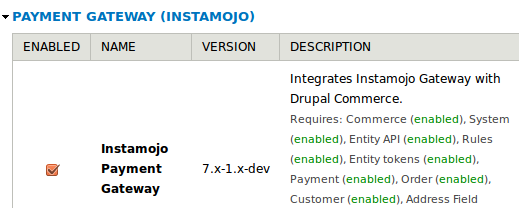
The Instamojo Payment Gateway is an easy way to collect payments for the digital sale of products ranging from instant downloads and subscriptions to physical goods and business services. To install the Commerce Instamojo Payment Gateway Module in your Drupal commerce (https://www.drupal.org/project/commerce), download the module and add it to your sites/all/modules directory. Enable it under /admin/build/modules.

Enable instamojo module

Configuring the Module

Step I

Login to your Instamojo account and create a payment link. You can select the “Pay What You Want” option for pricing your products.

Create a Payment Link in your Instamojo account

Step II

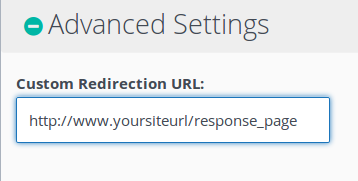
Navigate to Advanced Settings of the payment link to put your site URL/response_page and click on the “Get Started” button.

Advance settings of payment link

Add custom redirection URL as yoursiteurl/response_page. Replace yoursiteurl with your own site URL.

Step III

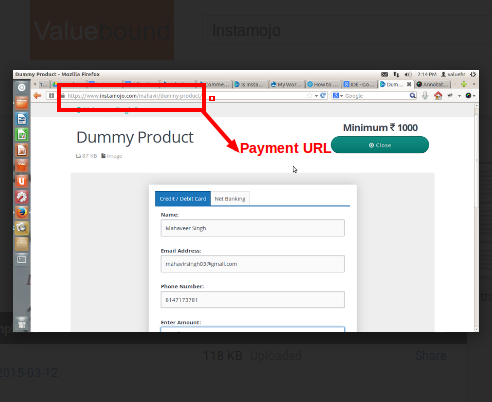
The Payment Link will look like this : instamojo-name/username/slug. The payment URL link is to be added in the module configuration page. Copy the payment URL as shown in the screenshot below :

Payment URL link

Step IV

Now navigate to the Instamojo Dashboard’s Footer and click on the Developers link.

developer link on Instamojo site

Step V

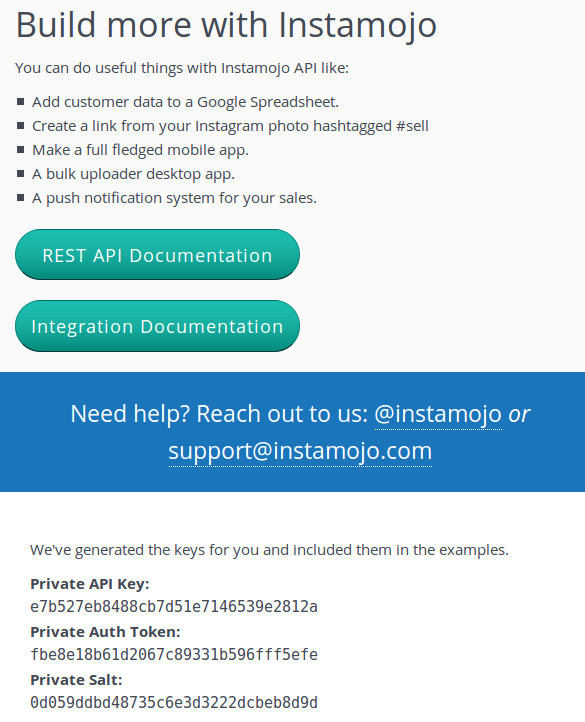
On your developers Page, you will find the Private API Key & the Private Authentication Token.

Instamojo for Developers-API & Auth Token

Step VI

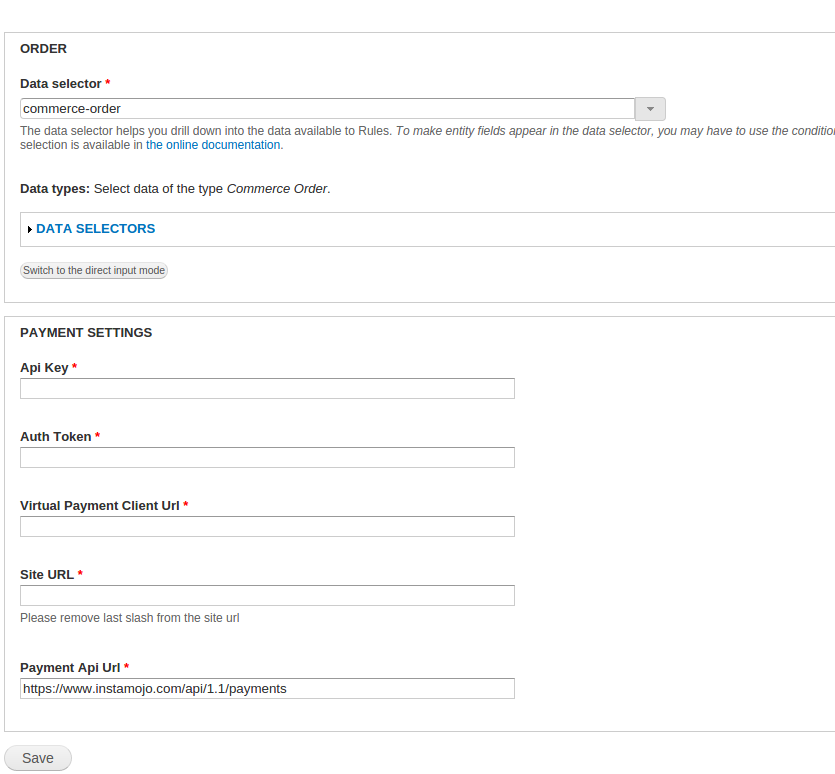
Now fill the values on module configuration page.

Store > Configuration > Payment Methods

Or you can browse directly through : http://mystore.com/admin/commerce/config/payment-methods

Private API Key & Token: Copy it from Step VI

Virtual Payment Client Url : URL copied as in Step III

Site URL: your_site_url (Replace this with your site URL without “/”)

Current Payment Api URL: https://www.instamojo.com/api/1.1/payments

Instamojo Drupal Module Configuration Page

Now you are all set to use the Instamojo Payment Gateway.

If you face any issues while setting up the module, please update it in Drupal issue queue here. You can also Contact us for site specific paid customization of the module and further information on our service offerings.

Structuring a Content Marketing Squad : Have you put together the Dream Team ?

Content Marketing is a multi-phase process that rides on the expertise of a well structured content marketing team. Content professionals are responsible for creating content that is not only coherent but appealing to a target audience for its convincing undertone and undeniable credibility. A content creator par excellence is a thought leader and a strategist bundled up together to add value to a content marketing team. The eventual quest for putting together a strategic mix of talent that is passionate about content can be broken down into a few sub-tasks as described here.

How to identify the Key Stakeholders?

A well structured Content Marketing Team is characterised by well defined roles and responsibilities. Content marketing professionals assume various responsibilities on a content marketing team based on their interests and core competencies. While some may enjoy coming up with creative ideas for content per se, strategizing and online promotional activity may be the forte for others. But if we talk about a professional Content Marketing unit that is passionately committed to the Content marketing initiative, it is definitely a structured team with well defined roles that wins the day hands down.

# Content Director/ Managing Editor

As an Opera Director involved in the ideation stages of scripting, stage setting and guiding performances in a theatrical, the Content Director is in charge of the entire Content Marketing initiative. A Content Editor is responsible for editorial management, content design approval and finalizing web, print or event resources. According to a report by Altimeter, a leader at the helm of a Content Marketing Team in an organization is a Content Evangelist who creates and monitors B2B content strategies for operating a content machine manned by a dedicated team of Content professionals.

# Content Strategists

As digital storytelling continues to rule the roost in online marketing, the role of a Content Strategist has evolved into that of a storyteller who can refine a content marketing initiative. Folks from Copywriting and Advertising backgrounds can add that extra zing to a content strategist’s role in a structured Content Marketing team. A Content Strategy basically revolves around the theory that there are multiple content resources at a content strategist’s disposal that are yet to be unexplored.

# Content Ideation Experts

They are ideation experts who are not necessarily engaged in content creation themselves but are the lifeblood of a brainstorming session. A content ideation expert could be anyone who is well acquainted with the industry related topics trending in the virtual marketplace. Although they are not a core member of a structured content marketing team, ideation experts can be invited over for their valuable suggestions and content generation ideas.

# Web Content Promoters

Content Promoters are part of the Content crew that is entrusted with the task of sharing and promoting the content across different social media platforms. They are expert social media networkers who have perfected the art of deciphering the web audience’s inclination towards a specific brand of web content. Although their main job is to promote the published web content, a Content promoter manages to reach a wider audience if they have an established brand persona for themselves on the social media.

# Web Content Specialist /Content Creator

A Content Creator is the glue in the Content marketing team as they put all the ideation and planning into audience ready formats. The backbone of any Content Marketing Campaign, a Content Creator or the Web Content Specialist is the person who coordinates with the Marketing Managers and technical staff to create and update dynamic web content. Their responsibilities also include scheduling and timely implementation of marketing campaigns and other promotional activities. Their skill sets are a combination of analytical thinking and creativity to craft strong visual presentations that maximize the impact of the content generated.

# Content Analyst

A Content Analyst is an individual who puts in the hours to assess the impact of your marketing campaign by reviewing the analytics for the promotional content. This person is responsible for evaluating the level of engagement based on the social shares, amount of traffic generated, search rankings and lead conversions. Their analysis lets you figure out the type of content that resonates with your target audience along with ways to optimize the entire content generation and promotion cycle.

Where to Look for the right Content Minded Marketers?

The search for potential candidates for your ideal Content Marketing Team should begin in your own backyard as there will be no dearth of enthusiastic internal contributors there. You can assign content creation jobs to your internal contributors based on their area of expertise or subject of interest. The tasks of content ideation, creation, editing, promotion and analysis can be delegated within the organization based on the aptitude and inclination of your employees. You can assign the content creation job  to an Agency in case you need a specific amount of content to be generated at a given time.

What to Look for in the prospective Content Professional?

The passion for ideating or generating unique content is an imperative quality that a content professional must possess. Members of a Content Marketing team should ideally have rock solid writing and editing skills with a keen eye for the details. Organizational skills,a disciplined approach and a reasonably sharp business acumen are some other plus points that will make the team a strategic unit that clubs in powerful and actionable insights.

How to hire an Undefeatable Content Marketing Team?

The Content Professionals may have to work in a cross-functional environment wherein they will have to coordinate with developers, product management teams or marketing specialists. Although there are no hard and fast rules on the how to hire the right Content Marketing personnel, the key lies in finding the right talent at the right time. Professionals should be hired based on the fact that each member of the team will have a definitive role to play in the content marketing initiative.

We at Valuebound keep a tab on the latest B2B content marketing trends and developments to provide you with Enterprise level web solutions to boost your digital marketing initiatives. For more information on our service offerings, please Contact Us.

Valuebound releases Commerce Instamojo Payment Gateway integration module

Valuebound has released the Commerce Instamojo Payment Gateway Module to integrate Drupal Commerce with Instamojo Payment Gateway.

Instamojo is a payment solution that can be seamlessly integrated with a business website. Its remote checkout feature combined with the ease of using add-on services like Discount Codes makes it a smoothly functioning Internet Payment Gateway. It has found favour with some top of the line E-commerce vendors as it significantly improves the conversion rates when integrated with an e-commerce website.

Requirements:

# You need to create a merchant account with Instamojo.

# Commerce Kickstart 7.x

OR

Drupal 7.x +

- commerce module
- commerce_payment module
- commerce_ui module
- commerce_order module

Installation & Configuration

Step I

The first thing to do is to download and install the Commerce Instamojo Payment Gateway Module.This module will successfully integrate Drupal Commerce with Instamojo Payment Gateway. The module should be placed in /sites/all/modules to create a path [DRUPAL-ROOT-FOLDER]/sites/all/modules/commerce_instamojo], before enabling it on a Drupal Commerce website.

Step II

The module needs to be enabled before it is configured at admin/modules.

instamojo_module_enable_page.png

Step III

After enabling the module the next step is to configure it by clicking on the Configure link :

instamojo configuration page

Step IV

After the module has been configured the next step is to choose Instamojo Payment Gateway as your payment method.

You can download the module here. Valuebound is a regular contributor of code to the Drupal Community. We at Valuebound understand your unique business needs and cater to them with our enterprise level web solutions. For further information on our service offerings or customizing this module, please Contact Us.

Disclaimer : The brand names and logos used herein are the sole properties of their respective owners. None of the listings here are intended to imply any endorsement or direct affliation with respective companies.

Download the Drupal Guide
Enter your email address to receive the guide.
get in touch