e-Learning: Challenges and Solutions

There are over 1.6 billion students across 150 countries who have been affected by the COVID-19 pandemic in the last two years, according to recent reports by The World Bank. As an immediate response to recurrent lockdowns, Institutions adopted e-learning or remote learning solutions. To simplify e-learning, there has been a significant surge in online learning tools supporting video conferencing, learning applications, and virtual tutoring. India’s Ed-Tech journey dates back to 1990’s with the launch of companies like Educomp. In this blog, we shall discuss the rise of e-learning, the response of ed-tech companies to cater to the education market, challenges and solutions around online classrooms.
Response of Ed-Tech to cater education sector
The development of next-gen advanced learning technologies to cater to the rising remote learning landscape is an immediate response of ed-tech companies. There has been a dramatic increase in AI-based learning applications, mobile learning firms, and mostly ed-tech unicorns. To put this in perspective, the world online education market is projected to reach $350 Billion in the next three years. The investments made in the ed-tech companies reached a historic height of $18.66 Billion in 2019.
In response to the rising demand for online learning models, various education technology companies like BYJU’s and Tencent classroom, have seen a significant rise. After the Government in China instructed about a quarter of one billion full-time students to begin online studies, Tencent Classroom saw 81% of K-12 students attending online school in Wuhan.
Video conferencing apps for teacher-student interaction and collaboration, real-time project co-editing, calendar scheduling, and auto-translation apps are other tools that bolster education capabilities. Rise of the digital options, engineering capabilities, and distance learning solutions to cater to the rising demand of e-learning are some of the immediate responses amidst and above lockdowns.
Emerging evidence of the effectiveness of remote learning during the pandemic has led to a rapid revolution of the education sector, but will the hybrid model of education sustain, or emerge? Some suggest that unplanned e-learning with little preparation, no training, and limited bandwidth is unconducive for sustained growth. This poses some challenges of e-learning that still need to be tackled.
Challenges of e-learning
Among the key challenges of online education are-
Technological limitations
No training, limited bandwidth, and lesser preparation especially in remote locations are among the major constraint of online classrooms. The disparity among students regarding access to necessities for e-learning, like a computer device, and internet connection are among the key challenge. In Austria, Norway, and Switzerland some 95% of the students have access to a computer, while in Indonesia only 34% can get this accessibility, according to the data from OECD. Difficulties with modern technology include installation issues, downloading errors, audio and visual problems, login issues, and more. Technical problems, and difficulty in understanding key instructional goals form major barriers in remote learning.
Limitation with students’ learning capabilities
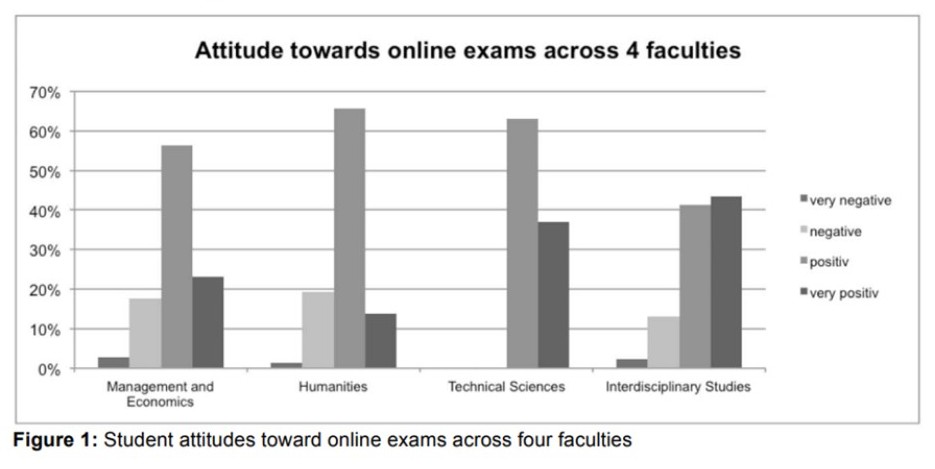
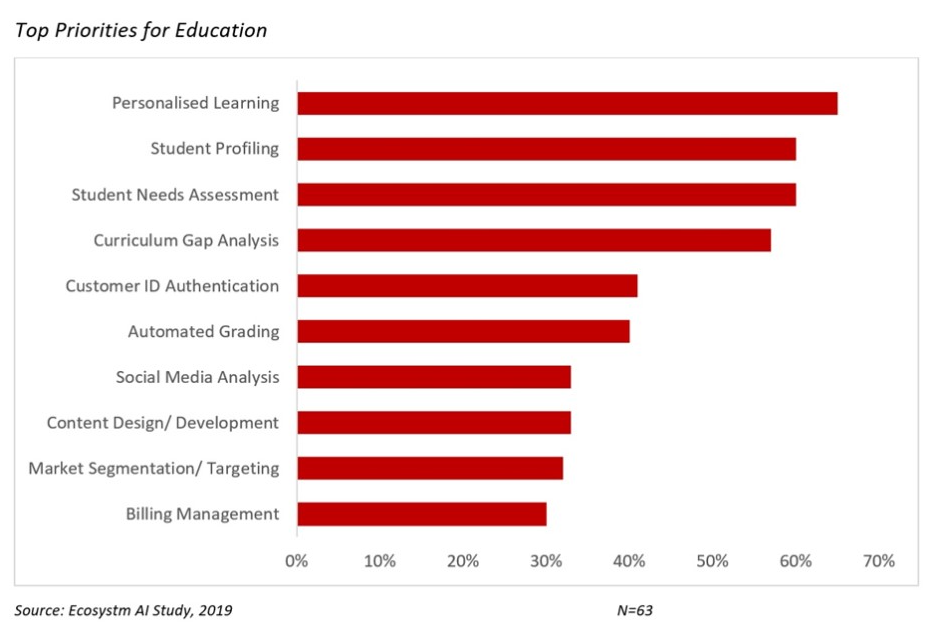
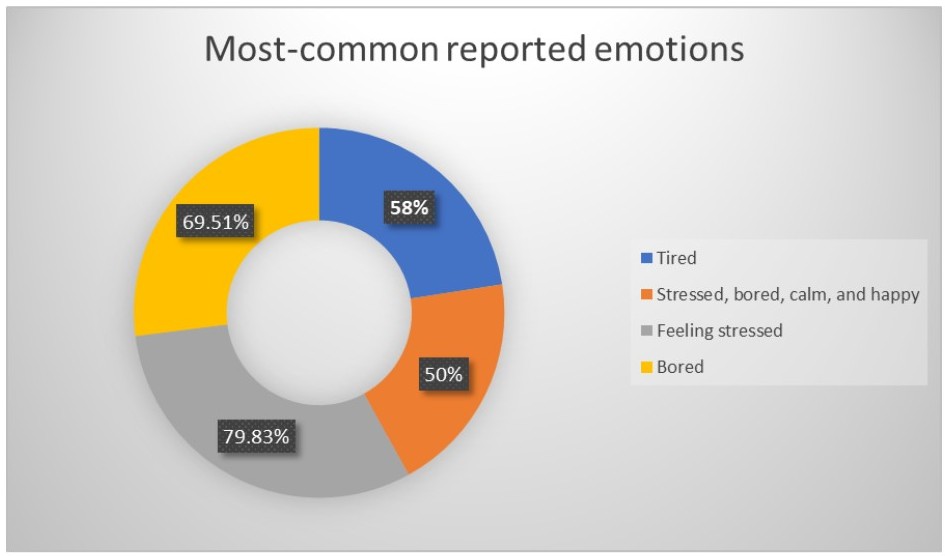
Students with limited learning capabilities or disadvantaged backgrounds struggle to adapt to e-learning methodology. UNICEF data shows that as many as 463 million children could not adapt to online education due to economic disadvantage. A major portion of students across the world find e-learning boring. Among 21,678 U.S. high school students surveyed by Yale, about 75% had a negative self-reported feeling regarding remote learning. A chunk of students feels disengaged or bored about 60% of the time (refer to Fig.1).
Limitations at the teachers’ end
Exhausted teachers are another factor that must be considered while talking about the obstacles of e-learning. Lack of personal attention and absence of two-way interaction is another key challenge of e-learning methodology. Mediocre content of course curriculum adds to major issue as well. There’s also a lower level of preparedness among students, and also some teachers regarding the use of Learning Management Systems (LMS). Building a positive learning attitude among students is a key challenge of e-learning, especially for the teachers.
Solutions to Challenges
While building a digital education ecosystem seems the only possible solution right now, e-learning is perhaps only 10% of the whole scenario. Digital education shouldn’t be solely seen in reference to technologies and innovative solutions but must be able to include other critical areas regarding all levels of education. Some of the possible solutions to key challenges of e-learning are-
Building an all-inclusive academic infrastructure
A digital education ecosystem must be inclusive of a robust academic infrastructure that does not remain confined to labs or virtual classrooms, but also include examination conducting, admissions, and providing analytics and insights to parents and students. The education industry also must weave elements of alumni connections, incubation, internships, and placements in the ecosystem.
Focusing on students’ and teachers’ needs
Sustaining non-cognitive skills like motivation, goals, and personality traits, among students should be a focus since these factors can create a direct and positive result in context with socio-economic outcomes. An effective hybrid digital education model must incorporate technology-based interaction among students and teachers for higher engagement. Online course curriculum must include dynamic, interactive, and more interesting activities to hone students’ skills. Content relevance, effective strategies, and group-based activities can help in enriching content. Humanizing learning processes and using group forums or social media for interaction can help in 1:1 communication amongst students, teachers, and parents.
Adopting innovative technological approach
Innovative pedagogies for education delivery, certifications, assessments, student administration, industry and governance linkage, campus activities, and alumni engagement, must be implemented. Fixing technical issues with content testing, pre-recorded video lectures, and having Plan B in place can be the possible solutions. Finding solutions by focusing on pedagogical issues, and laying greater emphasis on case learning, collaborative learning, and project-based online instruction can go a long way. While Edtech cannot replace personal interaction, it can contribute to instruction enhancement to make content delivery interesting, and engaging. Governments must work to bring down the digital divide by focusing on threefold objectives- equity, accessibility, and quality.
Conclusion
The EdTech sector has boomed in the wake of rising online education amidst pandemics. By 2021, the Edtech sector reached about 2 billion dollars, and continue to rise this year and beyond, according to Google and KPMG reports. However, the challenge of the education sector doesn’t just remain confined to finding new technologies, but also reviving the whole digital education ecosystem with reimagination. Helping students, teachers, and also parents with digital literacy, especially in remote and inaccessible regions is the key here.