Digital Transformation in Pharma

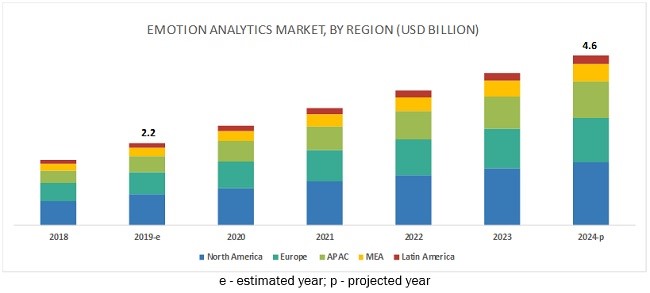
74% pharma companies reported paced up digital efforts in response to the pandemic, suggests a study, which means the spend on digital transformation in pharma could touch the $4.5 billion mark by 2030. On data analytics itself, pharmaceutical manufacturers would spend a whopping $1.2 billion in the next 7 years, ABI Research suggests. Even though pharma executives have already explored or planned to get the potential of digitalization in the sector, still a lot of them find it arduous to determine which initiatives they must adopt, and how.
Pharma digitization challenges fall under four main categories-
- Cash: like limited resources
- Competency: increased customer expectations, external competition, counterfeit medicines market etc.
- Capacity: data silos, and disparate systems
- Control: protecting critical and sensitive R&D data
Success of a digital strategy depends upon setting clear goals and strategy, followed by robust execution. In this blog, we discuss the challenges in selecting the right digital tools, define objectives and provide a roadmap for successful digitization of pharmaceuticals.
What does digitization mean for pharma?
Digitalization of the pharmaceutical sector includes implementation of digital technologies that can improvise products and services associated with healthcare like:
- Drug development
- Better R&D in drugs
- Achieving better patient care and interaction
- Improved pharmaceutical distribution
- Achieving transparency in supply chain
- Reduced carbon impact, etc.
How to digitize pharma?
Enterprise digital transformations for pharma companies should ensure end-to-end tech capabilities across processes, experiences, and brand. Consolidated digitization spans across business units, value chain, therapeutic area, technology infrastructure, innovation, data, and strategic focus, which includes therapy, patient, and leadership.
By adopting such a holistic approach, Sanofi had “risen in digital maturity from below average in mid-2019 to among the top 10 percent of pharma companies globally, by 2021,” says Dr. Pius S. Hornstein, presiding over Sanofi's China business.
Setting digital strategy objectives
Deloitte suggests setting digital strategy objectives across six critical areas:
- Customer-focused models- Driving operations and strategies from patient and healthcare professionals perspectives.
- Agile model approach- Rapid response to predictable and unpredictable circumstances.
- End-to-End connected model- Getting enterprise insights through connected business and democratized data.
- Intelligent optimization- Continuous optimization of processes enabled through extensive data and tech tools like IoT, Blockchain, and intelligent workflow.
- Predictive and holistic insights- Helping with accelerated decision making.
- Virtual, flexible, and unbounded workforce and organization.
Four Pillars of Digital transformation Strategy
Partnership with organizations including tech experts
To thrive in an ecosystem with complex collaborations, it is essential to partner with tech vendors, and integration partners who can help with back-end data sources through IT solutions. Data integration is essential for business functions like financial reporting, product marketing. Tech vendors help pharma companies with new app launches, testing beta versions of digital products, and successful integrations.
Getting digital tools to significantly improve patient experience
Digital apps like disease management solutions working alongside medication significantly improve patient experience and value of treatment. Companies planning to scale commercially should begin their digital journey like a start-up, suggests Forbes. A key approach here could be to demonstrate value proposition by testing first, and then innovating on digital products based on patient feedback, and data.
Data integration, data analytics and insights plays a significant digital solution, because it helps in identifying market trends, forecasting shortage of resources, and identifying operational efficiencies. Developing and implementing CTMS or clinical trial management systems is another key aspect. CTMS enables streamlining data transfer, improving research documentation, adding transparency, and solving challenges of competency and capacity.
Scalability through automation
Mechanizing data exchange and automation creates cost saving and incremental revenue, thus driving a significant value proposition. Digital platforms and APIs help in real-time collaboration across channels, and stakeholders, and help in connecting different technologies at multiple locations, thus providing real-time visibility.
Applications that are designed to automate data exchange between electronic data capture (EDC) and electronic health record (EHR) can remedy the challenge of interoperability. For example, a SaaS based digital solution can remotely access a patient’s information, and provide automated, verified, accurate, and traceable data.
Journal Biostatistics suggests that AI and ML technologies can help pharma companies in selecting the most promising compounds among thousands of them for a drug role. This can narrow down the time span of drug discovery from 4-5 years to a few months, which reduces cost and speeds up chances of regulatory approvals.
Digitizing core processes of business
With virtual audits during pandemic, live-saving drug development could be kept on track. This method allowed pharma companies to meet virtually with regulatory authorities, global teams, suppliers, and customers. Automation and integration of the operational core helps in delivering intelligent operations, enterprise connectivity, and efficient management. For many pharma companies today, digitizing core processes like HR, training, and finance is a part of holistic strategy.
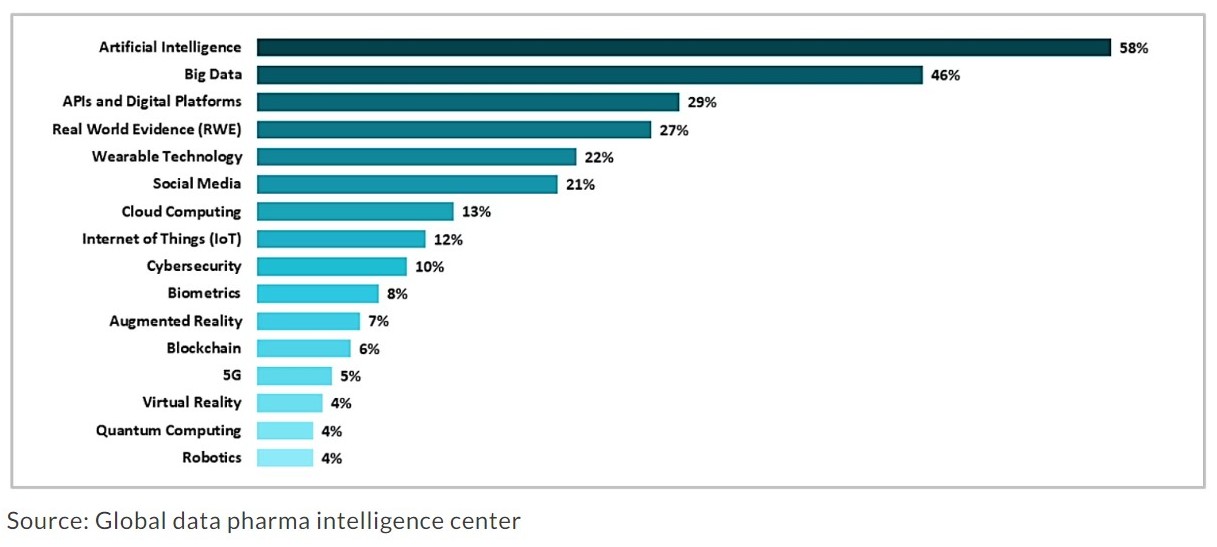
Key technologies enabling digitization in pharma sector
Some of the disruptive technologies in pharmaceutical sector include Artificial Intelligence (AI), Big Data, APIs and Digital Platforms, Real World Evidence (RWE), Wearable Technology, Cloud Computing, Internet of Things (IoT), Blockchain, and Robotics among others (Fig.1)
Internet of Things (IoT) is a critical disruptive technology behind digitization of the supply chain, which particularly helps in overcoming the challenge of counterfeit medicines market. Use of sensors, mobile technology, blockchain, and cloud allows suppliers and customers to properly track physical drugs across the supply chain.
AI, Machine Learning, and Advanced Analytics assist in drug discovery and improving life-saving drugs production, disease diagnosis, predictive forecasting for analyzing large data for clinical trials, enabling drug trials, and getting real-time data for efficient risk management. For example, Harvard medical school collaborated with Novartis for exploring early drug reactions with the help of ML technology. Sanofi employed Advanced Analytics, and Artificial Intelligence for analyzing critical data, which led to higher productivity and efficiency.
Start with modern integration digital strategy with us
Pfizer addressed key challenges of data silos, limited resources, and disparate systems through building an integrated platform as part of its digital strategy. Through its API-led connectivity model, Pfizer accomplished 60% IT delivery cost reduction, omnichannel physical engagement, speed, agility, and secure data sharing.
If you’re looking for a holistics digital strategy, speak with us to learn how we leveraged APIs, and engineered digital apps for our pharma client in mapping complex processes.