A Unity APK (Android Package) is required when you want to publish a game or application built using the Unity game engine for Android devices. The Unity engine allows developers to create 2D and 3D games and other interactive content that can run on multiple platforms, including Android. Creating a Unity APK allows the game or application to be packaged and distributed through the Google Play Store or other Android app marketplaces.
Need to create Unity APK for Android
Creating a Unity APK for Android allows businesses to publish their Unity-developed games or applications on the popular Android platform, reaching a wide audience of potential users. By leveraging the power of the Unity game engine, businesses can create engaging and interactive 2D and 3D games and other content that can run smoothly on a variety of Android devices.
Furthermore, Unity APKs can be distributed through the Google Play Store and other app marketplaces, providing businesses with a direct channel to reach their target users. Unity provides a wide range of tools and features that allow businesses to optimize their games for specific devices, add support for different device resolutions, and create virtual/augmented reality experiences. This makes Unity APKs an attractive option for businesses looking to expand their reach and engage with users on the Android platform.
Unity APK for Developers
Unity enables the developers to customize the APK file by adding specific features such as support for different device resolutions or the ability to enable or disable certain features.
Unity also allows developers to optimize their games for specific devices using Unity's built-in optimization tools. Moreover, It can also help in creating virtual/augmented reality applications. Unity APK helps in creating interactive visualizations, simulations, and architectural walkthroughs.
In the next section, we will take a detailed look at the process of creating a Unity APK for Android. We will cover everything from setting up the Unity game engine and exporting the project, to signing and aligning the APK file and distributing it through the Google Play Store and other app marketplaces.
Whether you're a business looking to expand your reach on the Android platform or an individual developer looking to publish your Unity-developed game or application, this guide will provide you with all the information you need to create and distribute a Unity APK for Android.
Prerequisites to create Unity APK for Android
Creating a Unity APK for Android requires a specific set of tools and software to be installed and configured on your computer. It includes installing the Unity game engine, Android Studio, and the Java Development Kit (JDK). By understanding and following these prerequisites, you'll be able to create and publish your Unity-based games and applications on the Android platform with ease.
Install Unity on the Operating System: Windows/macOS/Ubuntu
Download Unity from https://unity.com/download page for your preferred OS.
To set up Unity on your preferred OS Windows, macOS or Ubuntu based computer, these are the steps you can take:
Windows:
- Go to the Unity website (https://unity.com/) and click on the "Get Started" button.
- Select the "Personal" option and then click on the "Download" button for the appropriate version of Unity for your system.
- Once the download is complete, open the installer and follow the prompts to install Unity.
macOS:
- Go to the Unity website (https://unity.com/) and click on the "Get Started" button.
- Select the "Personal" option and then click on the "Download" button for the appropriate version of Unity for your system.
- Once the download is complete, open the installer and drag the Unity icon to the Applications folder.
- Open Unity from the Applications folder.
Ubuntu:
- Go to the Unity website (https://unity.com/) and click on the "Get Started" button.
- Select the "Personal" option and then click on the "Download" button for the appropriate version of Unity for your system.
- Once the download is complete, open a terminal and navigate to the location of the downloaded installer.
- Use the command "sudo dpkg -i unity.deb" to install Unity, replacing "unity.deb" with the actual name of the installer file.
Please note that these are high level steps, you may need to check the Unity website for specific version compatibility with your system and any additional requirements. The Unity Hub also allows you to manage and install additional versions and packages of Unity. Or, you can follow : https://docs.unity3d.com/hub/manual/InstallHub.html
Install Android Studio
Android Studio is the official integrated development environment (IDE) for Android app development, and it's necessary for building, testing, and publishing Unity APKs for Android. In this section, we will walk you through the process of installing Android Studio and configuring it to work with Unity, so you can start creating and publishing your Unity-based games and applications on the Android platform.
Install on Windows/ MacOS/ Ubuntu
Installation can be done using the link- https://developer.android.com/studio on different operating systems, namely- Windows, MacOS, and Ubuntu.
Additionally, it's worth checking if Java Development Kit (JDK) has been installed on your machine. JDK is essential to run and develop Java applications such as Android Studio. You can obtain the JDK from this page: https://www.oracle.com/java/technologies/javase-downloads.html
Install Unity Editor
Once you have downloaded the Unity Hub, you'll need to install the Unity editor. For new projects, you can select any version of the editor. However, if you're working on a project that has been created by someone else, it's important to install the exact version of the editor that the project was made with. You can access older versions of the editor at the following link: https://unity.com/releases/editor/archive.
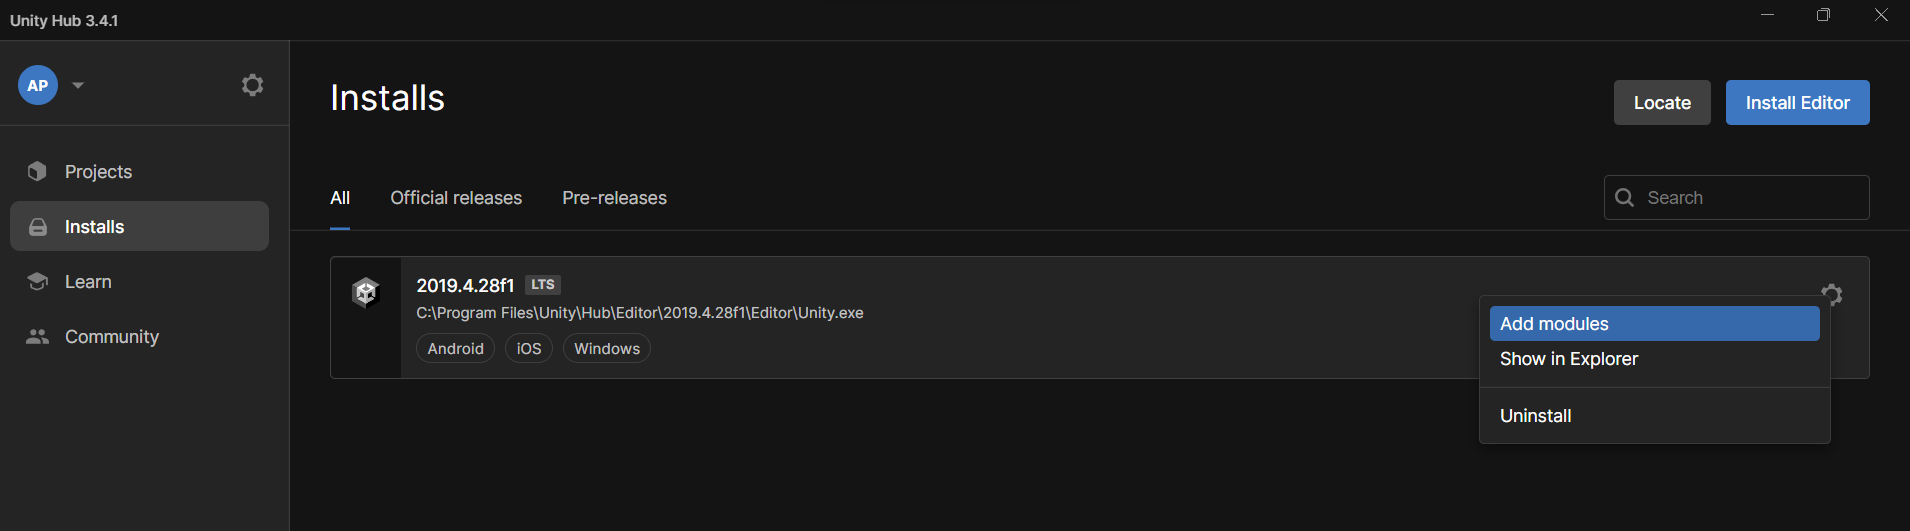
Install Android Modules in Unity
To include the Android modules in Unity, you can follow these steps:
- Open Unity editor and click on the "Installs" tab on the sidebar.
- Click the "Settings" button on the Unity editor.
- From the "Settings" window, click on "Add Modules" button.
- Select "Android Build Support" and click on "Install" button to proceed.
This will install the necessary Android modules in Unity, enabling you to create and distribute Android applications (Fig. 1).
Step-Wise Guide to Create Unity APK for Android
Creating a Unity APK for Android can seem daunting at first, but by following this step-wise guide you can go through the process, from setting up the necessary software and tools to exporting and signing your APK to finally publishing it on the Google Play Store or other Android app marketplaces.
It will also help you in troubleshooting any issues that may arise during the process. By following a step-by-step guide, you'll be able to create and publish your Unity-based games and applications on the Android platform with confidence and ease.
Step 1: Export Unity Code
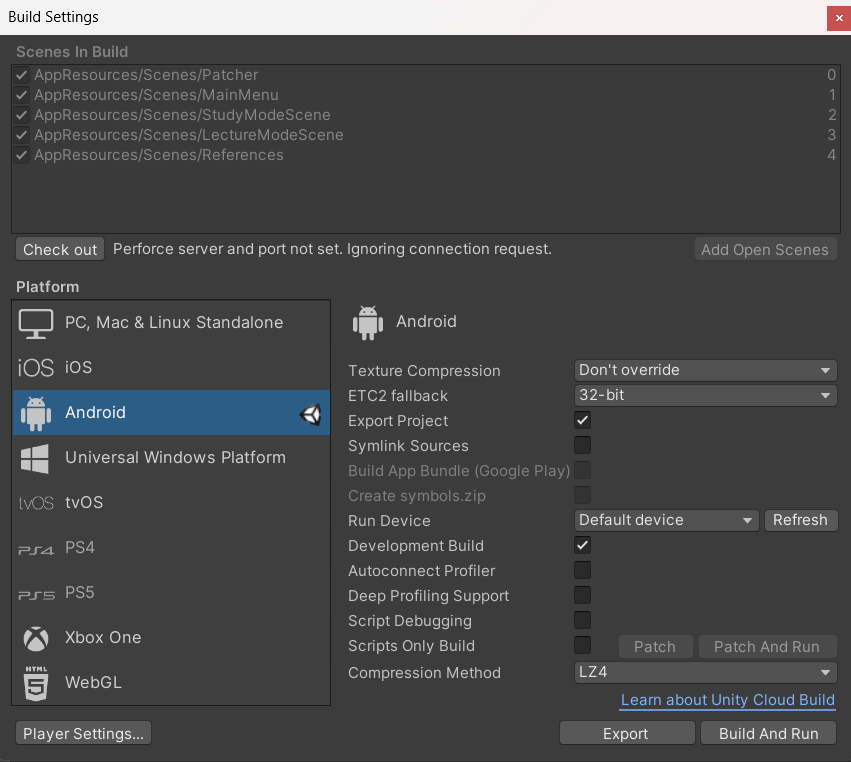
To begin creating an APK for Android, we will first export the Unity code. First, install the Unity editor and locate your Unity project file. Then, within the Unity editor, navigate to the "File" menu and select "Build Settings" or alternatively, you can use the shortcut key combination "Ctrl+Shift+B" on a Windows device as shown in Fig. 2 below.
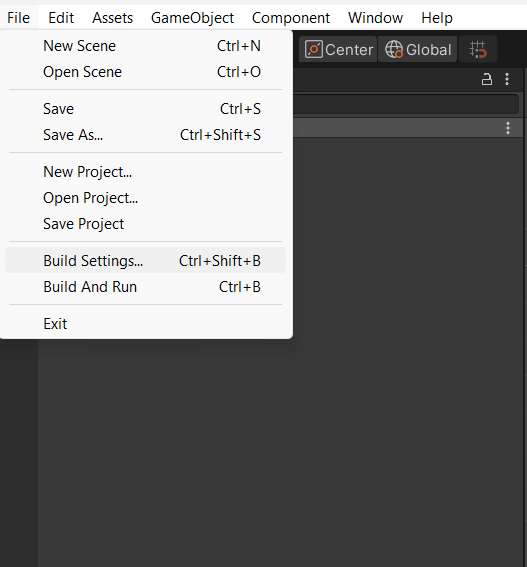
If your current platform is not set to Android, please select Android and switch to it. Before exporting, make sure to click the "Export" button. Additionally, don't forget to check the "Export Project" checkbox (Fig. 3).
Step 2: Import the exported file into Android Studio and build an APK for Android
To create an APK in Android Studio, follow these steps:
- Open Android Studio.
- Go to the "Build" menu and select "Generate Signed APK."
- Follow the prompts to sign and export your APK. It will be saved in the project's "build/outputs/apk" folder.
Note: A signed APK is required to publish your app on the Google Play store, as it guarantees the authenticity and integrity of your app by using a digital signature.
You can follow the below mentioned steps to generate a signed APK in Android Studio. (Fig. 4).

To create a signed APK in Android Studio, follow these steps:
- Open Android Studio.
- Go to the "Build" menu and choose "Generate Signed Bundle / APK."
- Select "APK" as the output type and click the "Next" button.
- Choose the signing configuration and keystore that you want to use. If you don't have any, you can create a new one by clicking the "Create New" button.
- Click the "Next" button.
- Provide the password for the keystore and choose the private key for signing.
- Click the "Finish" button.
The APK will be saved in the project's "build/outputs/apk" folder.
Once you have completed the steps above, Android Studio will create a signed APK and save it to the designated location. This APK can be used to publish your app on the Google Play Store or distribute it to testers or end users. Once the APK is generated, you can test it by installing it on a physical Android device or an Android Virtual Device (AVD).
Conclusion
In conclusion, creating an APK for an Android device from Unity is a straightforward process that can be completed using Android Studio. By following the steps outlined above, developers can easily generate a signed APK that can be used to publish their app on the Google Play Store or distribute it to testers and users.
From a business perspective, having a mobile app on the Android platform can greatly expand your reach and provide an additional avenue for revenue. With the ability to easily create an APK, businesses can quickly and efficiently develop and release their app to the Android market.
To take advantage of this opportunity, you may take initiative and create an APK for your Unity app on the android platform. This will help you to reach more customers, increase revenue and create a stable source of income.