Unit testing is an essential part of software development, and PHPUnit is a popular framework for testing PHP applications. In Drupal, PHPUnit is used to write and run automated tests for various components of the system. By writing tests with PHPUnit, developers can ensure that Drupal code is working as expected, catching bugs early and ensuring stable and reliable code. In this post, we'll walk through the steps of installing and setting up PHPUnit for Drupal 9/10, so you can start testing your Drupal code with ease.
What is PHPUnit?
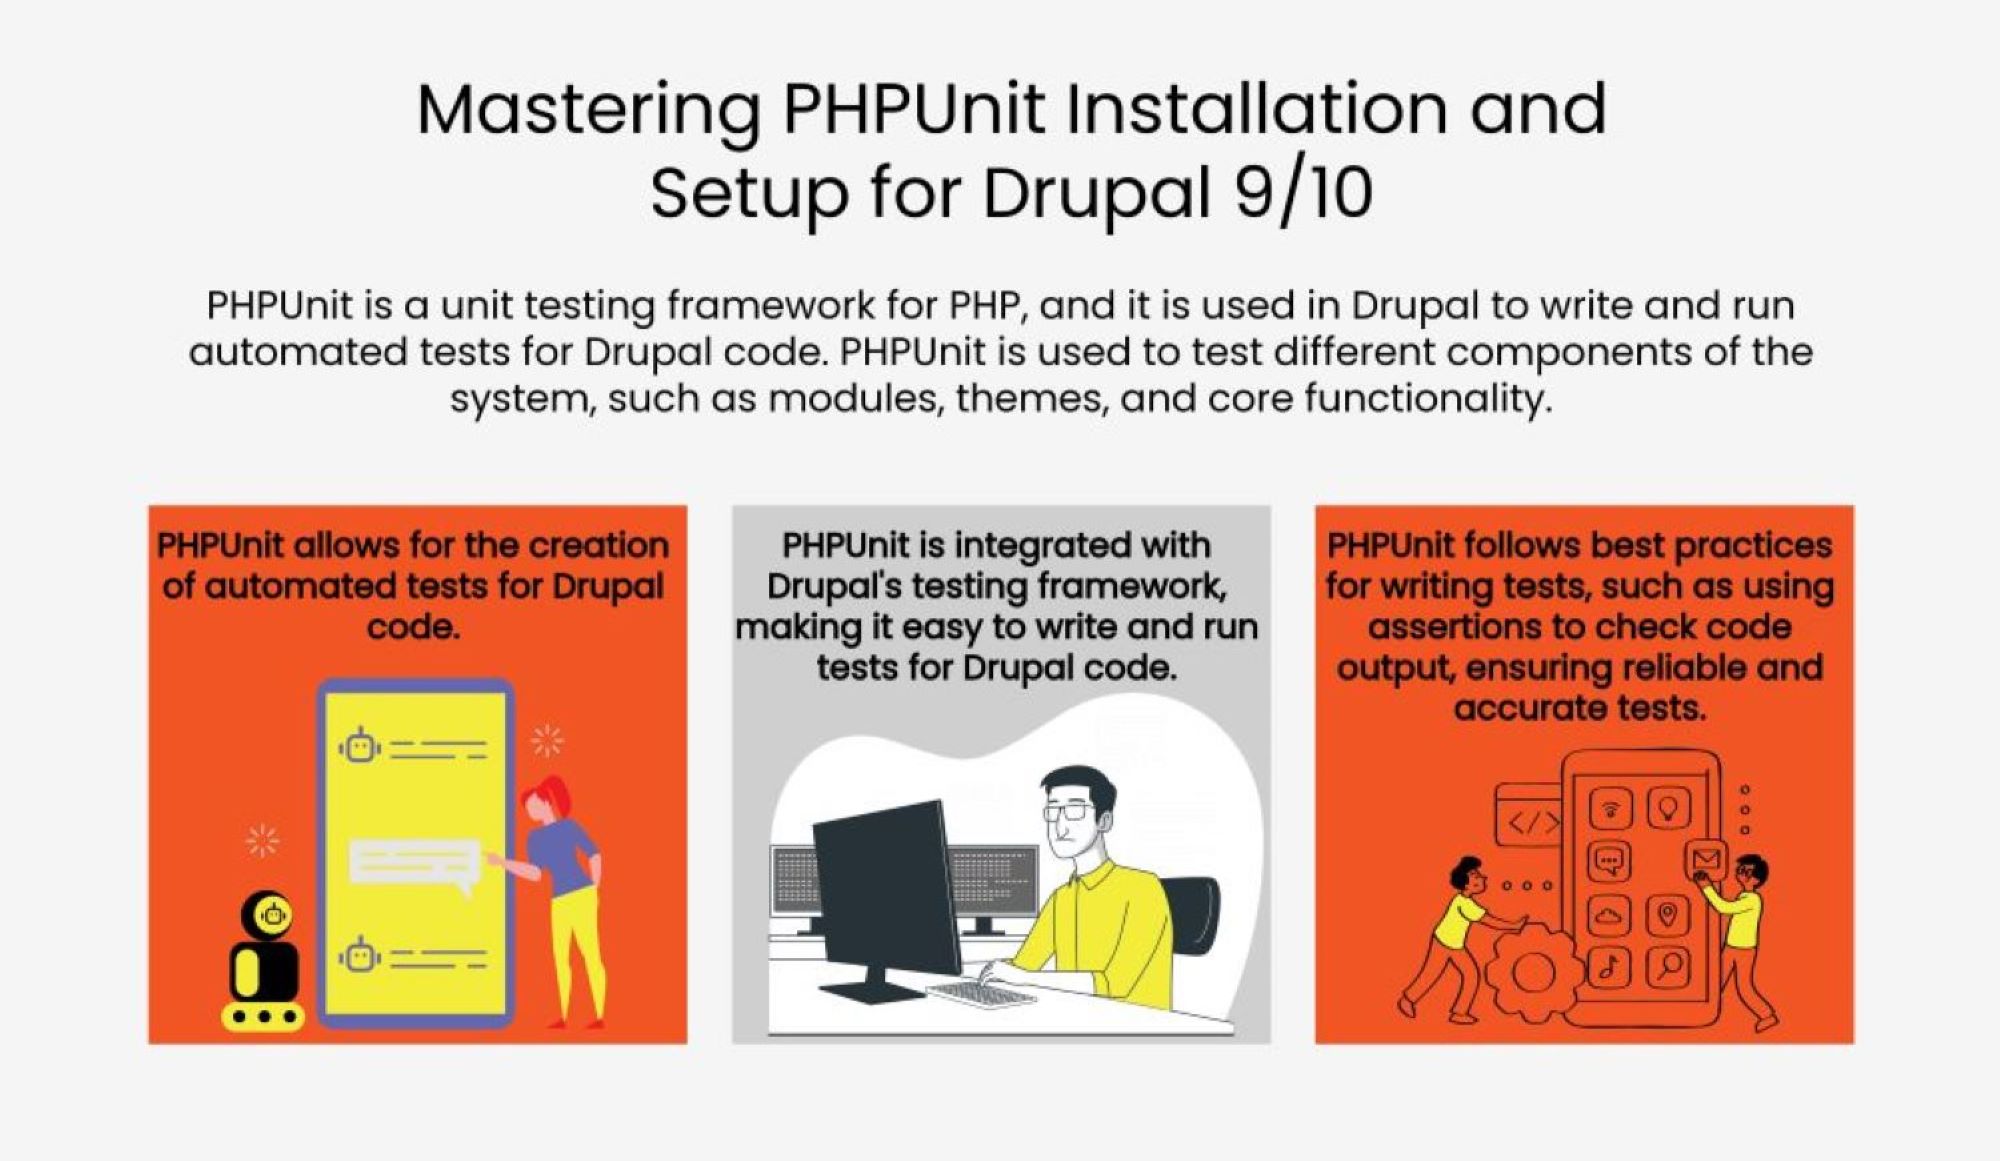
PHPUnit is a unit testing framework for PHP, and it is used in Drupal to write and run automated tests for Drupal code. PHPUnit is used to test different components of the system, such as modules, themes, and core functionality. Writing tests with PHPUnit helps ensure that Drupal code is working as expected, making it easier to identify and fix bugs, and catch problems early to ensure that the code is stable and reliable.
Why use PHPUnit for automated unit testing in Drupal?
PHPUnit has several features which make it the best option for automated unit testing in Drupal. Some of these features include:
Automated testing: PHPUnit allows for the creation of automated tests for Drupal code.
Coverage analysis: PHPUnit generates reports that show how much of your Drupal code has been tested.
Integration with Drupal: PHPUnit is integrated with Drupal's testing framework, making it easy to write and run tests for Drupal code.
Community support: PHPUnit has a large community of developers who use it for testing Drupal code, providing many resources for learning and troubleshooting.
Best practices: PHPUnit follows best practices for writing tests, such as using assertions to check code output, ensuring reliable and accurate tests.
How to install and setup PHPUnit for Drupal 9/10?
Step 1: Install Composer
PHPUnit is typically installed using composer, a dependency manager for PHP. You can download and install composer from their main website.
Step 2: Navigate to the root directory of your drupal project
Step 3: Require the PHPUnit module
Run the following command to install PHPUnit and it’s dependencies:
We require xDebug for generating coverage reports. We can install it using the following command:
$ sudo apt-get install php7.4-xdebug
Step 5: Enable Xdebug
After installing Xdebug, you'll need to enable it in your PHP configuration file. To do this, open your php.ini (/etc/php/7.4/cli/php.ini) file and add the following line at bottom:
xdebug.mode=coverage
Step 6: Verification
To verify the correct installation, run php -v and check for the following output:
PHP 7.4.33 (cli) (built: Feb 14 2023 18:31:23) ( NTS )
 Copyright (c) The PHP Group
 Zend Engine v3.4.0, Copyright (c) Zend Technologies
   with Zend OPcache v7.4.33, Copyright (c), by Zend Technologies
   with Xdebug v3.1.6, Copyright (c) 2002-2022, by Derick Rethans
The above line shows that Xdebug is enabled successfully.
Setting up PHPUnit for Drupal
Step 1: Creating the phpunit.xml file
Locate the phpunit.xml.dist file in the core folder of your drupal project. Copy and paste this file into your root directory and rename it to phpunit.xml.
Step 2: Creating simpl_test and browser_output directories
We need to create the two directories as mentioned above and assign the proper permissions to them. So run the following command to create them:
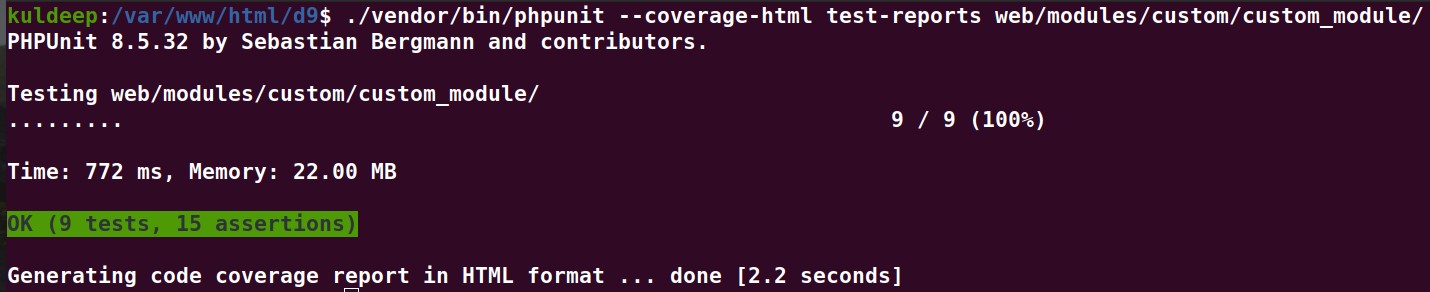
Once you have setup phpunit.xml, resolved all errors, and created the related directories, we can run PHPUnit test files using the following command from the root directory of your Drupal site:
You should get an output similar to the snapshot below:
You may check the test reports in the test-reports folder in the root directory.
Writing a PHPUnit test
In this example, we create a service for fibonacci sequence related operations and write tests to check for the validity of these operations.
Step 1: Create a custom module in the custom folder
Follow path ‘\web\modules\custom\’. ‘custom_module’ is the name of the module here.
Step 2: Create the info.yml file for the custom module
Follow the code as below:
Step 3: Create the ‘Services’ folder for the module
Follow the folder structure as shown below
‘\web\modules\custom\custom_module\src\Services`
Step 4: Create the FibonacciService.php file within the ‘Services’ folder
The code for the service file is given as below.
The above service file defines two functions, viz.:
‘returnNumber’ gives a random number between 0-9.
‘calculateNthFibonacci’ takes in a number ‘n’ and gives the ‘nth’ term of the fibonacci sequence via recursion
setUp() is a method in PHPUnit that is called before each test method and is used to set up the test environment and prepare objects for the test. It is used to perform repetitive tasks required for each test case method, like initializing objects or connecting to databases.
testReturnNumber() is a custom method to test for the returnNumber() function in the previously created service file. We use assertTrue() to check for the number being between 0-9 by inserting our custom condition as the parameter.
testNthFibonacci() is a custom method to test for the calculateNthFibonacci() function in the previously created service file. We first call the service method to calculate the result and store it in a separate variable. Then we check for equality using assertEquals() to verify the calculation.
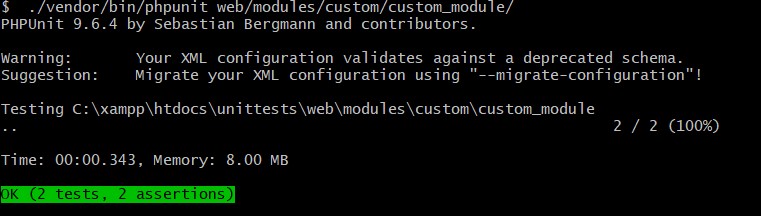
Step 7: Testing the module
Run the following command from the root directory of your project to perform the unit test:
This indicates that both of our tests were successful.
Conclusion
PHPUnit is an essential tool for writing and running automated tests for Drupal 9/10. By setting up and configuring PHPUnit, developers can catch bugs early and ensure that their code is stable and reliable. With the many features and benefits of PHPUnit, it's no wonder that it's the go-to choice for automated unit testing in Drupal. So why not get started with PHPUnit today?
If you need any help or guidance with installing or setting up PHPUnit for your Drupal projects, don't hesitate to reach out to the experts at Valuebound. Our team of experienced Drupal developers can help you with all your testing and development needs. Contact us today!
In a recent interview with Saurabh Bhardwaj, a Senior Software Developer at Valuebound, Content Manager Akanksha Mishra discussed a variety of topics related to building growth-oriented teams, technology leadership as a team lead, and more. During the conversation, Saurabh shared his personal experiences and technical challenges, which could serve as inspiration for aspiring software developers.
Team Management as a Team Lead at Valuebound
Q: Can you tell us about your experience as a software developer at Valuebound and how you became a Team Lead?
Saurabh: After joining VB as a senior software developer, I began working with my team immediately. Through hard work and dedication, my seniors and project manager began to trust me more and more. Eventually, they offered me the opportunity to lead a project, and together with my team, we were able to deliver high-quality work to our clients.
My strong leadership skills did not go unnoticed, and the management team recognized my potential. As a result, I was promoted to a leadership position, where I continue to excel in guiding my team toward success.
Q: How do you manage and motivate your team to achieve their goals?
Saurabh: To effectively manage my junior subordinates, I establish both professional and personal connections with them. I prioritize addressing any personal issues that may impact their work. When it comes to assignments, I allow my team to determine their own timelines and level of effort. Honesty is also key - I expect it from my team and make sure to reciprocate in kind.
To ensure my team achieves both their short-term and long-term goals, I guide them towards the right path. I regularly check in with team members to listen to their suggestions and help address any concerns. Additionally, I make sure everyone is compensated fairly based on their bands, which helps maintain motivation and morale.
Q: How do you prioritize tasks and allocate resources to ensure timely delivery of projects?
Saurabh: Our project management systems feature a robust tagging system that allows us and our clients to identify task priorities. Depending on a task's complexity and duration, I may break it down into smaller sub-tasks. When allocating resources, I prioritize assigning tasks that challenge my team members and help them learn and grow. I also ensure that the difficulty level of the task aligns with their band. If a team member requires assistance, the entire team is always available to provide support.
I firmly believe that the speed of the team is determined by its slowest member. As a result, I prioritize helping all members of the team improve their skills and abilities to ensure that we can continue delivering high-quality work efficiently.
Q: Can you walk us through a recent project you led, highlighting the challenges and how you overcame them?
Saurabh: During my recent oversight of one of the projects for a client, a significant flaw was discovered as we were preparing to deliver the project. I immediately reached out to my team to discuss the issue and the necessary steps to rectify it. Honesty and integrity were vital in this process, and we all acknowledged that we may have missed something in the beginning. We worked collaboratively to fix the issue and successfully delivered the project on time. The success of this effort was a testament to our team's cohesion and management.
We took this experience as a learning opportunity and identified areas where we missed important details. We made sure to avoid making the same mistakes in future projects by creating more robust architecture and development plans. We were able to complete the next project well before the deadline.
When I reported the flaw in the project to my seniors, they were supportive and encouraged me to find a solution. Their motivation helped me to remain focused on finding a solution and addressing the issue with my team.
WebRTC Project Success
Q: Can you provide an overview of the WebRTC project you successfully worked on? What were the main goals and objectives of the project, and how did you ensure they were met?
Saurabh: We recently received a client request to enable one-way audio, video, and screen broadcasting from teachers to students. Our primary challenge was to ensure scalability, reliability, and cost-effectiveness of the project.
To address these challenges, we developed a custom, reliable, and cost-effective solution using Mediasoup media servers. This technology is based on webRTC, but designed for larger-scale applications that require higher scalability and reliability.
To implement the project, we used different technology stacks. Our primary application was built in Drupal, while the teacher's side was developed using React JS for better performance. The media servers were built entirely in Node JS. Overall, this approach proved successful in meeting the client's requirements and ensuring a reliable, scalable, and cost-effective solution.
Q: How did you approach testing and debugging for the WebRTC project? What tools and technologies did you use to develop the WebRTC project?
Saurabh: To test the webRTC feature, we initially explored several vendors who offered testing services for webRTC. However, we found that their services were quite expensive. To overcome this challenge, we decided to write our own automated test scripts using Java for all leading browsers.
The results of our testing were extremely satisfying. With our own test scripts, we were able to test for up to 2000 concurrent users at a given time, and without incurring the high costs of external vendors. Overall, this approach allowed us to thoroughly test our webRTC feature and ensure its reliability and scalability.
Q: How did you ensure the WebRTC project was scalable and able to handle large amounts of traffic?
Saurabh: Since we were using a custom-built media server solution, we were confident that we could scale the application to meet our needs. Scaling the application simply requires choosing hardware that can support the increased demand. The larger and more powerful the hardware we use, the more capable our application becomes. With this level of control over our hardware, we are able to ensure that our application can handle any level of demand with ease.
Q: Can you share any best practices or tips for others who are working on WebRTC projects?
Saurabh: Open source media server libraries are becoming increasingly popular in the market due to their ease of implementation and well-documented functionalities. We used MediaSoup, an open source media server library, for our application and found it to be a great tool for developing cost-effective solutions for clients. Not only do these libraries provide cost-effective solutions, but they also provide ample opportunities to learn while developing such applications.
Tips and Suggestions for Aspiring Software Developers
Q: How do you stay up-to-date with the latest software development trends and technologies?
Saurabh: To remain current with the latest technologies, I consistently follow numerous technical blogs and engage in healthy discussions with my team. Recently, I initiated a program wherein each team member is encouraged to learn something new every week and share it with the rest of the team. This initiative has been beneficial in keeping the entire team up-to-date with emerging technologies and trends.
Q: What advice would you give to aspiring software developers looking to become Team Leads?
Saurabh: I continually strive to become a better team lead, and I believe that honesty is key to achieving this. I maintain transparency with my team and treat all members with respect, ensuring that everyone is treated equally.
I make an effort to listen to the concerns of my team members and assist them in resolving any issues, whenever possible. Regular follow-ups are part of my management style, ensuring that team members remain on track and avoid delays. Proactively identifying potential roadblocks that may impact their work is also something that I prioritize, working to prevent potential issues before they arise.
Conclusion
Saurabh Bhardwaj, a Senior Software Developer at Valuebound, shared valuable insights on building growth-oriented teams and overcoming technical challenges. It's clear that Valuebound's culture values employee development and innovation. If you're interested in learning more about the company's culture and reading more interviews with employees, check out our website.
Dynamic routing is a key aspect of Drupal's flexible and extensible architecture that allows developers to define their own routes dynamically. This feature can be particularly useful when creating custom plugins, which can have unique routes to present their forms to users.
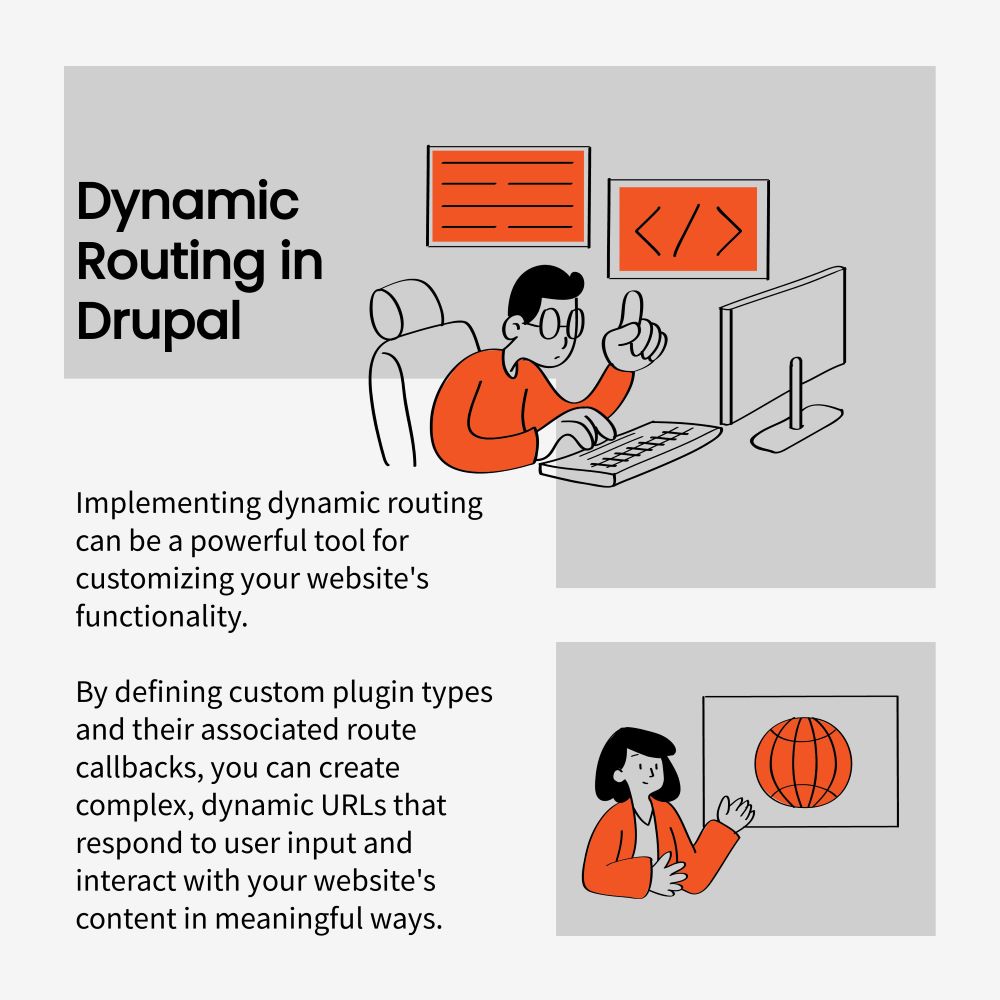
Implementing dynamic routing can be a powerful tool for customizing your website's functionality. By defining custom plugin types and their associated route callbacks, you can create complex, dynamic URLs that respond to user input and interact with your website's content in meaningful ways.
In this guide, we'll explore the ins and outs of implementing dynamic routing in Drupal, with a focus on the creation and use of custom plugin types and their associated route callbacks. Whether you're new to Drupal development or an experienced pro, this guide will help you master the art of dynamic routing and take your website's functionality to the next level.
Guide to implement dynamic routing in Drupal with custom plugin types
To implement dynamic routing in Drupal with custom plugin types, you need to follow these steps:
Step 1: Add 'route_callbacks' in the module's routing.yml file
Create a routing class that defines the dynamic routes for each plugin. This class should use the WebUtilityPluginManager service to get the definitions of all the custom plugins and create a new Route object for each one.
Add a display controller that renders the plugin form for the dynamic route. This controller should use the WebUtilityInterface service to load the plugin's configuration and content, and the FormBuilderInterface service to generate the plugin form.
Overall, dynamic routing in Drupal allows developers to create more flexible and customizable websites by defining their own routes and providing unique user experiences for each route.
Dynamic routes and route callbacks are powerful features of the Drupal CMS that allow developers to create custom paths and define their own logic for handling those paths. Dynamic routes are used to create paths with placeholders that can be replaced with variable values at runtime, while route callbacks define the logic for handling those paths and returning a response.
Hence, dynamic routing in Drupal is a powerful tool for creating custom functionality on your website. By defining custom plugin types and their associated route callbacks, you can create URLs that respond to user input and interact with your website's content in meaningful ways. Whether you're building a simple blog or a complex e-commerce site, dynamic routing can help you create a better user experience and improve your website's functionality.
If you're looking for help implementing dynamic routing in Drupal, Valuebound is here to help. Our team of Drupal experts can work with you to create custom plugin types and route callbacks that meet your website's unique needs. Contact us today to learn more about our Drupal development services and how we can help take your website to the next level.
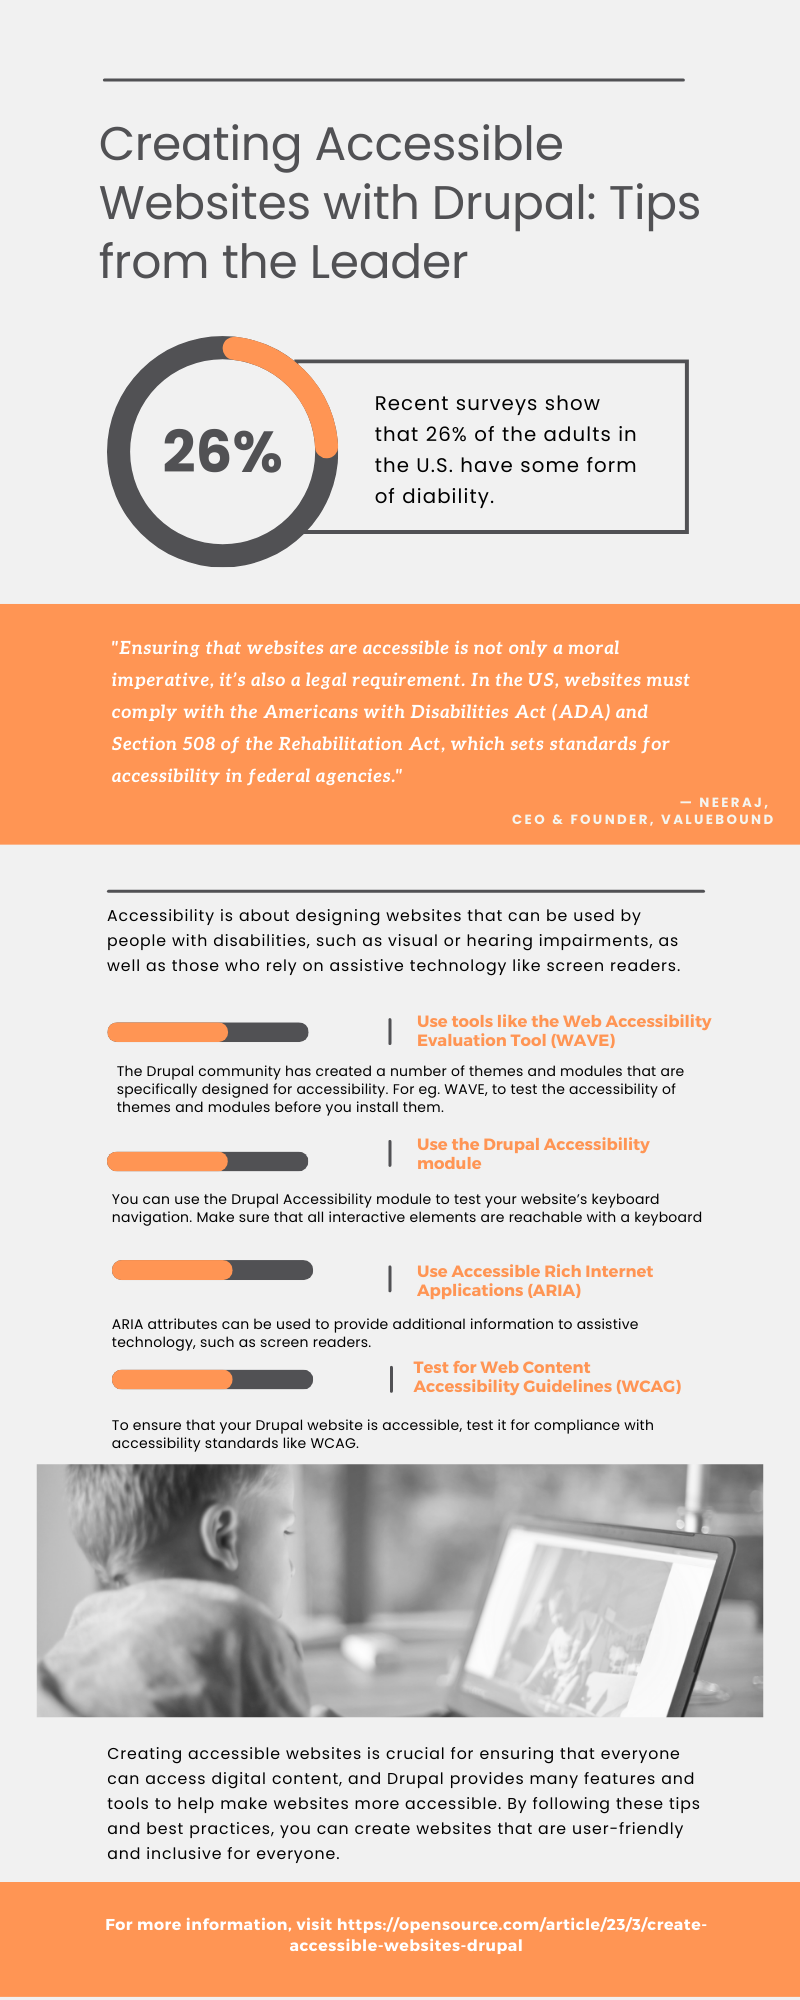
In today's digital age, it's essential to ensure that websites are accessible to everyone. This includes people with disabilities, such as visual or hearing impairments, as well as those who rely on assistive technology like screen readers. In this article, Valuebound CEO & Founder, Neeraj explores recommendations for creating accessible websites with Drupal, a popular open-source content management system.
Recommendations on creating accessible websites with Drupal
By implementing these recommendations, you can create an accessible website that provides a better user experience for all users.
Conclusion
Creating accessible websites is crucial for ensuring that everyone can access digital content, and Drupal provides many features and tools to help make websites more accessible. By following these tips and best practices, you can create websites that are user-friendly and inclusive for everyone.
Ultimately, prioritizing accessibility in website design benefits both users and organizations, as it improves the overall user experience, fosters greater inclusivity, and enhances brand reputation.
Are you looking to create accessible websites that cater to a diverse range of users? Look no further! Contact us at Valuebound to speak with our team of Drupal experts. We can help you implement accessibility best practices and leverage Drupal's features to create an inclusive and user-friendly experience for all. Let's work together to build a better digital world for everyone.
Drupal is a flexible content management system that allows you to create and manage various content types. One of the powerful features of Drupal is entity reference, which allows you to create relationships between different types of content on your website. Entity reference can be useful for data management, organization, and enhancing user experience.
In this article, we will explore how to use entity reference in Drupal with a practical coding example.
Understanding Entities in Drupal
Entities are self-contained data units with unique identifiers in Drupal. Examples of entities include nodes, users, and taxonomy terms. Entities help Drupal manage content in a structured way, and you can define entities and their properties to create custom content types that meet your needs.
What is Entity Reference?
Entity reference is a Drupal module that allows you to create relationships between different types of entities on your website. With entity reference, you can link one entity to another, even if they are different types of entities. For instance, you can link an article to an author or a product to a category.
Using Entity Reference in Drupal
Here is a step-by-step guide on how to use entity reference in Drupal:
Install the Entity Reference module: First, install the Entity Reference module from the Drupal module repository or using Composer. You can install the module using Composer with the following command:
composer require drupal/entity_reference
Create your content types: Next, create the content types you want to link together. For this example, we will create two content types, "Event" and "Speaker". To create the content types, navigate to the Content Types page in Drupal's administrative interface and select "Add content type."
Add a reference field: After creating the content types, add a reference field to one of them. For instance, add a "Speaker" reference field to the "Event" content type. To do so, navigate to the "Manage fields" page of the "Event" content type and click "Add field". Choose "Entity reference" as the field type, and set the "Target type" to "Speaker".
Configure the reference field: Configure the reference field by selecting how many values are allowed, whether the field is required, and other settings. For example, you can limit the reference field to one speaker or allow multiple speakers to be referenced.
Link your content: Finally, link the content types together. When creating a new "Event" entity, select the speaker(s) who will be presenting at that event. Once you have saved the entity, the speaker(s) will be linked to the event.
Here is an example code snippet showing how to create an entity reference field in Drupal programmatically:
There are several benefits of using entity reference in Drupal:
Better Data Management: Entity reference allows you to establish relationships between different types of content, which can help you better organize and manage your data.
Enhanced User Experience: With entity reference, you can create dynamic pages that show related content to users. For example, if a user is viewing an article, you can display other articles by the same author.
Increased Flexibility: Entity reference allows you to create custom content types that meet your specific needs. You can define your own entities and their properties to suit your requirements.
Conclusion
Drupal entity reference is a powerful tool that allows you to link different types of content together. By establishing relationships between entities, you can create a more structured and organized website that offers a better user experience. Hopefully, this article has given you a better understanding of how entity reference works in Drupal and how you can use it to enhance your data management capabilities.
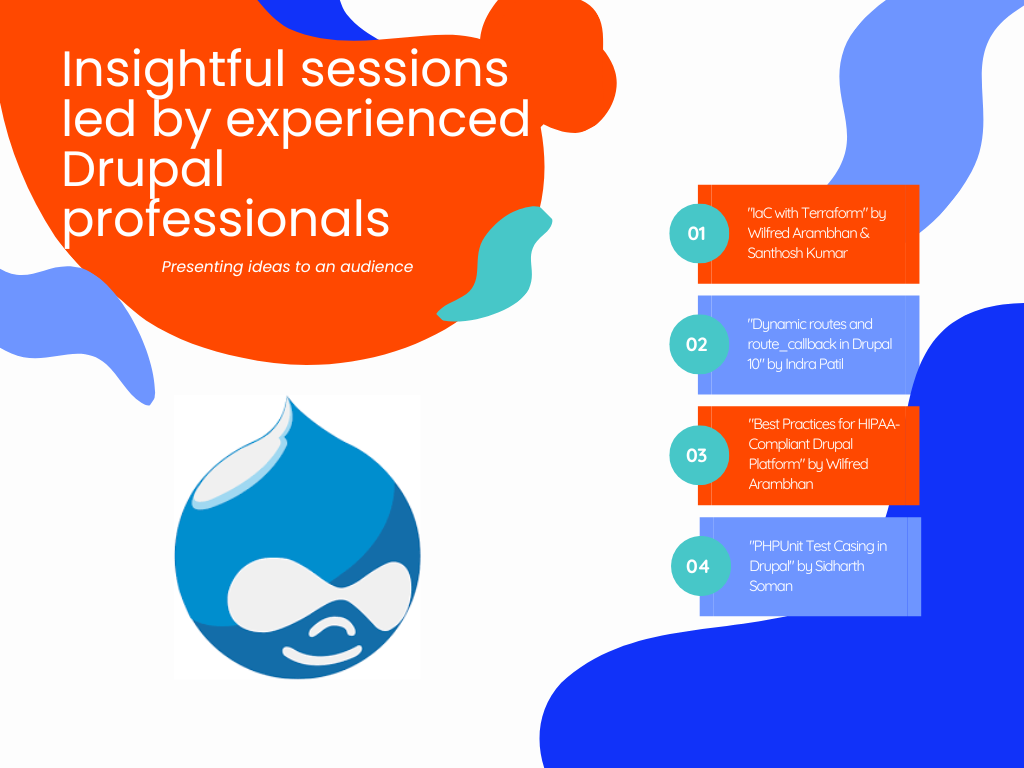
Valuebound is proud to announce the success of our recent Drupal Meetup 2023, held at our Bangalore office. The event was a gathering of talented Drupal developers from different companies who came together to share knowledge, discuss best practices, and explore innovative solutions using Drupal and open source technologies. The event provided attendees with valuable insights into Drupal and showcased the versatility of open source technologies.
The event featured four insightful sessions led by experienced professionals, including "IaC with Terraform" by Wilfred Arambhan and Santhosh Kumar, "Dynamic routes and route_callback in Drupal 10" by Indra Patil, "Best Practices for HIPAA-Compliant Drupal Platform" by Wilfred Arambhan, and "PHPUnit Test Casing in Drupal" by Sidharth Soman. Each presentation provided attendees with valuable knowledge and showcased the versatility of Drupal and open source technologies.
Valuable Knowledge Shared
During the "IaC with Terraform" session, Wilfred Arambhan and Santhosh Kumar discussed how Infrastructure as Code (IaC) can help automate the process of creating, modifying, and deleting infrastructure. The session highlighted the benefits of using Terraform as a tool for implementing IaC.
In the "Dynamic routes and route_callback in Drupal 10" session, Indra Patil shared insights into Drupal 10's new routing system. The session provided attendees with valuable knowledge on how to leverage Drupal 10's dynamic routing capabilities.
Wilfred Arambhan's "Best Practices for HIPAA-Compliant Drupal Platform" session focused on the importance of HIPAA compliance when building Drupal websites that handle sensitive healthcare data. The session highlighted the best practices for building a secure and compliant Drupal platform.
Lastly, Sidharth Soman's "PHPUnit Test Casing in Drupal" session provided attendees with insights into Drupal's testing framework, PHPUnit. The session provided valuable knowledge on how to write effective tests for Drupal code.
Opportunities for Networking and Collaboration
The event was not just about the presentations but also provided attendees with the opportunity to network, exchange ideas, and explore potential collaborations. Participants had the chance to meet and connect with other Drupal developers, share ideas, and discuss potential projects.
At Valuebound, we are passionate about open source technology and remain committed to supporting the Drupal ecosystem. The success of the Bangalore Drupal Meetup is a testament to our dedication to empowering developers and advancing open source initiatives. We believe that these events provide a platform for developers to learn, share knowledge and ideas, and build connections.
Gratitude to Participants
We would like to extend our heartfelt gratitude to everyone who participated in the event and contributed to its success. Without your participation, the event would not have been possible. We look forward to hosting more Drupal and open source-focused events in the future, and we encourage you to stay connected with us for updates on upcoming gatherings.
Conclusion
The Bangalore Drupal Meetup was a great success, providing attendees with valuable knowledge and insights into Drupal and open source technologies. The event highlighted the versatility of Drupal and the potential of open source technologies. Valuebound remains committed to supporting the Drupal ecosystem and providing a platform for developers to learn, share knowledge and ideas, and build connections. We look forward to hosting more events in the future and encourage you to stay connected with us for updates.
Welcome to the last segment of our special Women’s Day blog series, where we'll be talking with women technologists who work with Drupal at Valuebound. Valuebound has been dedicated to promoting diversity and inclusion in the Drupal community, and we're excited to hear from the women who are part of that effort.
In this interview, we'll be talking to women who work with Drupal in various capacities, including as developers, designers, project managers, and community members. We'll be asking them about their journeys, their insights into the Drupal world, and the initiatives and programs that Valuebound has implemented to support women technologists working with Drupal.
Through these conversations, we hope to shed light on the important contributions that women technologists make to the Drupal community and to provide a platform for their voices to be heard. We also hope to inspire and encourage more women to pursue careers in technology and get involved in the Drupal community.
So join us as we dive into everything you wanted to know about women technologists in Drupal at Valuebound and learn from the experiences and perspectives of these talented and inspiring women.
About the Speakers in Discussion:
Akanksha Mishra:Market Specialist (Content & Marketing) deftly led the discussion and conducted insightful interviews with our panel of esteemed experts. With over two years of experience working alongside Valuebound's team of skilled technologists, she has gained a deep understanding of the challenges and opportunities faced by women in the tech industry.
Valuebound’s Top Women Drupal Contributors:
Neelam WadhwaniSenior Drupal Developer at Valuebound with a total experience of 9 years, she has honed her expertise in module development, theming, site building, and database management. Her skills include Bootstrap theming, responsive theme development, CSS, HTML, PHP, and jQuery, among others.
Indra PatilSkilled Drupal developer/ Senior Software Engineer at Valuebound with 7+ years of experience in both back-end and front-end development. Her areas of expertise include Drupal custom modules, themes, payment gateways, and other related technologies. With a deep understanding of the Drupal ecosystem, she brings a wealth of technical knowledge and experience to every project.
Urvashi VoraSoftware Development Engineer at Valuebound with a total experience of 3.9 years. She is proficient in Drupal Site Building, Custom theme integration, HTML, CSS, PHP, MySQL, JavaScript, jQuery, and WordPress. She is dedicated to contributing to the open-source community and pushing the boundaries of what is possible in technology.
Valuebound’s Top Drupal Developers:
Anwesha SinhaDrupal specialist at Valuebound with 6 years of expertise, she possesses a wealth of knowledge in handling technical queries and troubleshooting issues with aplomb. Her experience in implementing enterprise systems using complex back-end management systems is extensive, and she brings a deep understanding of the intricacies of Drupal to every project
Shalini JhaSoftware Developer at Valuebound with a proven track record of success over 4.2 years, she is a seasoned professional who is committed to delivering exceptional results for clients. With a rich background in PHP and Drupal technologies, she has experience in all phases of software application development, from requirement analysis to design, development, and maintenance.
Srilakshmi RDrupal Developer at Valuebound with an extensive experience of 7 years, her expertise in web application development is diverse and spans multiple domains, allowing her to bring a breadth of knowledge to every project. With a commitment to excellence and a passion for innovation, she is dedicated to delivering top-notch results for every client.
Saranya MariappanDrupal Tech Lead at Valuebound comes with a total experience of over 10 years. Her strong development skills in Drupal 7/8/9, PHP, and MySQL enable her to handle complex customization and module development with ease.
Priyanka SawantSkilled Software Engineer/ Drupal Developer at Valuebound with 5+ years of experience, her expertise includes custom module development and site-building, enabling her to create robust and dynamic web solutions that meet my clients' needs.
Deborah BlessySenior Software Drupal Developer at Valuebound with 6 years of experience, her expertise is seen in site building, theming, and frontend and backend development. With an unwavering commitment to excellence and a deep understanding of Drupal's latest developments and versions, she is a trusted partner for businesses seeking to enhance their online presence.
Our top Drupal contributors are thrilled to share the role of diversity and inclusion in driving innovation and growth in the industry and giving out unique perspectives and insights in this lively discussion.
Watch the full video here:
Read on to see how the interview went:
Q&As:
1. What do you think are some of the biggest challenges facing women in the technology industry, and how have you overcome these challenges?
Neelam- As a professional woman, it is often necessary to balance household responsibilities with career demands, leading to a need for a hybrid work environment that accommodates such demands. Fortunately, I found that Valuebound provided such flexibility, allowing me to effectively manage both responsibilities. As a result of this positive work environment, free from any gender biases, I have grown considerably stronger and more confident in my abilities.
Deborah- One of the most significant hurdles faced by women in the technology industry is a lack of opportunities. Women are often hired at a lower ratio of 7:3 (women to men) due to assumptions that they may require flexible schedules or extended leaves, such as for marriage or maternity. This biased approach has led to many women missing out on valuable career opportunities and losing their sense of identity as a result.
To address this issue, women in technology must focus on not only developing their career skills but also strengthening their mental health. Consistent hard work and dedication are key to overcoming these obstacles. Fortunately, some companies have recognized the importance of diversity in the workplace and have implemented programs that offer women employees greater opportunities for growth and advancement.
2. How do you stay up-to-date with the latest trends and developments in Drupal and the technology industry more broadly?
Urvashi- In order to remain current with the latest trends and advancements in the field, I have taken proactive measures such as subscribing to Drupal newsletters and participating in various Drupal-related groups and forums. Additionally, I make a concerted effort to maintain contact with the primary contributors and committers of the community, as they serve a crucial role in disseminating information on the most recent releases and keeping the broader community informed and engaged.
Indra - To remain current and informed, I make a point of regularly reviewing new blog entries and following relevant LinkedIn posts. By doing so, I am able to stay apprised of the latest developments and trends in my field.
Saranya- I've enrolled in numerous YouTube channels, Facebook groups, Drupal newsletters, and Quora forums to stay current on SDLC trends, including emerging IT fields and the industry's future.
3. Can you share an example of a time when you had to troubleshoot a difficult technical issue related to Drupal, and how you resolved it?
Anwesha- During my tenure of 1.5 years at Valuebound, I encountered a unique challenge while collaborating with the client. Specifically, we were tasked with developing a system whereby uploaded doc or docx files would be automatically converted to PDF format at runtime. While libraries for text-to-PDF conversion exist, the true difficulty arose in extracting text from the original file formats.
To address this challenge, I employed a two-step process. Firstly, I converted the XML text of docx files (including formatting) into HTML tags before converting to PDF. For doc files, I utilized antiword to extract the necessary text.
Neelam- During my time working with a client, I was presented with a complex challenge that required a deep understanding of front-end development with React JS. Specifically, the client requested that email functionality be implemented using their proprietary application, which presented a significant obstacle.
To address this challenge, I developed a solution that leveraged APIs to achieve the desired functionality. By carefully integrating the API with the existing React JS front-end, I successfully completed the project to the client's satisfaction.
4. How do you approach collaboration and teamwork when working on Drupal projects with other team members?
Urvashi- I believe that teamwork is the joint action of people who work together effectively to achieve the same ultimate goal. And when we talk about working as a team, we realize that communication is key. The more effective the communication, the easier it is to explain or understand a particular task. Before we start developing any project, we begin our process by first preparing a checklist, followed by ETAs, plans and tasks related to the Code.
We try to communicate with team members prior to starting a task, simply to ensure that the person assigned to the task has the appropriate details of the work. In case of barriers, we are always there to help our team members.
5. In your experience, what are some of the benefits of using Drupal as a content management system, particularly for businesses or organizations?
Srilakshmi - The very first benefit is Drupal is an open-source CMS developed and maintained by a large collaborative community. It offers flexibility and scalability for the applications. Drupal provides user-friendly configurations which can be used for maintaining and managing the applications even with less coding knowledge.
Also drupal is secure. Regularly the security vulnerabilities will be examined and fixed by the community. The well-maintained, well-tested code makes it easier for the developers to extend or customize according to the business requirements.
6. What advice would you give to other women who are interested in pursuing a career in technology or getting involved in the Drupal community?
Deborah- Pursuing a career needs passion, hard work, and consistency. In order to balance work and personal life to perfection requires time management skills. Drupal is comparatively a flexible open source. Anybody can learn and pursue their carrier in this technology. Learning and practicing proper standards will help in long run and contributing to the community will help others to learn. Involving in the drupal community will eventually improve our learning.
7. What strategies do you use to optimize Drupal performance, particularly in high-traffic or resource-intensive scenarios?
Indra-
Caching: Drupal has several caching options to reduce server load and improve performance. The Drupal cache API, which includes page caching, block caching, and views caching, can be used to improve the site's response time.
Database optimization: Poorly optimized database queries can cause a website to become sluggish. Tuning the database configuration, enabling MySQL query caching, and database replication can help improve the database performance.
Content Delivery Network (CDN): Using a CDN can help reduce server load and improve the site's response time by caching and delivering static content from servers located closer to the end-user.
Server optimization: Tuning the web server configuration, such as the Apache or Nginx settings, and optimizing PHP settings can help improve server performance.
Load balancing: Load balancing distributes the traffic across multiple servers, helping to improve performance and scalability. Using a load balancer, such as HAProxy or Nginx, can help achieve this.
Code optimization: Improving the code quality, such as minimizing the number of database queries, reducing the number of modules, and optimizing code performance, can help improve Drupal performance.
It is important to note that each website has unique requirements, and optimizing Drupal performance requires a holistic approach that considers all aspects of the site's infrastructure. Therefore, I strongly recommend performing regular load testing and performance tuning to ensure optimal site performance.
8. What are some of your favorite Drupal modules or tools to use in your projects, and why do you find them useful?
Shalini- Drupal is a highly intuitive content management system, featuring an extensive array of core and contributed modules and tools. Over the course of my experience with Drupal, I have discovered a number of particularly useful tools that have proven invaluable in my work on various projects.
One such tool is the Drupal Console, a suite of command-line tools that allows for the rapid generation of boilerplate code and seamless interaction with a Drupal installation. This tool proved instrumental in a recent project, in which we were tasked with developing over 130 custom entity modules.
Thanks to the console's streamlined commands, we were able to create these modules with ease, reducing both the time and complexity typically associated with such a task. Overall, our experience with the Drupal Console was highly positive, and we were able to complete the project with ease and efficiency.
9. How do you approach testing and quality assurance when working on Drupal projects?
Indra- Develop a testing plan: Define a comprehensive testing plan that covers all aspects of the project, including functionality, performance, security, and usability. The plan should also specify the tools, techniques, and methods to be used for testing.
Use automated testing tools: Drupal provides automated testing tools, such as PHPUnit and Behat, that can help streamline the testing process and reduce errors.
Conduct manual testing: While automated testing can be helpful, manual testing is still essential for catching user interface issues and other complex issues that automated tests may not detect.
Test in different environments: Test the project in different environments, such as staging and production environments, to ensure that it works as expected in different contexts.
Use version control: Use a version control system, such as Git, to keep track of changes and collaborate with other team members. This can help prevent code conflicts and ensure that the project remains stable throughout development.
Conduct code reviews: Have other team members review the code to catch errors and ensure that the code follows best practices.
Continuously test and iterate: Continuously test and iterate throughout the development process to catch issues early and ensure that the project meets the requirements and standards.
10. Can you tell me about any initiatives or programs that Valuebound has implemented to support women technologists in Drupal?
Priyanka- One initiative that Valuebound has implemented is to provide mentorship and networking opportunities for women in tech. Another common program is to provide training and certification opportunities to help women develop their skills and expertise in technology. Valuebound also offers flexible work arrangements, such as remote work options or flexible hours, to help women balance their work and personal responsibilities.
11. How has Valuebound created a supportive and inclusive environment for women technologists working with Drupal?
Srilakshmi - Valubound has provided a great opportunity and support for all the technologists. We get all the technical support from experts when in need. We can find women in all the roles like mentors, tech leads, contributors, and developers, which reflects the support that women are getting from the organization.
Neelam - I would say Valuebound is a great place to work for women. Here we are getting all the support from mentors. Women can manage their work-life balance, career advancement, and work balance.
Indra- At Valuebound, women receive ample support from mentors and can effectively balance their career growth with their personal lives. It is a great workplace for women. The outstanding quality of the organization that sets it apart as an excellent workplace is its people. The team members demonstrate a remarkable level of trust, support, and camaraderie, readily standing together to address any challenges. The executives are approachable and responsive to any concerns that may arise.
12. Can you talk about any mentorship or training opportunities that Valuebound has offered specifically for women technologists?
Priyanka - In our organization, we have the benefit of assigned mentors who provide invaluable support to us. These individuals offer guidance, support, and a vast network of contacts that are invaluable in navigating the often complex and rapidly evolving industry landscape.
Our mentors provide guidance, support, and a network of contacts to help us navigate the industry. They offer advice on career paths, feedback on technical skills, and help us develop confidence and leadership skills.
13. In your experience, how has Valuebound supported women technologists in their career growth and development, both within the Drupal community and in the broader technology industry?
Shalini- Valuebound is supporting all technologists in their career growth by providing encouragement and training for certifications. Also, the reward policies will encourage everyone to grow along with the organization. We have many women technologists in various roles who are growing tremendously well in their careers with the support of the organization.
Anwesha- Valuebound always encourages us to contribute to Drupal and fix its core issues or in any contributed modules. This helps us to learn different functionalities of Drupal and improve our coding standards. This also increases our knowledge and helps us in our career growth.
Cloud computing has become an essential component of modern business infrastructure. With the emergence of cloud computing providers like Amazon Web Services (AWS), businesses can now leverage the power of the cloud to drive innovation, growth, and transformation. AWS offers a comprehensive suite of cloud computing services that can help businesses meet their unique needs and challenges. In this article, we explore some of the key AWS services that businesses can use to innovate and transform their operations.
AWS Lambda
AWS Lambda is a serverless compute service that enables businesses to run code without provisioning or managing servers. With AWS Lambda, businesses can rapidly build and deploy applications at scale, without worrying about server management. This service allows businesses to focus on their code and business logic, while AWS Lambda handles the underlying infrastructure. By utilizing AWS Lambda, businesses can reduce costs, improve scalability, and increase agility.
Amazon S3
Amazon S3 is a highly scalable object storage service that enables businesses to store and retrieve data from anywhere in the world. This service provides businesses with durable, secure, and highly available storage for their data. With Amazon S3, businesses can store and retrieve any amount of data, at any time, from anywhere on the web. This service is ideal for businesses that need to store and access large amounts of data, such as media and entertainment companies, research institutions, and financial institutions.
Amazon RDS
Amazon RDS is a managed relational database service that provides businesses with an easy-to-use and highly scalable database solution. This service automates routine administrative tasks, such as hardware provisioning, database setup, patching, and backups, allowing businesses to focus on their applications and data. With Amazon RDS, businesses can choose from six popular database engines, including MySQL, PostgreSQL, Oracle, SQL Server, MariaDB, and Amazon Aurora. This service is ideal for businesses that require a highly scalable and reliable database solution, such as e-commerce companies, healthcare organizations, and financial institutions.
Amazon EC2
Amazon EC2 is a highly scalable compute service that provides businesses with secure and resizable compute capacity in the cloud. This service enables businesses to quickly deploy and scale their applications, without the need to invest in hardware or infrastructure. With Amazon EC2, businesses can choose from a wide range of instance types, each optimized for specific workloads, such as memory-intensive, compute-intensive, and storage-intensive workloads. This service is ideal for businesses that require flexible and scalable compute capacity, such as startups, media and entertainment companies, and e-commerce companies.
Many businesses have successfully used AWS services to drive innovation and transformation. For example, the ridesharing company Lyft uses AWS Lambda to process millions of ride requests per day, without managing servers. The financial services company Intuit uses Amazon S3 to store and retrieve customer data securely, while improving data access speeds. The healthcare company Philips uses Amazon RDS to store and manage patient data securely, while reducing costs and improving scalability. The e-commerce company Zulily uses Amazon EC2 to quickly deploy and scale its website, while reducing infrastructure costs.
Therefore, businesses seeking to innovate and transform can benefit greatly from leveraging the key AWS services discussed in this article. AWS provides businesses with scalable, flexible, and cost-effective solutions that can help them improve their agility, reduce costs, and drive growth. By utilizing AWS services like EC2, S3, Lambda, and others, businesses can unlock new opportunities for innovation and stay ahead of the competition.
Cloud computing has become an essential tool for businesses seeking to innovate and stay competitive in today's fast-paced digital landscape. The worldwide public cloud services market is projected to grow 20.7% in 2023, reaching a total value of $591.8 billion, suggests Gartner. To fully benefit from cloud computing, it's crucial to follow best practices that can help ensure success. In this article, we'll delve deeper into the best practices for leveraging cloud computing to achieve business innovation, with added technical depth.
Define clear goals and objectives
Before embarking on a cloud computing initiative, it's important to identify clear goals and objectives. These can range from reducing costs and improving operational efficiency to launching new products and services. By understanding what you want to achieve, you can more effectively select the right cloud computing solutions, services, and deployment models (public, private, or hybrid cloud) to support your goals.
Select the right cloud services and solutions
There are a wide variety of cloud services and solutions available, each with their own strengths and weaknesses. To effectively leverage cloud computing for innovation, it's important to select the right solutions for your specific needs. This may involve:
Selecting the right cloud provider (e.g., AWS, Azure, Google Cloud) based on factors like cost, performance, and geographic presence
Choosing the right combination of IaaS, PaaS, and SaaS services to support your applications and workloads
Evaluating managed services and serverless offerings to optimize resource utilization and reduce operational overhead
Focus on scalability and flexibility
One of the significant benefits of cloud computing is its ability to rapidly scale up or down based on demand. To achieve this, design your cloud architecture with scalability and flexibility in mind by:
Adopting microservices architecture to decouple application components and enable independent scaling
Utilizing containerization and orchestration tools like Docker and Kubernetes to simplify deployment and management of applications
Implementing auto-scaling policies to automatically adjust resources in response to traffic fluctuations
Ensure security and compliance
With data breaches and cyber threats on the rise, it's essential to ensure your cloud infrastructure is secure and compliant with relevant regulations. Consider the following measures:
Using encryption for data at rest and in transit, and employing key management best practices
Implementing multi-factor authentication and robust access controls to protect against unauthorized access
Monitoring and logging cloud activity to enable timely detection and response to potential threats
Adopting a shared responsibility model, understanding the division of security responsibilities between your organization and the cloud provider
Leverage automation and DevOps practices
To more effectively innovate and drive business value, leverage automation and DevOps practices by:
Using tools like infrastructure-as-code (IaC) and continuous integration/continuous delivery (CI/CD) to streamline infrastructure management and application deployment
Automating routine tasks and processes with scripting languages, configuration management tools, and serverless functions
Fostering a DevOps culture that emphasizes collaboration, continuous improvement, and rapid feedback loops
Conclusion
By following best practices of cloud computing like identifying clear goals, selecting the right cloud services, focusing on scalability and flexibility, ensuring security and compliance, and leveraging automation and DevOps practices, businesses can more effectively leverage cloud computing to achieve their objectives and drive growth.
Cloud computing has become an increasingly popular tool for businesses seeking to achieve digital transformation. The global cloud computing market size is expected to grow from $545.8 billion in 2022 to $1,240.9 billion by 2027, at a Compound Annual Growth Rate (CAGR) of 17.9% during the forecast period, suggests a report by MarketsandMarkets. It provides a range of benefits that can help drive innovation and growth. In this article, we'll discuss some of the key benefits of cloud computing for business transformation in more technical depth, along with real-world examples and data points of how companies have successfully used the technology.
Scalability
One of the most significant advantages of cloud computing is its ability to rapidly scale computing resources up or down as needed. This is possible due to:
Elasticity: Cloud providers like AWS, Azure, and Google Cloud offer services that can automatically provision or release resources based on demand, ensuring optimal resource allocation.
Pay-as-you-go pricing models: Businesses only pay for the resources they consume, avoiding the need for large upfront investments in hardware and infrastructure.
This scalability allows companies to be more agile and responsive to market changes while reducing costs.
Flexibility
Cloud computing offers a range of services and solutions that businesses can choose from to meet their specific needs:
Infrastructure-as-a-Service (IaaS): Provides virtual machines, storage, and networking resources on-demand.
Platform-as-a-Service (PaaS): Offers a managed environment for developing, testing, and deploying applications without managing the underlying infrastructure.
Software-as-a-Service (SaaS): Delivers applications over the internet on a subscription basis.
This flexibility is valuable for companies that need to quickly adapt to changing market conditions, customer needs, or regulatory requirements.
Reduced capital expenditures: Businesses can avoid significant investments in hardware and infrastructure by using cloud-based resources.
Operational efficiency: Cloud providers handle infrastructure maintenance, upgrades, and security, freeing up internal IT resources to focus on strategic initiatives.
Improved Security
Cloud providers typically offer a range of security features and controls that help businesses protect their data and systems:
Encryption: Data at rest and in transit can be encrypted to protect sensitive information.
Identity and access management: Cloud providers offer tools to manage user access and permissions, ensuring that only authorized users can access resources.
Monitoring and logging: Cloud providers offer services to monitor and log activities in the environment, enabling timely detection and response to potential threats.
Real-world Examples
Many companies have successfully used cloud computing to achieve innovation and growth. Here are a few examples:
Netflix: By using AWS, Netflix was able to rapidly scale its video streaming service to millions of users in a matter of months, while keeping costs low. In fact, according to AWS, Netflix now accounts for over a third of all internet traffic in North America during peak usage hours.
Airbnb: Airbnb uses a range of AWS services to support its operations, including Amazon S3 for storage and Amazon Redshift for data analytics. This has enabled Airbnb to rapidly scale its service to meet the needs of its growing user base, while also improving its ability to analyze user data.
Capital One: Capital One has migrated a significant portion of its operations to the cloud, enabling the company to rapidly develop and deploy new applications and services. This has helped the company improve its agility and responsiveness, while also reducing costs.
Conclusion
Cloud computing has become a critical tool for businesses seeking to achieve digital transformation, offering benefits such as scalability, flexibility, cost-effectiveness, and improved security. The success stories of companies like Netflix, Airbnb, and Capital One demonstrate how cloud computing can enable businesses to achieve innovation and growth by providing them with the tools and resources needed to quickly adapt to changing market conditions and customer needs.
Additionally, if you need expert guidance on how to leverage cloud computing for your business, we invite you to contact Valuebound, a trusted partner with extensive experience in cloud computing and digital transformation. Don't miss out on the opportunity to take your business to the next level with cloud computing!