Impact of fintech on Indian Retail Banking

75% of customers in the World Retail Banking Report 2022 opined that they are attracted to FinTechs’ cost-effective and seamless services focussed on automation in finance. This significantly raises their digital banking expectations. Oracle's study finds that nearly 81% of customers use digital channels while interacting with banks to avoid physically going to the bank. Retail customers of nearly all banks have reported Internet and Mobile banking outages. This is because all traditional banks in India are built on the foundation of security rather than scalability, and most banks are still not comfortable with cloud migration. This is where new-age, next-gen FinTech companies are overpowering traditional retail banking in India.
For starters, technology and fintech have challenged the status quo of conventional retail banking- impacting their revenue as well. With the future of fintech in India becoming more relevant, it’s about time that automation in finance becomes a central theme across all banking services in India.
In our insight, we explain the core themes that can drive new business models in the retail banking industry in India.
The Metamorphosis of Retail Banking in India
Consumers have better expectations regarding customer service, reduced app or web downtime, and core functions like investments, savings, payment facilities, and credit across segments, but topping them all with the seamless user experience across various platforms.
Financial inclusion became a keyword a few years ago, which penetrated technology and fintech into the banking services, leaving the conventional firms wondering if their time is up. In a simple definition, financial inclusion means an act where all consumers across the length and breadth of India are included in the banking services. The digital literacy divide among the Indian audience is a major pain point among IT security, regulatory uncertainty, and differences in management and culture.
Most Gen Z and Millennial Indians have started calling fintech the primary financial service provider. Hence, it doesn’t matter whether a new product or service comes to the market or not- fintech has captured the mind share and market. Regarding the impact of fintech on Indian retail banking, fintech companies have not replaced the traditional banking model- they’ve only introduced new services and products in the market. This has fundamentally metamorphosed supply and demand for financial services. So where does that leave the traditional retail banking industry in India?
Technology and Fintech: A Game-Changer for Traditional Banking Model in India
The regulatory authorities in India realized that technology could be a game changer for financial inclusion in India. Institutes like the National Payment Corporation of India (NPCI), the Institute for Development and Research in Banking Technology (IDRBT), and the India Stack became the key pillars to set the foundation of fintech in India with the intent of driving digital transformation in finance and advancing the motive of financial inclusion.
To combat the pain point of the digital divide, schemes like NFS, UPI, Aadhar, and Digital India set the foundation for financial literacy and inclusion, which led to automation in the financial landscape of the country. Against these grounds, it might become useful to comprehend the impact of fintech on retail banking in India.
There are 6 core themes that Valuebound observes regarding the impact of fintech on Indian retail banking-
Customer Experience & Customer Engagement at the Core
Channel diversification has become the key driving factor in the retail banking sector in India. Critical reasons for this include growth in the number of mobile users. As per Deloitte's analysis, the demand for smartphones in India is expected to reach about 400 million in 2026 from 300 million in 2021. Increased use of web-based platforms is another strategic reason for channel diversification to cater to a larger audience. Mobile-first approach to reaching out to the customers, and offering mobile applications to the clients for banking-at-the-doorstep is an investment that most traditional banks are now making to enhance customer experience substantially.
Integration & Collaboration
Fintech incubation programs and captive accelerator programs have increasingly become popular among traditional banks in India to foster innovation and create a safer environment for customers. One such example is the SBI Fintech Innovation Incubation Program (SBI FIIP), which runs with an overarching purpose to promote a culture of FINTECH innovation and entrepreneurship in India.
While the traditional banking models remained upended due to the fintech ecosystem 5 years ago, they’re now actively introspecting how they can be a part of disruptive innovation. Account Aggregators under open banking architecture are another notable change in India’s retail banking ecosystem.
Establishing Win-Win Partnerships
The win-win partnership between new fintech entrants and traditional banks gives a direct benefit to the country’s financial ecosystem with customers at the center. Potential opportunities could include expanding infrastructure capabilities by banks and enhancing knowledge of product design and IT development.
Access to lending is set to be democratized, the lending models will be subject to greater regulatory scrutiny. While overall credit card penetration will increase, the role of non-banks is unclear; to be shaped by regulation, which explains the need for win-win partnerships. These developments bring banks, NBFCs, and Fintechs closer, as collaborators and not as competitors.
Building Strong IT Infrastructure
In December 2020, Shaktikanta Das, the RBI Governor urged banks to invest more in IT infrastructure and technology to remain competitive with Fintech companies. The retail banking sector in India does not lack the capital to invest in technology- there’s a lack of vision and business leads that could take strong decisions. Yet, the metamorphosis of retail banking we talked about in the previous section is visible now.
In 2021, HDFC Bank created its own Digital and Enterprise Factories to enhance the digital banking experience of customers. This enterprise factory aims at upgrading legacy infrastructure, decouple existing systems, and build its own capabilities by embracing open-source to build resilience and scale.
“The Digital and Enterprise factories will help us realize the strategy of ‘running’ the bank, while ‘building’ the bank for the future,” says Parag Rao, Group Head – Payments, Consumer Finance, Digital Banking & IT, HDFC Bank. He also adds, “we have led the digital transformation of the Indian financial services sector and continue to invest in technologies.”
Mitigating Cyber Security Risks
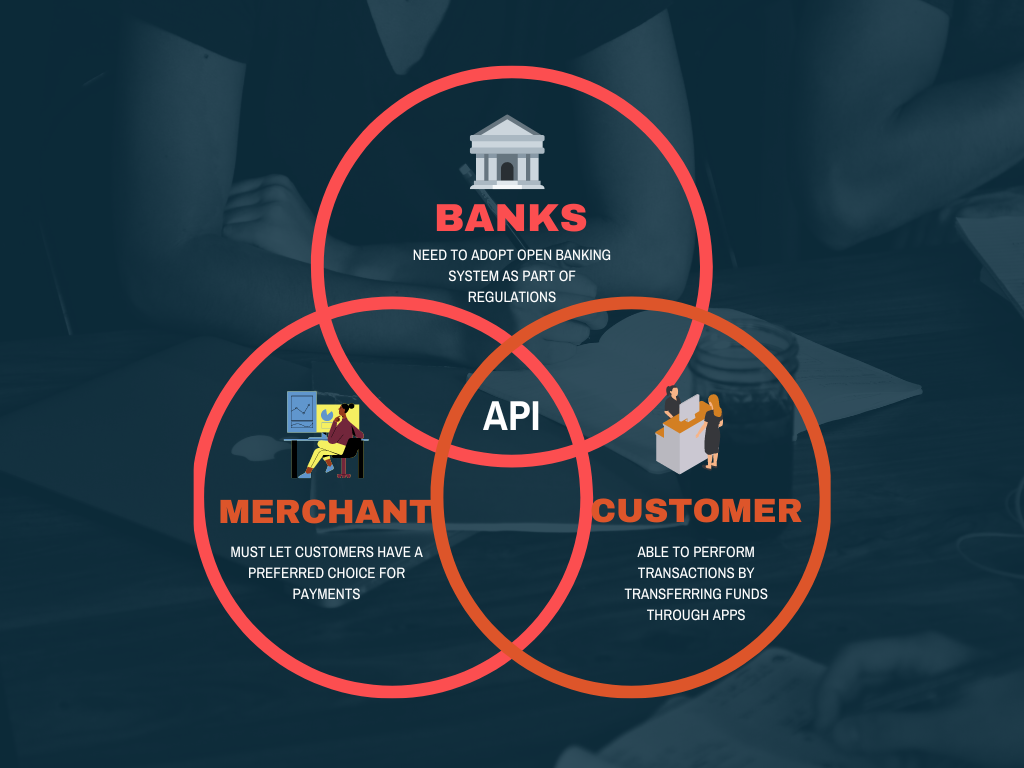
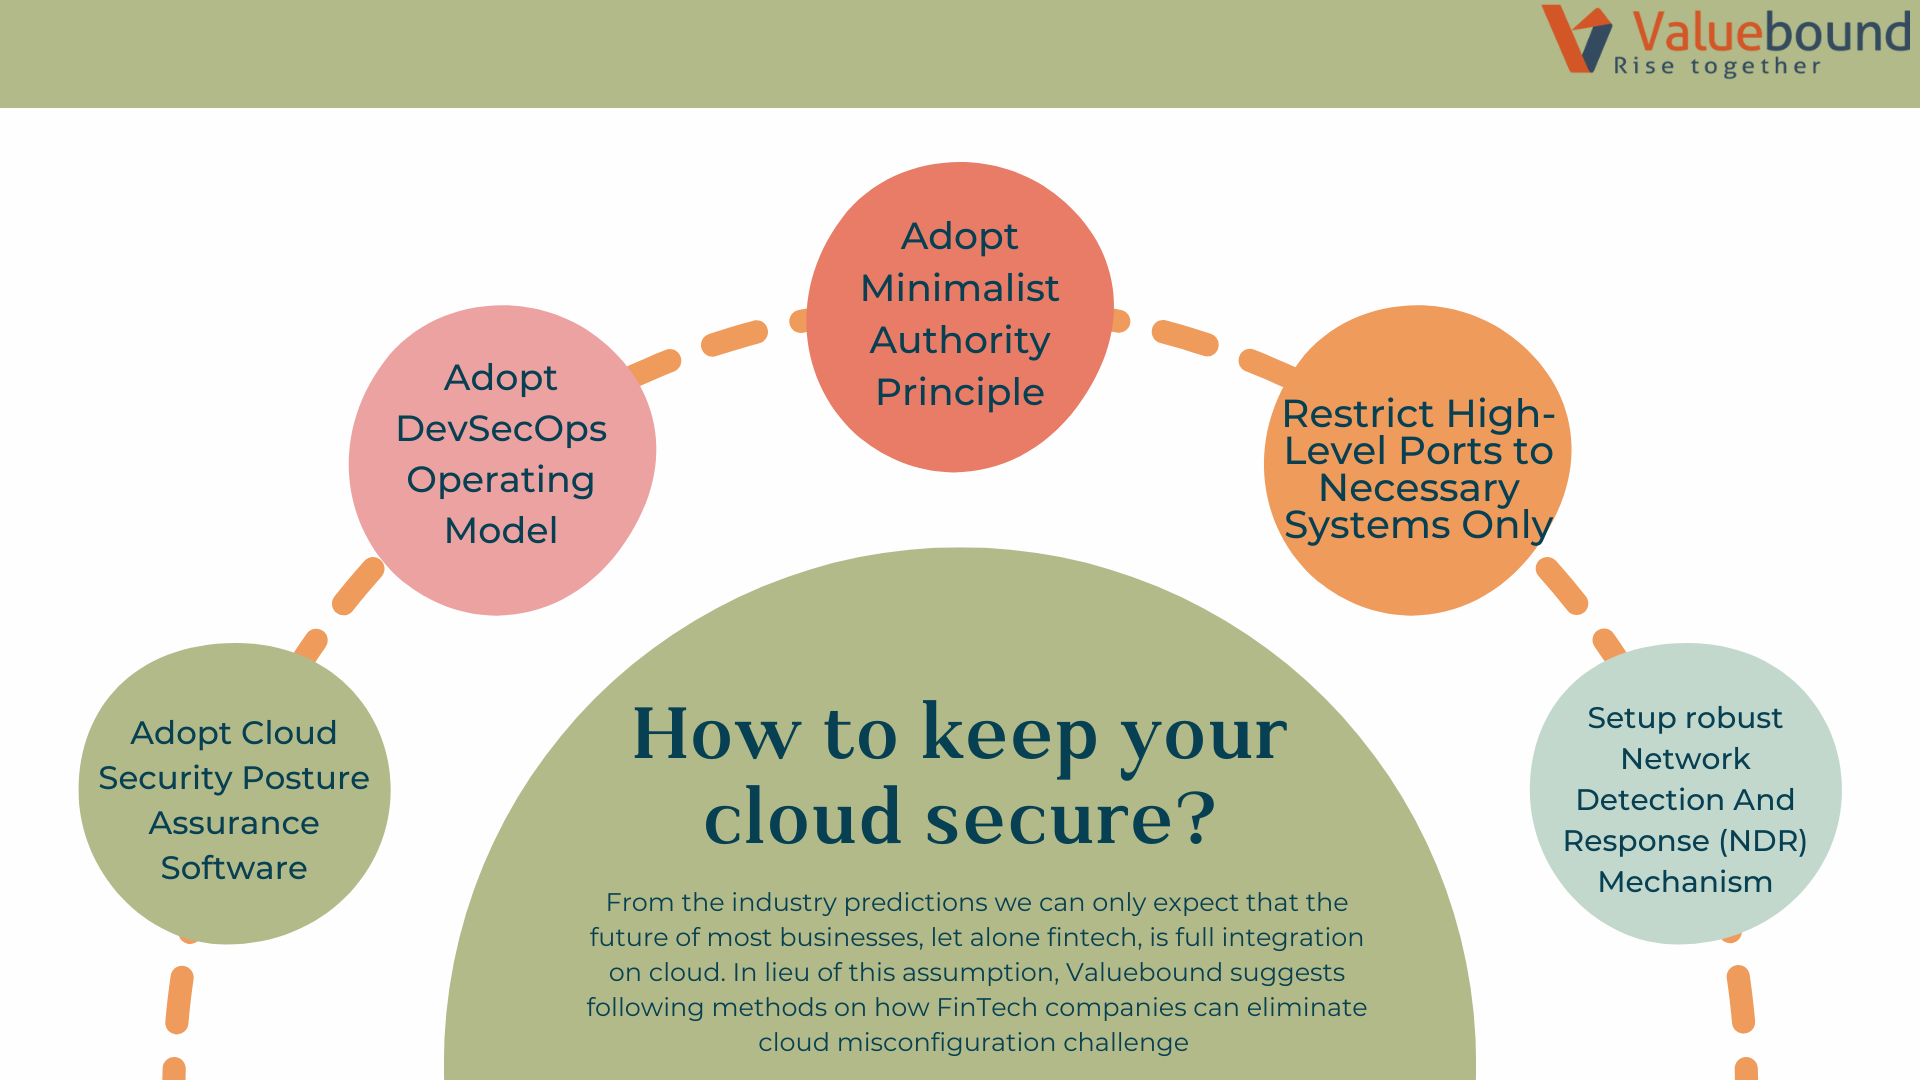
Cyber security risks erupt when external APIs interact with banks’ IT systems, leaving the bolt open for vulnerabilities and information breaches that transverse the positives mentioned above. The banks are now partnering with IT organizations to address such challenges. However, cloud sourcing increases risks of money laundering, data security, customer privacy, and cybercrime- all of which can be addressed with strong decision-making and advanced technologies in place.
Compliance and Regulations
Reliability of APIs and the cloud has increased interconnectedness amongst banks and third-party apps, which may not be subject to equivalent regulations and compliances. Banks cannot risk non-compliance with data privacy and security. But if vetted technically and through the right channels, traditional banks can utilize this in their favor- something where fintech companies would lag behind.
Wrapping Up
These developments bring Indian banks, NBFCs, and Fintechs closer, as collaborators and not as competitors. The success of innovation and amalgamation between retail banking and fintech largely depends on regulations and compliance. In spite of the long way to go, the impact of fintech on retail banking in India shall emerge for the highest good of digital transformation of financial services and customers.