An overview of Modules & Controllers in AngularJs

This is the third post in my series on the AngularJS
Before having a look at AngularJS’ components, terms and terminologies, let’s make sure everyone is on the same page. If not then you can go through our previous blogs “Introduction to AngularJs” and “Data-binding methods in AngularJS” to have a clear understanding of binding technique and when/where these can be used for a better result.
When we talk about AngularJS, we come across many new terms and terminologies such as Angular module controller, and others. So why these modules and controllers are called building blocks of an Angular application. And what are the use cases?
First thing first, let’s start with the main objective of this post. Do not worry when you will complete this blog, you will have an intermediate level of expertise on AngularJS modules & controllers.
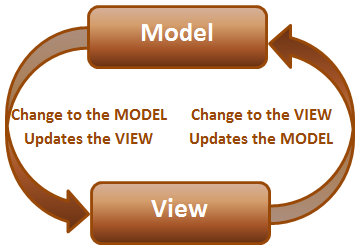
In the previous AngularJS Tutorial, titled Data-binding in AngularJS, you might have noticed the source code similar to the one mentioned below:
angular.module(name, [requires], [configFn]);
Parameter
name: Name of the module.
requires: is an optional parameter, if mentioned the new module gets created. If not, an existing module is being retrieved.
configFn: is an optional parameter, execute a function on module load
The universal way to create or register the module with Angular is Parameter. It has a suite of services, controllers, services, configuration & directives. In other words, you can consider it as a main() function to initialize and get chained with variables and methods for an application.
Sample code:
Var MyNewapp = angular.module(“MyNewApp”, []);
Code simplification: We are using an Angular object to create the module. Here you will also find two parameters of angular.module, the first parameter is the name of a module and second refers to a blank array.
Remember, there could be a scenario when your custom module will be dependent on another module. In that situation, you can pass that module over the Angular module function as a parameter and utilize its resources.
Use: To bootstrap an Angular application, declare ng-app name on your page.
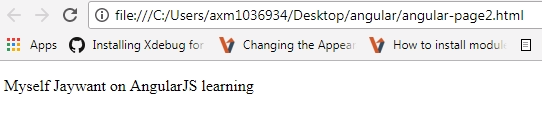
In the above source code, the
tag have {{firstname}}. The browser will look for Angular variable and print the value in the view.
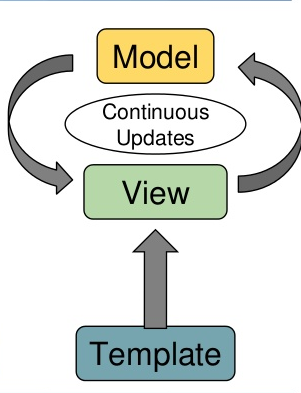
Now let’s move to the controller (new app declaration). A controller is nothing but a JavaScript constructor function, which is responsible for building a model (data) so that the same data could be displayed in a view. It has the ability to perform some operation or initializing the variable or getting the data from the endpoint URL.
In other words, when you work on the decoupled website, the job of a controller is to get the data from web services. Hope this information is clear and helpful. Let’s view the basic syntax code and explanation of the code.
Syntax:
var ControllerName  =  function ($scope) {
   /* variable initialization goes here */
}
Explanation: In the above source code, we are creating an anonymous function and assigning it back to a variable. Note that it has one parameter, called $scope, which is an angular object pass to the controller. ControllerName is the name of the controller. Using the AngularJS Data binding methods, we can fetch the data in the view. Here we are also assigning ValueA property to $scope object.
$scope.ValueA = "100 INR";
Once the controller has been created. The next step would be to Register the controller with the newly created module (myApp).
Syntax:
Module object.Controller(“NewControllerName”, Controller-Function)
Sample:
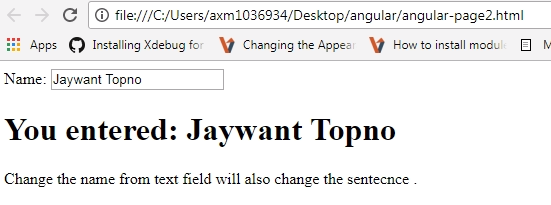
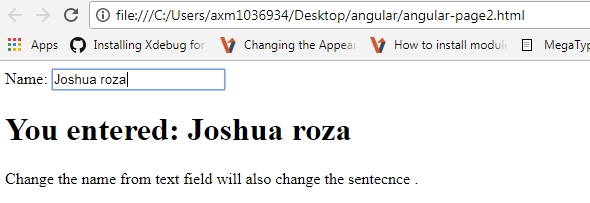
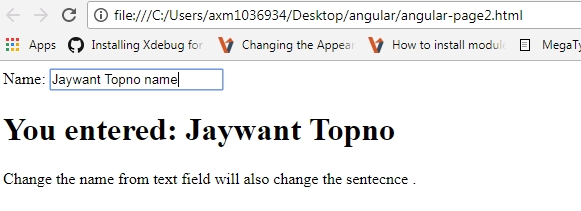
Myapp.controller(“'myCtrl'”, function($scope) {
   $scope.firstname = "Jaywant Topno";
});
Follow the above steps to:
1. Create a controller and register it with the app.
2. Avoid unnecessary variable storage by declaring and then referring.
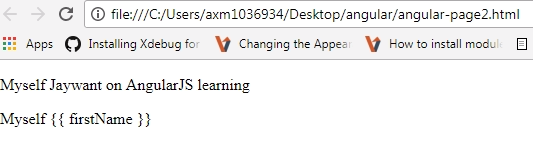
In case the name of the controller gets changed then you need to make similar changes in view also. Else view won’t be able to recognize your variable.
Sample code:
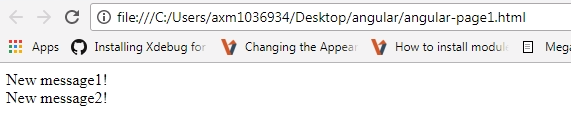
So far we have created a module, a controller and registered that newly created controller.
Now let’s have a look at how to pull up a model to view using ng-app and ng-controller.
Points to remember:
1. View data won’t work outside scope until the controller is declared in the self
2. Create and register a controller within a single code to reduce unwanted memory allocation.
Phew! That was quite a ride. Remember, before building an application, it is necessary to have an intermediate level of knowledge of AngularJS. Modules and controllers are building blocks of a newly created module where the controller helps to initialize variables and perform an operation. Further, using ng-app we can tell the view to use a specific app and ng-controller for the scope of the variable.
GitHub source code: https://github.com/xaiwant/AngularJS-Modules-Controllers