AngularJS Series: An introduction to Scope

This is the Sixth post in my series on the AngularJS; have a look on my initial posts covering ‘An intro to AngularJS’, ‘Data-binding methods’, ‘Modules & controllers', 'Filters' and ‘Custom services’.
Before jumping to another component of AngularJS - Scope - let’s make sure you all have seen the term $scope under controller function(). Scope is used to access variable and methods in Angular.
As the name suggests, $scope means ‘within the range’. In Angular, $scope is a reserved word. As per the name $scope does the same by availing variable/functions () within the range. So the same variable could be rendered in the view.
Technically: $scope is service for AngularJS. It is an object that refers to a model. It acts as a mediator between the View & the Controller. It allows accessing properties and variable Within the scope. Scope looks to expression in your view and performs the event.
Sample code:
The below source code allows you to print the data directly from the Scope. As you can see our custom app has myCtrl controller and data is bind to the scope using $scope.name & $scope.job. The same variable can be pulled up in view while rendering the data. We have used {{name}} & {{job}} in our view.
Response Result:
Another way to create a controller
You might have come across a situation where you need to develop a huge application of not just 50-100 lines of code but 10X larger than that. In this scenario, it's very difficult to manage each and every controller and get a minified version of JS script. When we talk about the minified version that means it will remove unnecessary blank space, comment and try to look for parameter and transform it to very simple name.
While compiling new variable ‘b’ will be replaced with $scope.
Sample code :
Every App has a local & global scope (root scope), where $rootScope never bound with any controller. In other words, $rootScope is a parent controller where are $scope_1 ,$scope_2…..$scope_n are the child of parent controller(--------- ) and can be accessible from anywhere in the application. Here variable has the same name and calls out within the scope and outside of the scope. In this scenario, variable within the local scope gets executed before root scope.
Let me share one small example:
Code Simplification:
In above codebase, a module has two controllers including run().
run() is one of the phases of code execution order. Only constant and an instance can be taken up and called right after config(). In other words, you can use run() to boost the application.
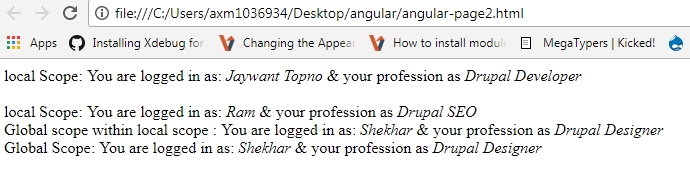
Back to code: we have two controller myCtrl & yourCtrl. These controllers are called within local scope whereas $rootScope have an object in global scope and rendered the same in the view.
To access the $rootScope property or methods within the controller, you need to mention $root. Method_name or $root.property_name
In case you need $rootScope inside the local scope of your controller then you need to pass $rootScope as Dependency injection in your local scope of the controller.
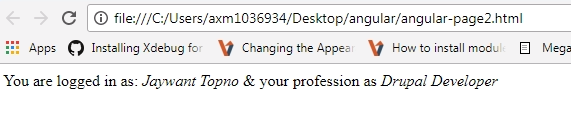
In below source code $rootScope.job will take up the value from the global controller and assign back to myCtrl. Using this technique, global data can be passed through multiple controller and local data within the same controller.
 app.controller('myCtrl', function($scope, $rootScope) {
                              $scope.name = "Jaywant Topno";
                              $scope.job = $rootScope.job;
                   });
Sample response:
This is what Scope in AngularJS all about. The goal of our series of tutorial on AngularJS is to bring you valuable information to help you gro tow enhance your technical knowledge. We hope you enjoy this post!
Git Source code: https://github.com/xaiwant/AngularJS-Scope